Chocolate Cake
There’s something truly magical about baking a Chocolate Cake that makes my heart flutter. It’s not just about the ingredients or the process—it’s about the memories created along the way. I remember the first time I baked a cake for my best friend’s birthday. We were young and filled with dreams, and I thought, what better way to celebrate than with a rich, decadent cake? As the smell of the baking chocolate filled the air, our laughter echoed in the kitchen, and it felt like time stood still. This Chocolate Cake recipe has become a tradition in my home, perfect for intimate celebrations or cozy evenings. Whether you want to impress someone special or simply indulge yourself, this cake will undoubtedly do the trick!
Recipe Snapshot
50 mins
20 mins
30 mins
Medium
360 kcal
4 g
Gluten-Free, Low FODMAP
18 g
6-inch cake pans, Stand-up Mixer, large bowl, Whisk, spatula
Why Try This Chocolate Cake
Decadent Flavor
It’s hard to resist the rich, deep flavor of this Chocolate Cake. Each bite melts in your mouth, delivering a burst of sweetness balanced by the slight bitterness of cocoa. The layers of chocolate and creamy frosting create a delightful contrast that leaves you wanting just one more slice.
Perfect for Two
This recipe is crafted specifically for two, ensuring you have just the right amount without the temptation of leftovers. It’s an ideal treat for date nights, anniversaries, or any occasion where you want to share something sweet with someone you love.
Simple Ingredients
The beauty of this Chocolate Cake lies in its simplicity. You don’t need fancy ingredients or complicated techniques. Just basic pantry staples like flour, sugar, and buttermilk come together to create magic. Anyone can master it, whether you’re a novice baker or a seasoned pro.
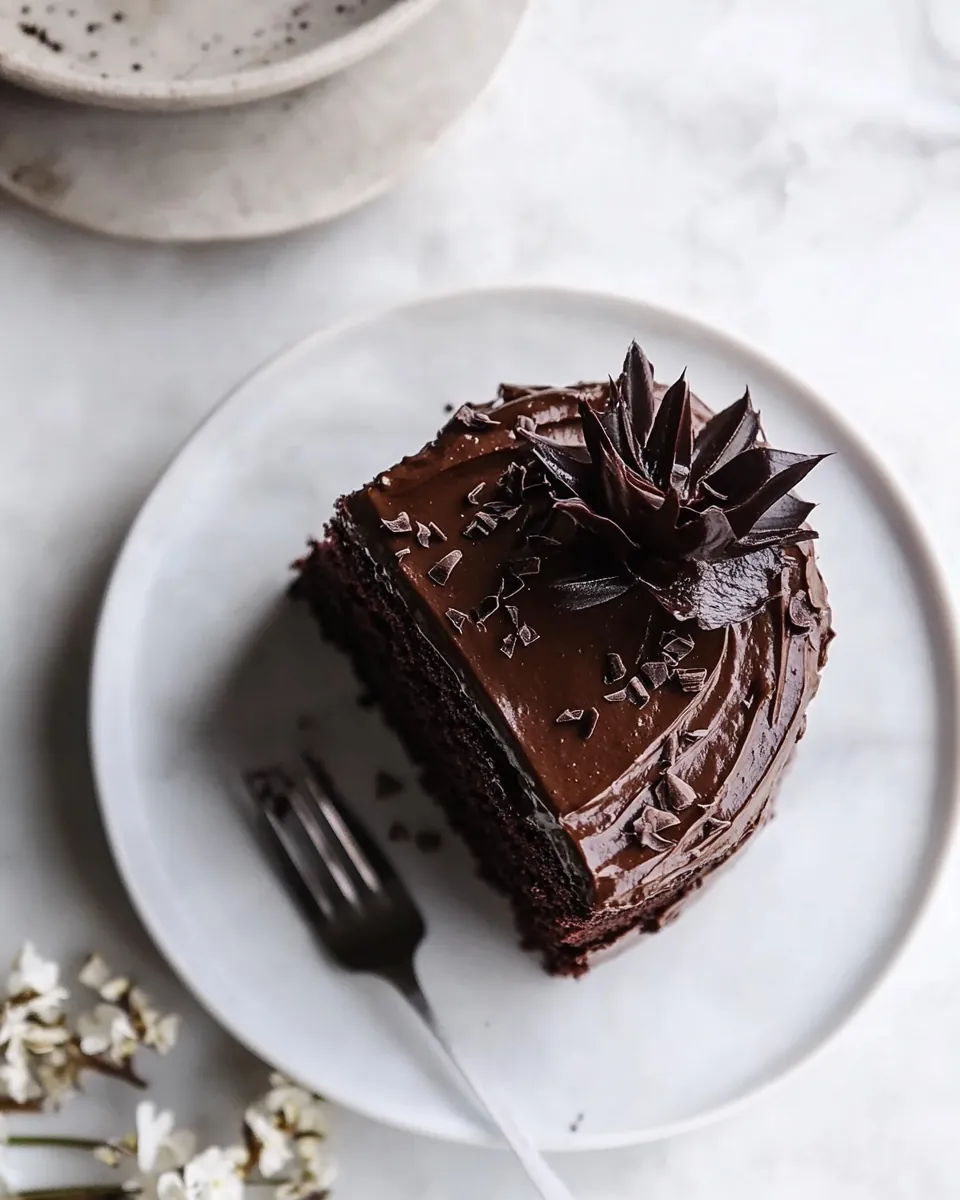
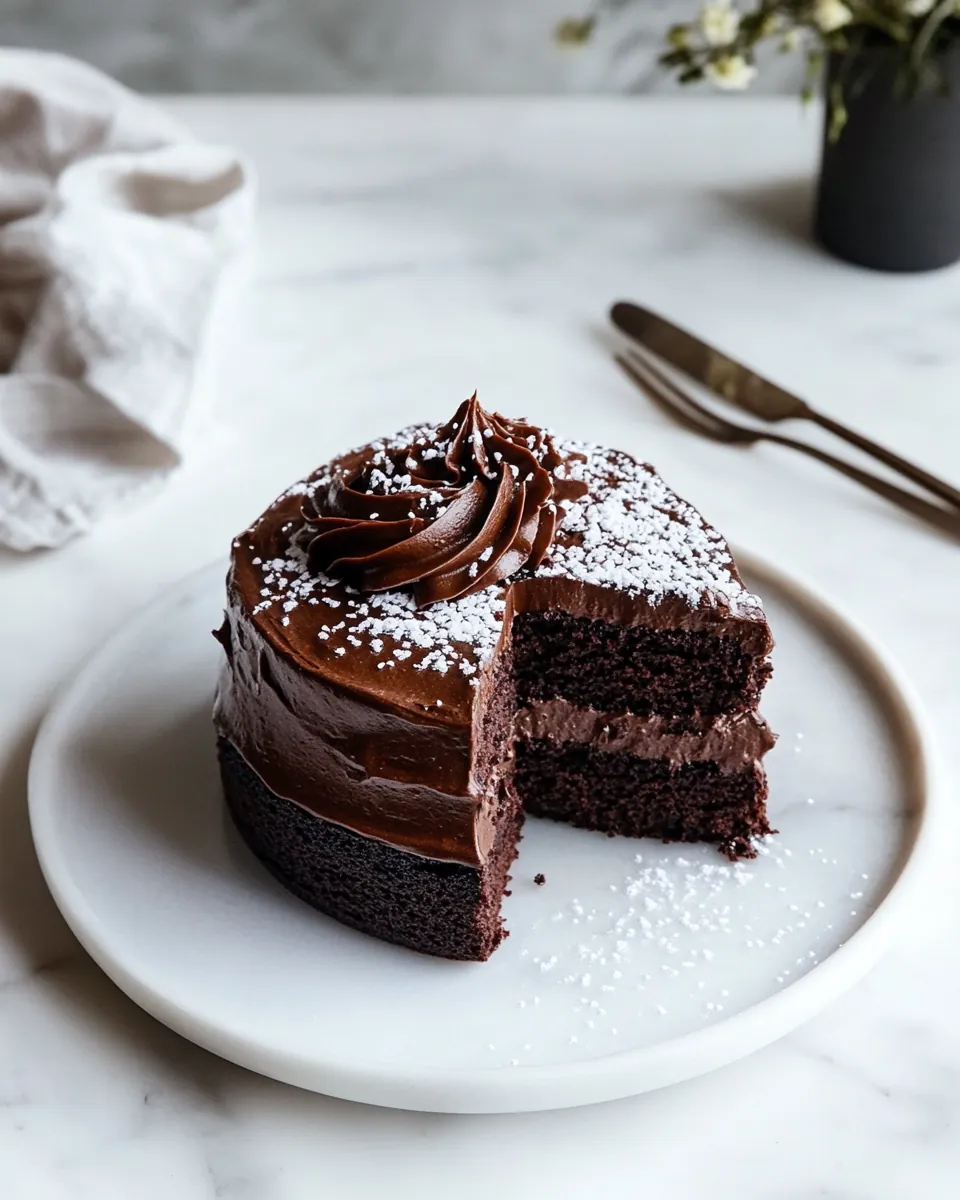
Visual Appeal
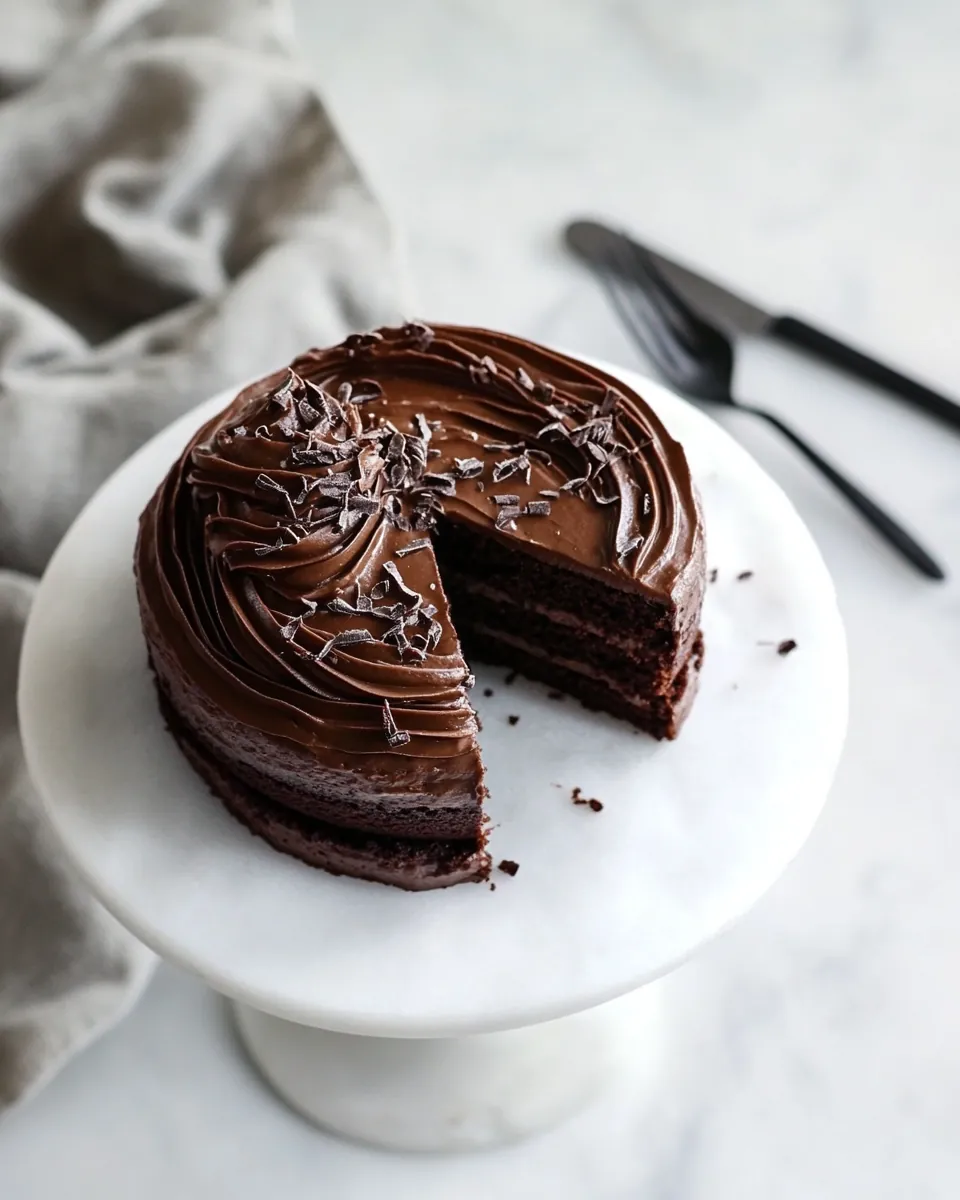
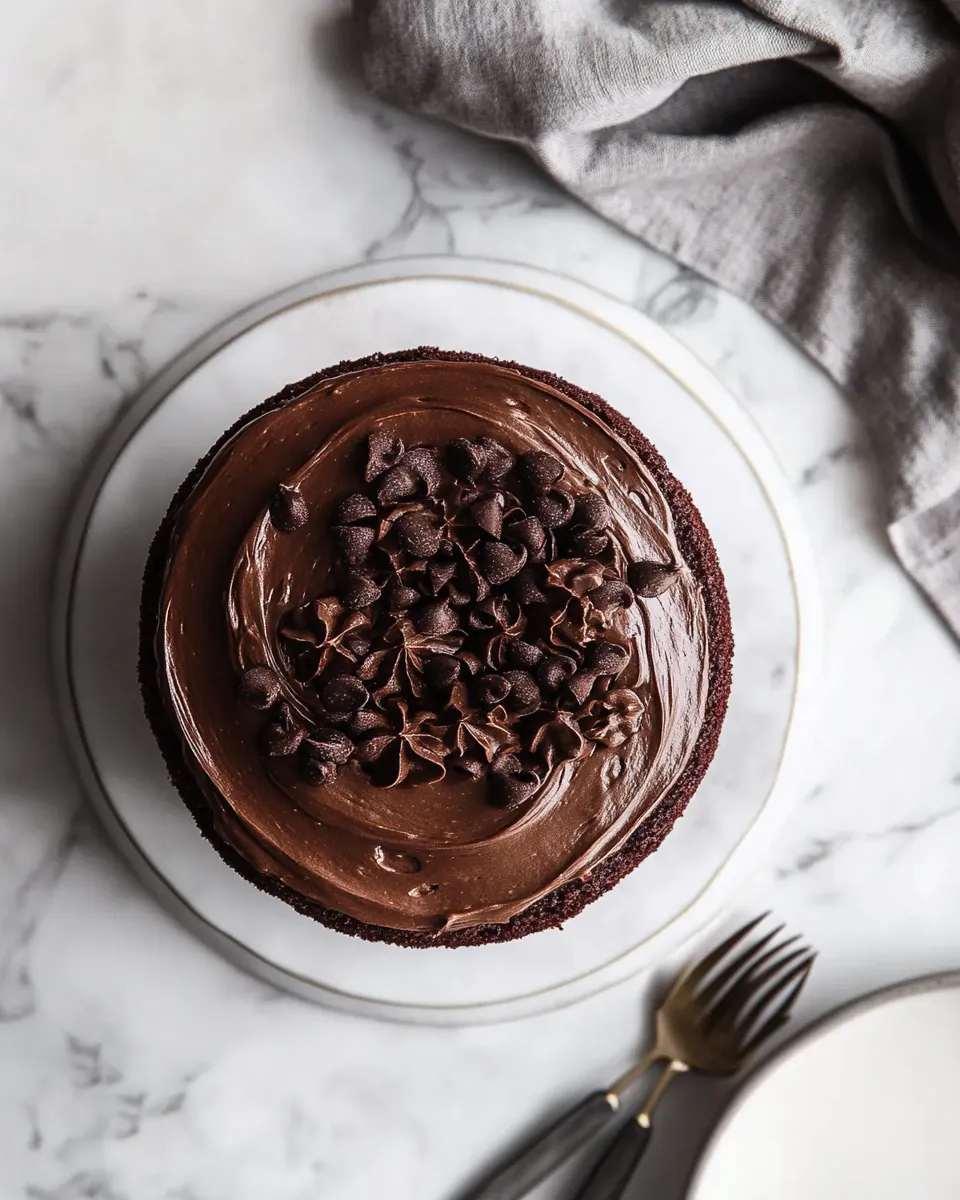
Let’s not forget the visual delight! This cake can be dressed up or down, depending on the occasion. Whether you go for a naked cake look with some flaky sea salt on top or pile it high with frosting rosettes, it’s guaranteed to be a showstopper on any dessert table.
Endless Variations
The Chocolate Cake serves as a blank canvas. Feel free to experiment with different add-ins such as nuts, chocolate chips, or even a fruity filling. You can easily customize this cake to suit your taste or celebrate the season with flavors that inspire you!
Joy of Baking Together
Baking this cake can be a fun bonding experience. Invite a friend or family member into the kitchen and create this delicious dessert together. The laughter and memories made during the process are just as sweet as the cake itself.
Chocolate Cake Shopping List
Gathering the right ingredients is essential for creating your Chocolate Cake. The ingredients work harmoniously to produce a cake that’s both tender and flavorful. Here are the key players:
- All-Purpose Flour: Provides the structure needed for a fluffy cake.
- Granulated Sugar: Adds sweetness and helps the cake rise.
- Cocoa Powder: Delivers that delicious chocolate flavor.
- Egg: Binds everything together while adding moisture.
- Buttermilk: Creates a tender crumb and adds a slight tang.
- Dark Chocolate: Enhances the flavor with richness.
- Butter: Adds moisture and richness to the cake.
Making Chocolate Cake
Let’s dive into the baking process of this Chocolate Cake. It’s a rewarding journey that leads to a delicious end. Follow these steps closely, and I promise you’ll end up with a cake that’s not only stunning but also full of flavor!
- Preheat your oven to 350 degrees F. This step is crucial as it prepares the environment for baking the cake evenly.
- Prepare two 6-inch cake pans by buttering and flouring them. To ensure an easy release after baking, I recommend lining the bottoms with parchment paper.
- In a large bowl or the bowl of a stand-up mixer, combine the all-purpose flour, sugar, cocoa powder, espresso powder, baking soda, baking powder, and kosher salt. Mix until well combined; the dry ingredients should be evenly distributed.
- Next, crack in the egg and add the buttermilk, warm water, olive oil, and vanilla extract. Mix on medium speed for about 1 minute until the batter is smooth. You’ll notice it’s thinner than typical cake batter, but that’s perfectly fine.
- Divide the batter evenly between the prepared cake pans. This ensures that both layers will bake evenly. Transfer them to the oven and bake for 27 to 30 minutes. Check for doneness by inserting a skewer into the center; it should come out clean.
- While the cakes are cooling, prepare your frosting. In the cleaned large bowl, combine the unsalted butter, powdered sugar, melted chocolate, cream or milk, and another vanilla extract. Beat until fluffy and well-combined.
- Once the cakes are completely cool, remove them from the pans. Place one layer on a serving plate and add a few tablespoons of frosting to the center, smoothing it out to the edges. Sprinkle a pinch of flaky sea salt all around for a delightful flavor contrast.
- Top it with the second layer, then apply more frosting around the seam for a “naked cake” effect. Remember, perfection is not the goal here—rustic is stylish!
- Using a piping bag fitted with a star tip, pipe a decorative rose on the top layer, starting from the center and spiraling outwards. Don’t stress if it doesn’t look perfect; just have fun with it!
- To finish, sprinkle more flaky sea salt on top to elevate the cake. Slice, serve, and enjoy the fruits of your labor!
Things Worth Knowing
- Keep Ingredients at Room Temperature: Before you start, let your butter, eggs, and buttermilk sit out for about 30 minutes. This helps them blend better, leading to a smoother batter.
- Don’t Overmix: When combining your ingredients, mix until just combined. Overmixing can lead to a dense cake rather than a light and fluffy one.
- Check Your Oven Temperature: Invest in an oven thermometer to ensure it’s at the right temperature. An oven that’s too hot or too cold can affect the baking time and final product.
- Utilize Parchment Paper: Line your cake pans with parchment paper for easy removal. It makes a significant difference, especially with stickier batters.
- Cool Cakes Completely: Be patient and let your cakes cool completely before frosting. This prevents the frosting from melting and sliding off!
Expert Tips about Chocolate Cake
To make your baking experience even better, here are some expert tips for perfecting your Chocolate Cake:
- Storage: If you have leftovers, store them in an airtight container at room temperature for up to 3 days. For longer storage, refrigerate for up to a week.
- Freezing: You can freeze the cake layers for up to 3 months. Just wrap them tightly in plastic wrap once completely cooled.
- Pairing: This cake pairs beautifully with a scoop of vanilla ice cream or a dollop of whipped cream. It enhances the flavor and adds a delightful texture contrast.
- Variations: Feel free to add spices like cinnamon or a hint of orange zest for a unique twist on the classic chocolate cake flavor.
- Serving Suggestions: Serve your cake as a fun birthday treat, a romantic dessert for two, or a special indulgence during family gatherings.
Serving This Chocolate Cake
When it comes to serving your Chocolate Cake, presentation and pairing can elevate the experience. Here are some delightful ideas:
- With Ice Cream: A slice of this cake served warm with a scoop of vanilla ice cream is a heavenly match.
- For Special Occasions: It’s perfect for birthday parties, anniversaries, and intimate dinners.
- Seasonal Pairing: Try serving this cake with fresh berries in summer or spiced whipped cream in winter.
- Storage Tips: If you have leftovers, store them in an airtight container. They can stay fresh for 3 to 4 days at room temperature.
- Presentation: Consider adding decorative touches like shaved chocolate curls or edible flowers on top for an extra touch of elegance.
FAQ
Conclusion
This Chocolate Cake is not just delicious; it’s a heartfelt creation that brings joy and love into your kitchen. It’s perfect for special occasions or just a cozy night in. I encourage you to try this recipe and share the experience with someone you cherish. Happy baking!
Chocolate Cake
Ingredients
Equipment
Method
- Preheat your oven to 350 degrees F. This step is crucial as it prepares the environment for baking the cake evenly.
- Prepare two 6-inch cake pans by buttering and flouring them. To ensure an easy release after baking, I recommend lining the bottoms with parchment paper.
- In a large bowl or the bowl of a stand-up mixer, combine the all-purpose flour, sugar, cocoa powder, espresso powder, baking soda, baking powder, and kosher salt. Mix until well combined; the dry ingredients should be evenly distributed.
- Next, crack in the egg and add the buttermilk, warm water, olive oil, and vanilla extract. Mix on medium speed for about 1 minute until the batter is smooth. You’ll notice it’s thinner than typical cake batter, but that’s perfectly fine.
- Divide the batter evenly between the prepared cake pans. This ensures that both layers will bake evenly. Transfer them to the oven and bake for 27 to 30 minutes. Check for doneness by inserting a skewer into the center; it should come out clean.
- While the cakes are cooling, prepare your frosting. In the cleaned large bowl, combine the unsalted butter, powdered sugar, melted chocolate, cream or milk, and another vanilla extract. Beat until fluffy and well-combined.
- Once the cakes are completely cool, remove them from the pans. Place one layer on a serving plate and add a few tablespoons of frosting to the center, smoothing it out to the edges. Sprinkle a pinch of flaky sea salt all around for a delightful flavor contrast.
- Top it with the second layer, then apply more frosting around the seam for a “naked cake” effect. Remember, perfection is not the goal here—rustic is stylish!
- Using a piping bag fitted with a star tip, pipe a decorative rose on the top layer, starting from the center and spiraling outwards. Don’t stress if it doesn’t look perfect; just have fun with it!
- To finish, sprinkle more flaky sea salt on top to elevate the cake. Slice, serve, and enjoy the fruits of your labor!
Notes
- Tip 1: You can freeze these cake layers up to 3 months ahead. Bake the cakes, allow them to come to room temperature and then wrap them tightly in plastic wrap.
- Tip 2: The frosting can be made up to 3 months ahead. Make the frosting, transfer to a freezer-safe container and transfer to freezer.
- Tip 3: To keep in the fridge: make the cake layers up to 2 days ahead. Wrap tightly in plastic wrap. Frosting can also be kept in the fridge in an airtight container for up to 2 days.