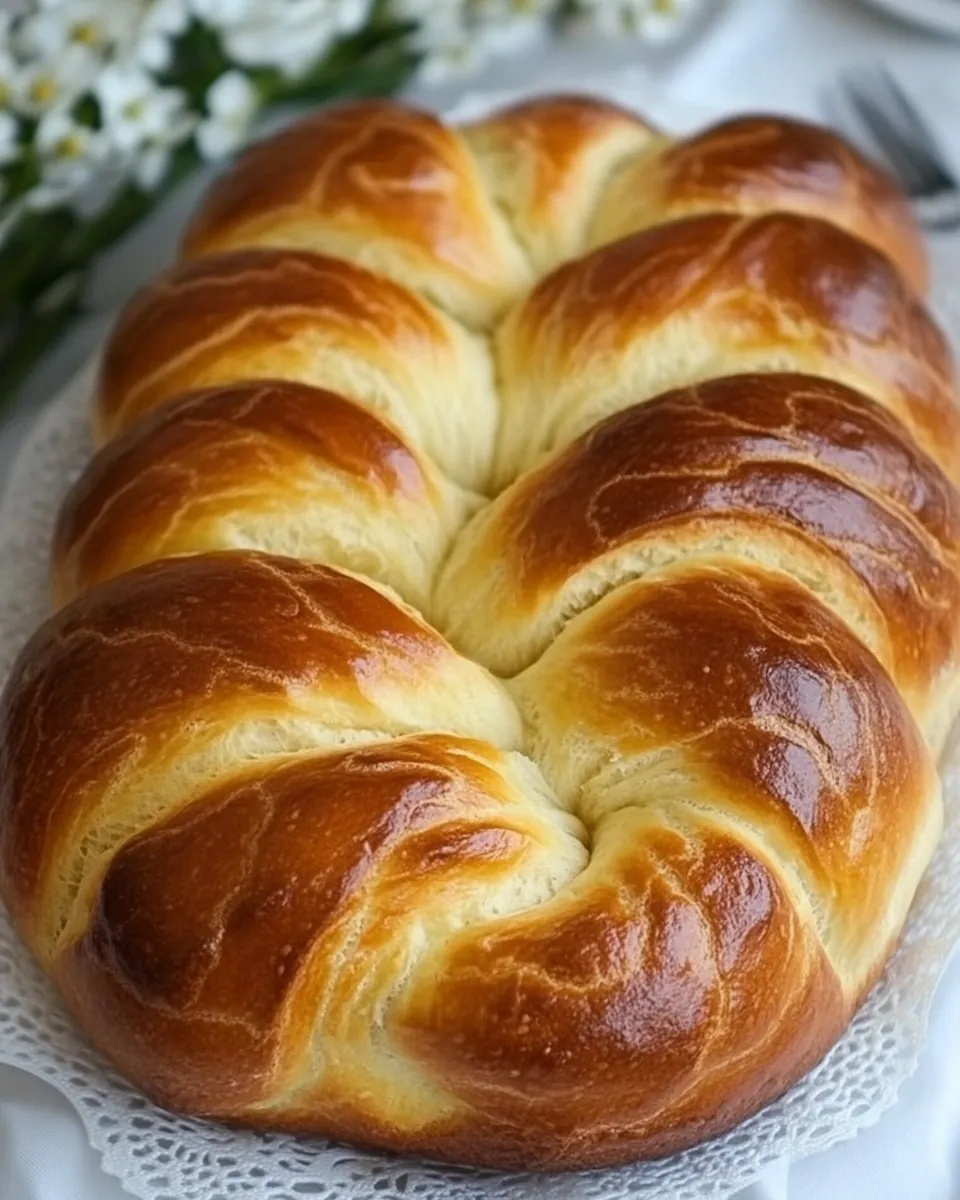
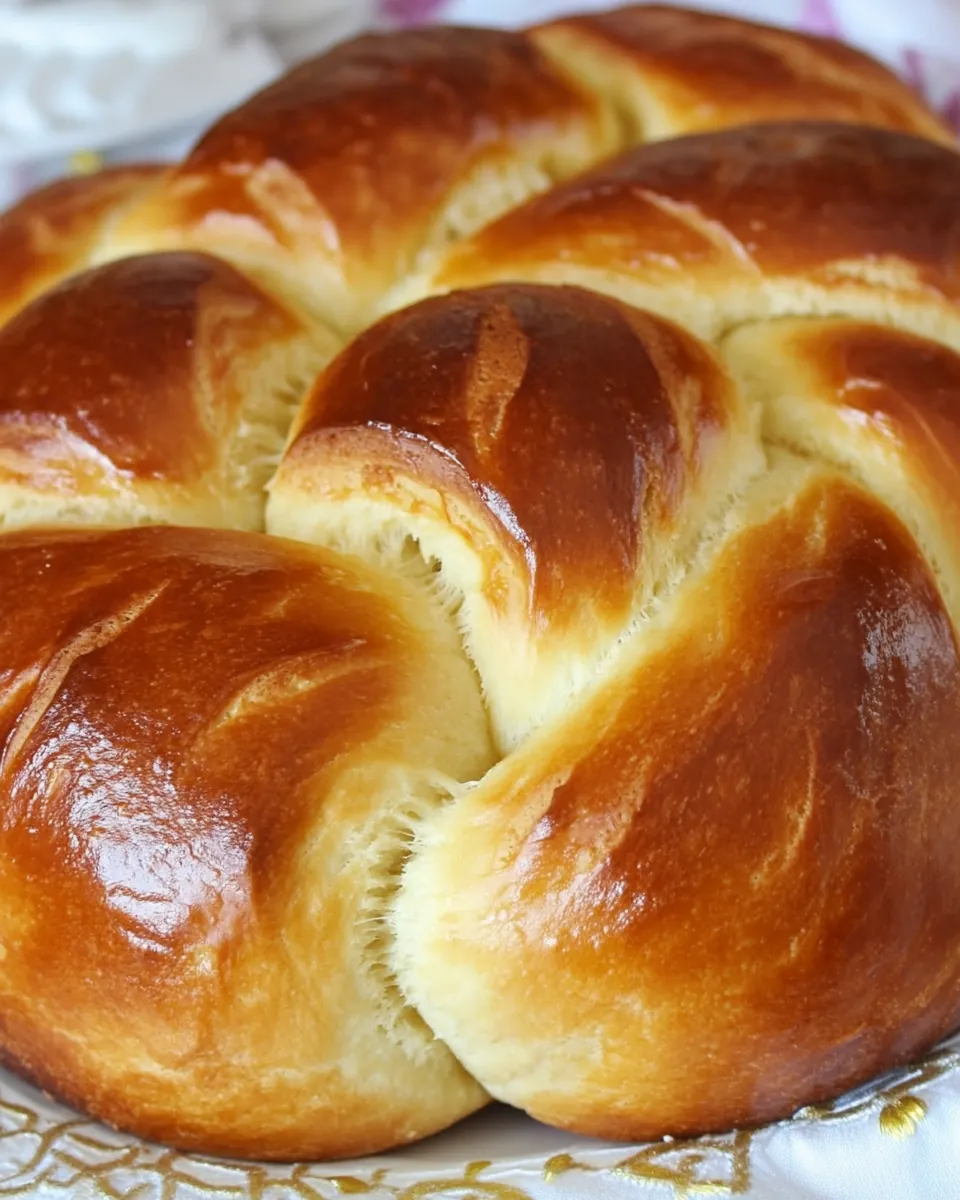
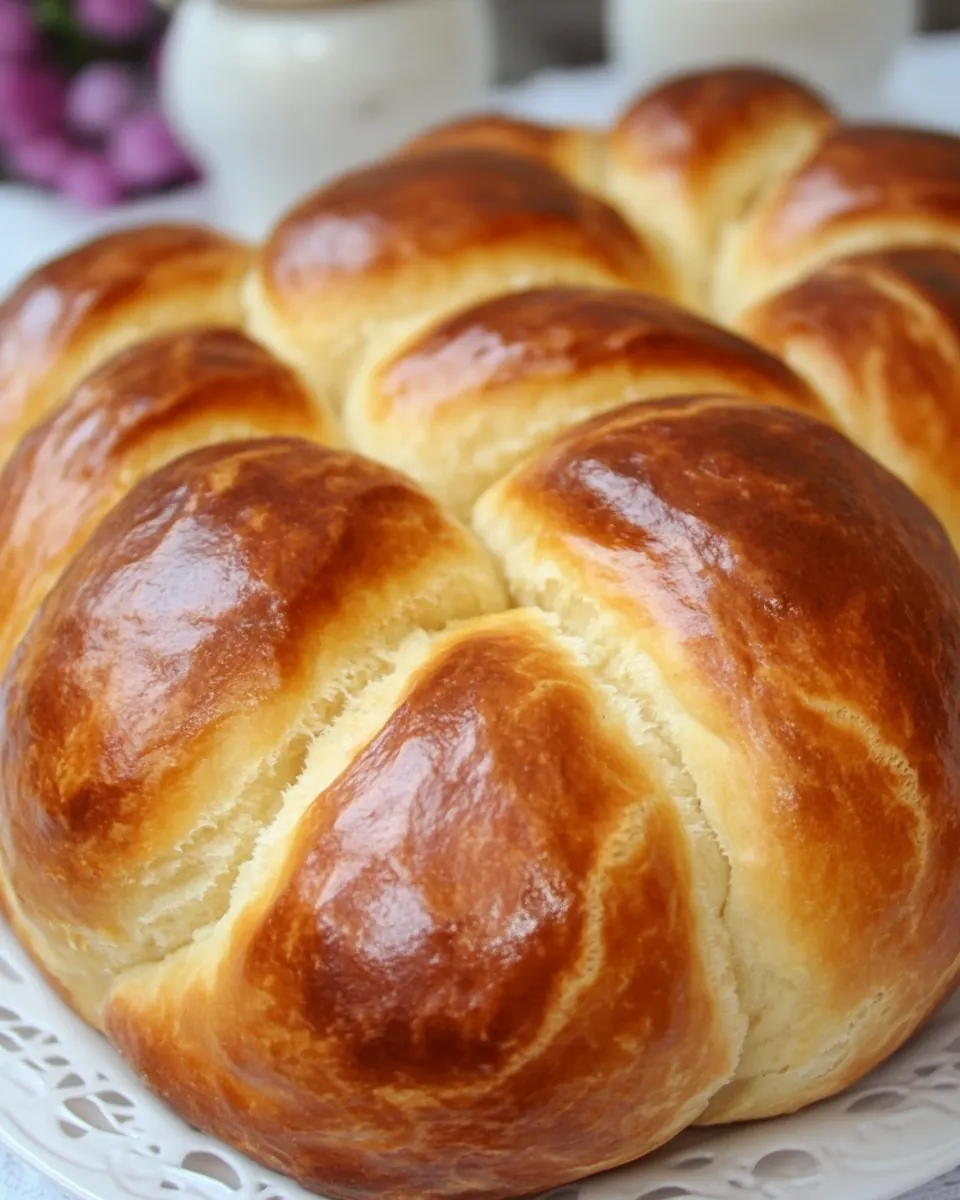
Portuguese Easter Bread
The first time I baked Portuguese Easter Bread, the scent of sweet, warm bread filled my home, instantly transporting me to memories of family gatherings during spring. Each braided loaf tells a story of tradition, love, and the anticipation of Easter celebrations. This bread is not just a treat; it’s a symbol of togetherness, often shared around the table with laughter and joy. As the gentle aroma wafts through the air, you can almost hear the chatter of loved ones, and the enticing golden crust invites everyone to partake in this special moment. I remember my grandmother teaching me the intricate braiding technique, her hands guiding mine as we crafted this beautiful loaf together. Each twist and turn of the dough seemed like a dance, a celebration of life and heritage that I now cherish and pass down to my own children.
Recipe Snapshot
3 hr 22 mins
180 mins
22 mins
Hard
250 kcal
6 g
Gluten-Free, Low FODMAP
6 g
Oven, Baking Sheet, Frying Pan, Large Pot, Mixing Bowl, Wooden Spoon
Why This Portuguese Easter Bread Works
A Labor of Love
One of the most beautiful aspects of Portuguese Easter Bread is the way it brings people together. Whether it’s a gathering with family or a simple brunch with friends, this bread often becomes the centerpiece of shared moments and laughter. As you knead the dough, you’re not just following a recipe; you’re creating memories that will last a lifetime.
Tradition at Its Finest
This recipe embodies tradition, passed down through generations. Each family has its own version, sometimes with special additions like fruits or spices. It’s fascinating how these variations tell the unique stories of each family while honoring the same cherished roots.
Perfect for Any Occasion
While Portuguese Easter Bread is often associated with Easter, its deliciousness makes it suitable for any occasion. Whether it’s a festive brunch, holiday gathering, or even a cozy family dinner, this bread fits right in, making every meal feel special.
A Sweet Delight
The sweetness of this bread is perfectly balanced with the richness of the dough. The combination of raisins and butter adds depth, making each bite an indulgent experience. It’s the kind of bread that you can enjoy on its own or paired with your favorite spreads.
Versatile and Fun to Make
Baking Portuguese Easter Bread is not just about the final product; it’s about the joy of cooking. The braiding method is fun to learn and allows for creativity. You can shape the bread in various ways, making it a delightful activity for families, especially with children eager to help.
Essential Ingredients for Portuguese Easter Bread

To create the perfect Portuguese Easter Bread, the ingredients are crucial. Each one plays a key role in building flavor and texture that will leave you and your guests wanting more. The combination of butter, milk, and sugar creates a rich, tender crumb while the raisins add a delightful sweetness. Here’s what you’ll need to start your baking adventure.
- 1 and 1/2 Cups very warm milk – This is essential for a soft and tender bread.
- 1 cup sugar + 1 tsp sugar – Sweetness that balances perfectly with the bread’s richness.
- 1/2 cup 8 Tbsp unsalted butter, softened – Adds richness and flavor to the dough.
- 1 tsp salt – Enhances the overall flavor profile.
- 2 envelopes active dry yeast, 1 and 1/2 Tbsp – The key leavening agent that makes your bread rise.
- 3 eggs, well beaten – Gives the bread a rich texture and color.
- 6 and 1/2 Cups unsifted all-purpose flour – The base of our dough.
- 1 egg – For the egg wash that gives the bread its golden finish.
- 1 tsp water – To mix with the egg for the wash.
- 3/4 cup to 1 cup white or brown raisins + 2 cups boiling water – Soaked to plump them up, adding sweetness and texture.
Recipe Directions for Portuguese Easter Bread
Baking Portuguese Easter Bread is a delightful journey that combines tradition with technique. Follow these steps to create a beautifully braided loaf that will fill your home with warmth and love.
- Start by placing 1 cup of white or brown raisins in a bowl with 2 cups of boiling water for about 10 minutes. This plumping process makes the raisins even sweeter and juicier. Once done, drain them well and set aside.
- For the yeast mixture, pour 1/2 cup of warm milk (heated for about 30 seconds in the microwave) into a large measuring cup. Add 1 tsp of sugar and sprinkle the yeast over the top. Stir gently and let it stand to proof until it becomes bubbly and doubles in size, which should take about 10 minutes.
- In a large bowl, combine 1 cup of very warm milk (about 1 minute in the microwave), 1 cup of sugar, softened butter, and 1 tsp of salt. Stir until the butter is mostly melted and the mixture is well combined.
- Next, stir in the 3 well-beaten eggs followed by the yeast mixture into the butter mixture. You’ll want to mix this well, ensuring that everything is fully incorporated.
- Using a dough hook attachment or a wooden spoon if you’re mixing by hand, gradually beat in the 6 and 1/2 cups of flour, one cup at a time, until a soft dough forms. The dough should be smooth and elastic after kneading for about 8 to 12 minutes. It’s okay if it’s slightly sticky but shouldn’t cling to your fingers.
- After kneading, stir in the plumped raisins until they are evenly distributed throughout the dough.
- Transfer the dough to a large buttered bowl, turning it so the buttered side is up. Cover with a tea towel and let it rise in a warm area away from drafts for about 1 and 1/2 hours or until it doubles in volume. An excellent tip is to set your oven to low, turn it off, and let the dough sit inside; this creates a warm environment perfect for rising.
- Once doubled, punch the dough down gently. Turn it out onto a lightly floured surface and divide it in half. Take one half and further divide it into four equal pieces, rolling each piece into strips about 15 inches long.
- Pinch the four strips together at one end to start braiding. Cross the far-right strip over its neighbor and tuck the far-left strip under its neighbor and over the next strip, repeating until you finish the braid. Pinch the other end together to secure it.
- Place each braid into a buttered baking dish. Cover loosely with a towel and let the braids rest for about 30 minutes. If you want a larger baking pan for better expansion, now’s the time to switch!
- Preheat your oven to 375°F (190°C) after the braids have rested. Beat together 1 egg and 1 tsp of water for the egg wash. Generously brush the top and sides of each braid with this mixture.
- Bake each loaf separately for about 20 to 22 minutes or until golden brown. The wonderful aroma will fill your kitchen, and you’ll know your Portuguese Easter Bread is ready to be enjoyed!
Things Worth Knowing
- Using warm milk is essential as it helps activate the yeast. Too hot, and you risk killing the yeast.
- Make sure to knead the dough until it’s elastic and smooth, which ensures the right texture for your bread.
- Let the dough rise in a warm, draft-free area. If it’s too cold, the yeast won’t activate properly.
- When braiding, keep the tension even on the strips to ensure a beautiful and uniform bake.
Helpful Hints
Baking is a journey filled with learning and exploration. Here are some tips to guide you as you make your Portuguese Easter Bread:
- Storage: Keep leftover bread in an airtight container at room temperature for up to three days. You may also wrap it in plastic wrap to keep it fresh.
- Freezing: You can freeze the bread for up to three months. Just wrap it tightly in plastic and place it in a freezer bag. Thaw at room temperature when ready to enjoy.
- Variations: Feel free to experiment with different types of raisins or even add nuts for an extra crunch.
- Serving: This bread is delightful with butter or your favorite jam. Try it with a cup of coffee for a delightful breakfast.
- Perfecting the Braiding: If you’re new to braiding, practice with some dough scraps before using the main dough. It can be a fun family activity!
Side Dish Ideas for Portuguese Easter Bread
Serving Portuguese Easter Bread can be as delightful as baking it! Here are some ideas to pair with this lovely loaf:
- Fruit Salad: A refreshing fruit salad complements the sweetness of the bread while adding a vibrant touch to your table.
- Brunch Spread: Serve alongside a spread of cheeses, spreads, and fresh fruits for a delightful brunch experience.
- Seasonal Salads: A light spring salad with citrus dressing pairs perfectly, balancing the richness of the bread.
- Herbal Teas: Accompany your bread with cups of herbal teas, creating a cozy atmosphere for leisurely mornings.
- Golden Honey: Drizzle some honey over warm slices of your Portuguese Easter Bread for a sweet treat that everyone will love.
FAQ
Conclusion
The Portuguese Easter Bread is not just a recipe, but a beautiful tradition that embodies the spirit of togetherness and celebration. I encourage you to try your hand at this delightful bread, whether for Easter or any special occasion. You’ll find that the process of baking and sharing this bread is just as meaningful as enjoying it. Happy baking!
Portuguese Easter Bread
Ingredients
Equipment
Method
- Start by placing 1 cup of white or brown raisins in a bowl with 2 cups of boiling water for about 10 minutes. This plumping process makes the raisins even sweeter and juicier. Once done, drain them well and set aside.
- For the yeast mixture, pour 1/2 cup of warm milk (heated for about 30 seconds in the microwave) into a large measuring cup. Add 1 tsp of sugar and sprinkle the yeast over the top. Stir gently and let it stand to proof until it becomes bubbly and doubles in size, which should take about 10 minutes.
- In a large bowl, combine 1 cup of very warm milk (about 1 minute in the microwave), 1 cup of sugar, softened butter, and 1 tsp of salt. Stir until the butter is mostly melted and the mixture is well combined.
- Next, stir in the 3 well-beaten eggs followed by the yeast mixture into the butter mixture. You’ll want to mix this well, ensuring that everything is fully incorporated.
- Using a dough hook attachment or a wooden spoon if you're mixing by hand, gradually beat in the 6 and 1/2 cups of flour, one cup at a time, until a soft dough forms. The dough should be smooth and elastic after kneading for about 8 to 12 minutes. It’s okay if it’s slightly sticky but shouldn’t cling to your fingers.
- After kneading, stir in the plumped raisins until they are evenly distributed throughout the dough.
- Transfer the dough to a large buttered bowl, turning it so the buttered side is up. Cover with a tea towel and let it rise in a warm area away from drafts for about 1 and 1/2 hours or until it doubles in volume. An excellent tip is to set your oven to low, turn it off, and let the dough sit inside; this creates a warm environment perfect for rising.
- Once doubled, punch the dough down gently. Turn it out onto a lightly floured surface and divide it in half. Take one half and further divide it into four equal pieces, rolling each piece into strips about 15 inches long.
- Pinch the four strips together at one end to start braiding. Cross the far-right strip over its neighbor and tuck the far-left strip under its neighbor and over the next strip, repeating until you finish the braid. Pinch the other end together to secure it.
- Place each braid into a buttered baking dish. Cover loosely with a towel and let the braids rest for about 30 minutes. If you want a larger baking pan for better expansion, now's the time to switch!
- Preheat your oven to 375°F (190°C) after the braids have rested. Beat together 1 egg and 1 tsp of water for the egg wash. Generously brush the top and sides of each braid with this mixture.
- Bake each loaf separately for about 20 to 22 minutes or until golden brown. The wonderful aroma will fill your kitchen, and you'll know your Portuguese Easter Bread is ready to be enjoyed!
Notes
- Tip 1: Keep leftover bread in an airtight container at room temperature for up to three days.
- Tip 2: You can freeze the bread for up to three months.
- Tip 3: Feel free to experiment with different types of raisins or even add nuts for an extra crunch.
- Tip 4: This bread is delightful with butter or your favorite jam.
- Tip 5: If you’re new to braiding, practice with some dough scraps before using the main dough.