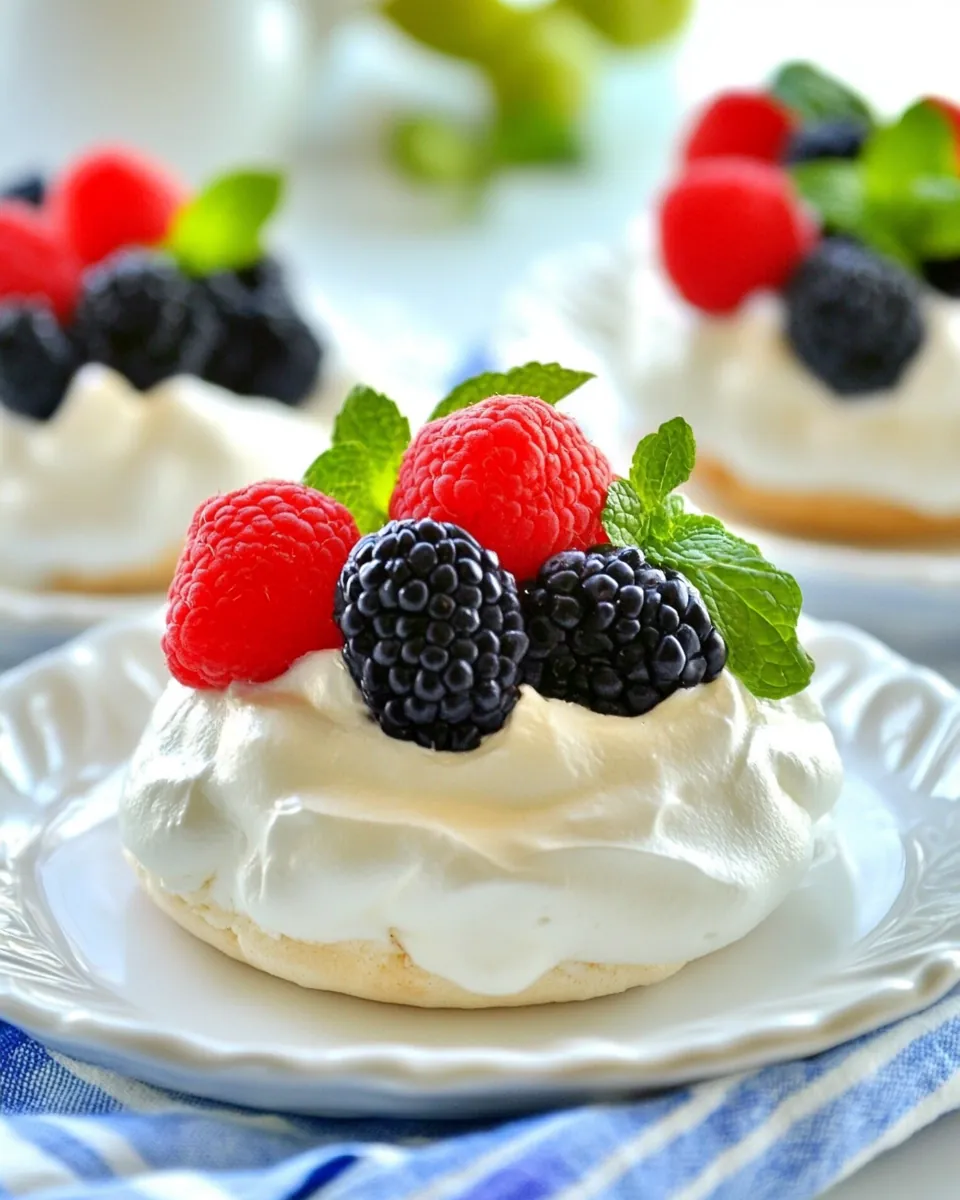
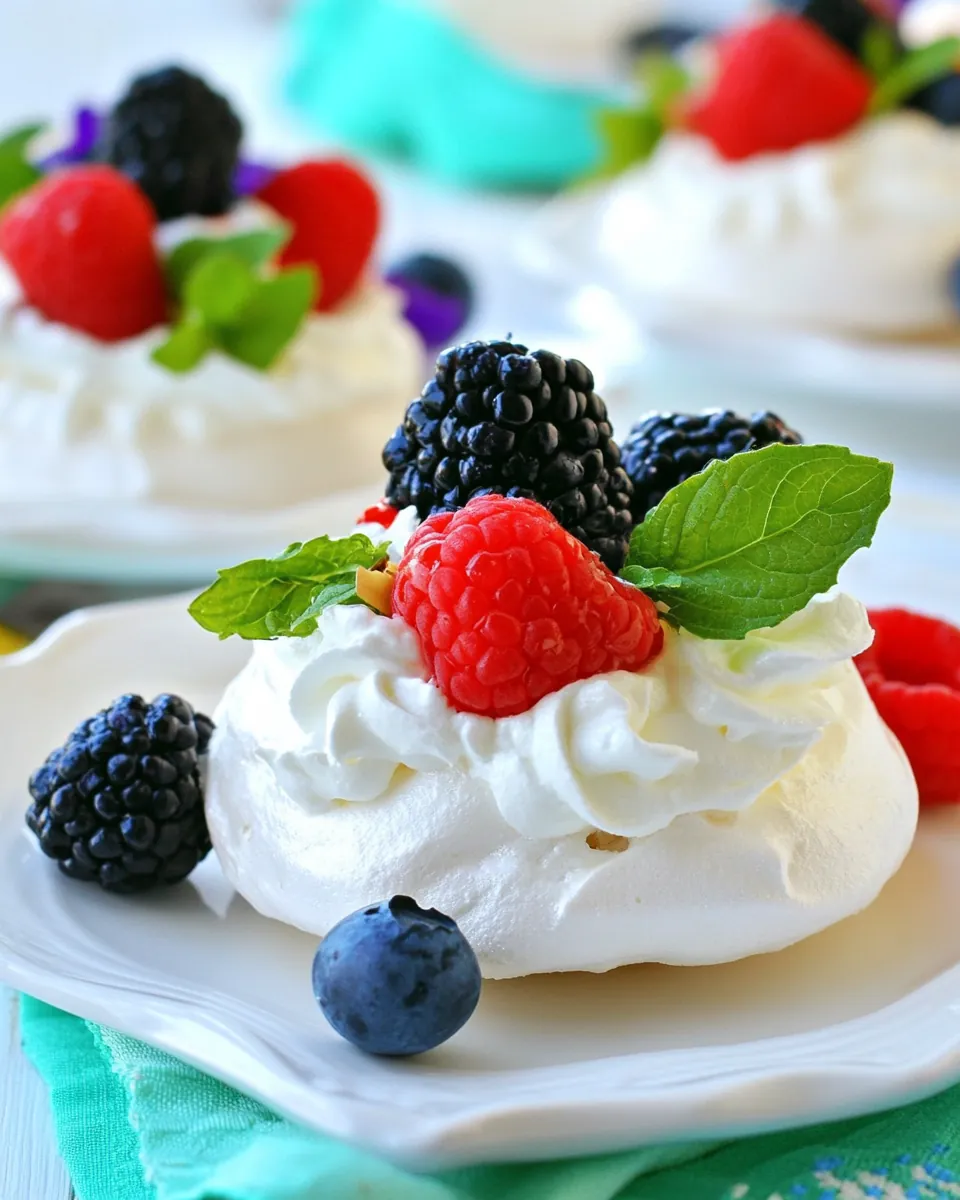
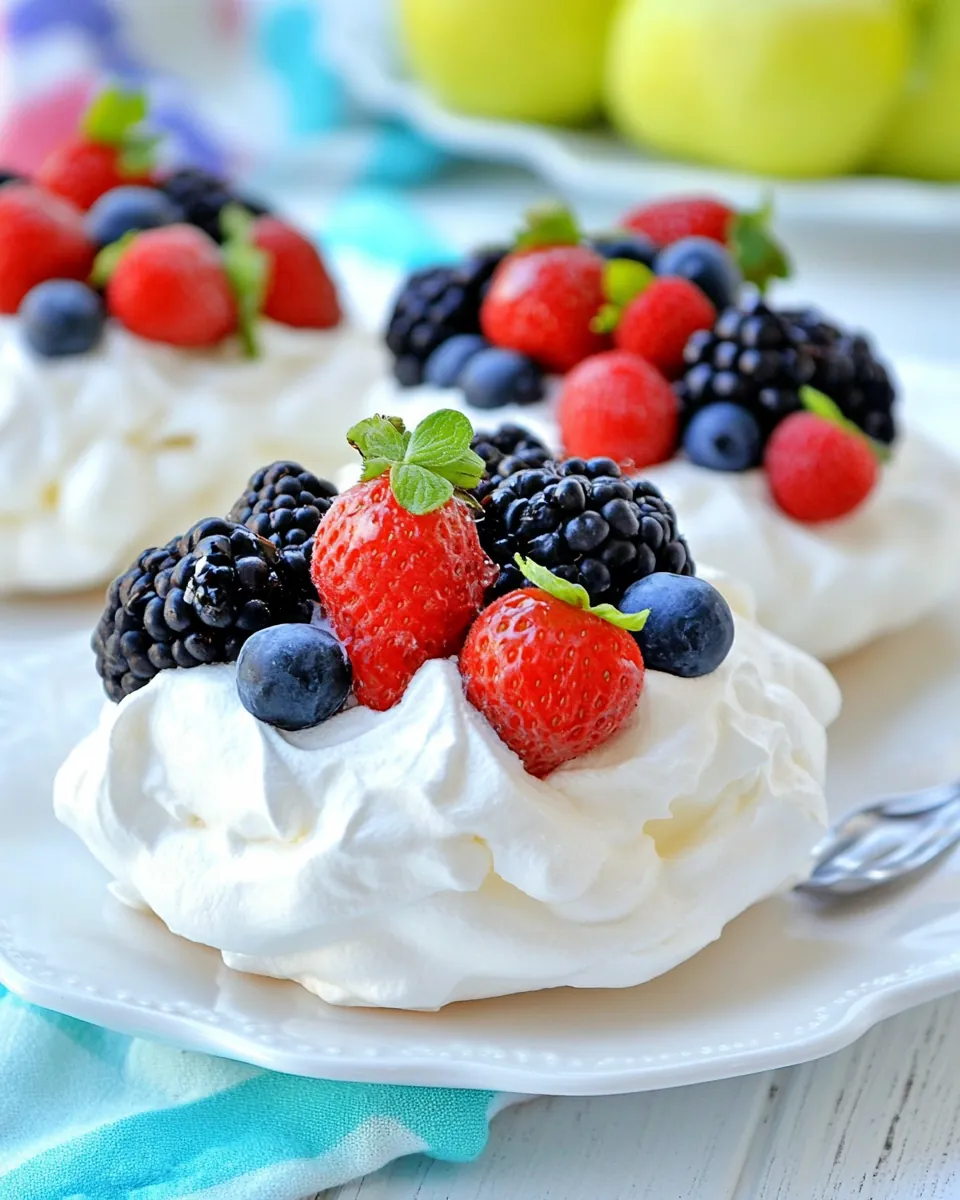
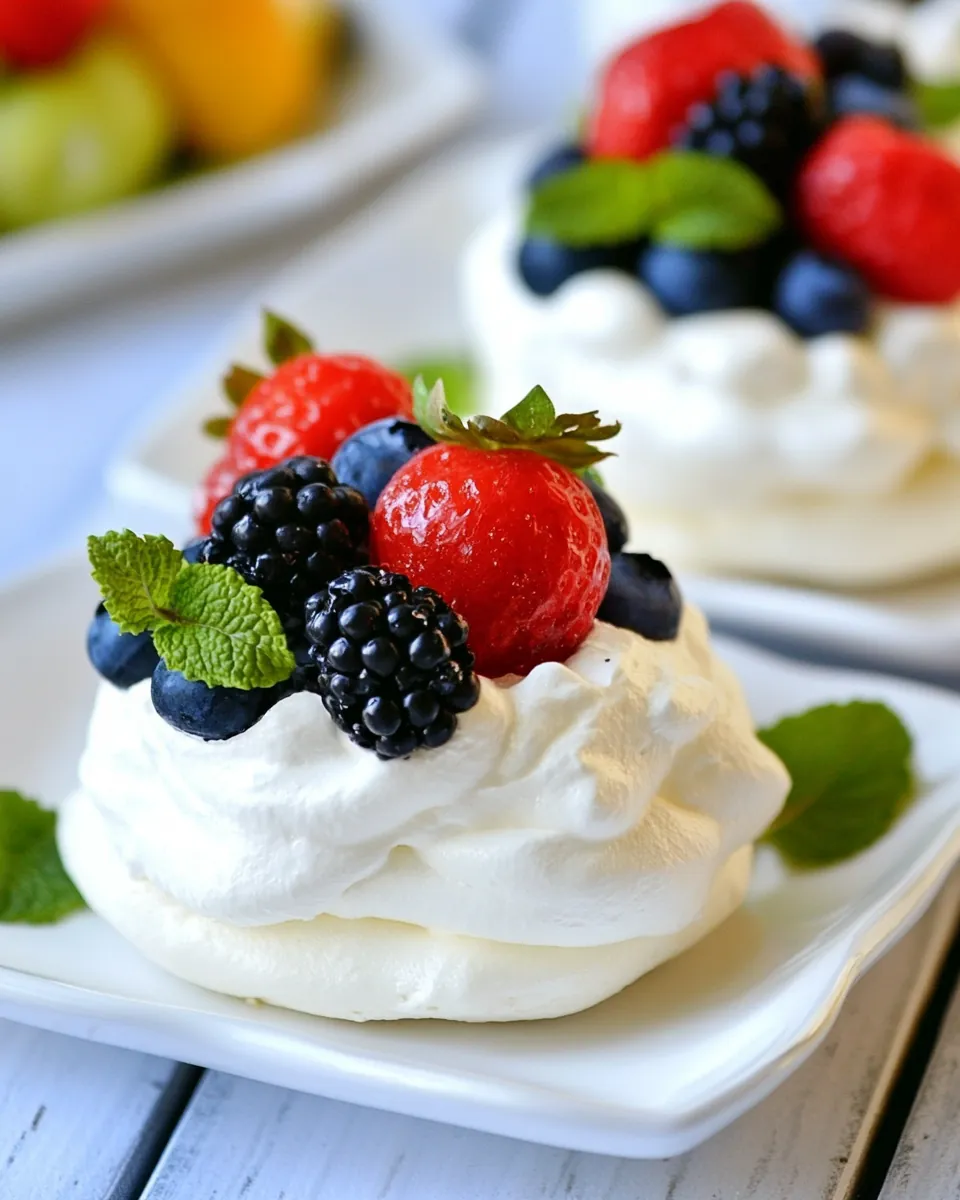
Individual Pavlova Nests
The first time I made Individual Pavlova Nests, I was captivated by the delicate, crisp exterior and the soft, airy center. These little beauties have a way of elevating any gathering, transforming a simple dessert into a spectacular centerpiece. I remember preparing them for a spring brunch with friends, each nest filled with freshly whipped cream and vibrant fruits. As we sat outside, laughter mingling with the scent of blooming flowers, we indulged in these delightful morsels. Each bite was a perfect blend of sweetness and lightness, making them an instant favorite. Now, I can’t help but whip up Individual Pavlova Nests for any occasion, whether it’s a casual get-together or a more formal celebration. They’re not just a treat, but a memory maker, bringing joy to every table they grace.
Recipe Snapshot
2 hr 15 mins
15 mins
120 mins
Hard
200 kcal
2 g
Gluten-Free, Low FODMAP
10 g
Baking Sheet, Blender, Oven
What’s Great About This Individual Pavlova Nests
Light and Airy Texture
One of the standout features of Individual Pavlova Nests is their incredible texture. The outer shell is crisp while the inside remains soft and chewy, creating a beautiful contrast. It’s this unique texture that makes each bite so enjoyable, as the meringue gently melts in your mouth.
Versatility
These nests are perfect for accommodating various toppings. You can fill them with your favorite fruits, from berries to tropical selections, or even a layer of creamy chocolate mousse. This versatility allows you to customize each nest to suit different tastes and occasions, making them a delightful surprise for everyone.
Stunning Presentation
There’s something undeniably elegant about Individual Pavlova Nests. Their whimsical shape and the vibrant colors of the fruits make them a feast for the eyes. You can truly impress your guests with their beautiful presentation, making any dessert table look sophisticated.
Easy to Make
You don’t need to be a master baker to create these delightful nests. With just a few simple steps, you can achieve impressive results. The recipe is straightforward, and even if you’re new to meringues, I assure you, with a bit of patience, you’ll succeed.
Seasonal Adaptability
Whether it’s spring with fresh strawberries or summer with peaches and blueberries, Individual Pavlova Nests can be made year-round with seasonal fruits. This adaptability not only enhances the flavor but also makes them a go-to dessert for any season.
Great for Sharing
These nests are perfect for gatherings. Since they are individual portions, everyone can have their own delightful nest, making it easy to serve at parties, picnics, or family dinners. They’re also great for those who love dessert but want to enjoy it in moderation.
Main Ingredients for Individual Pavlova Nests
The ingredients for Individual Pavlova Nests are simple yet essential for achieving that perfect texture and flavor. Each component plays a critical role; for instance, the egg whites provide the structure while the granulated sugar adds sweetness and stability to the meringue. The heavy whipping cream is whipped to perfect peaks, creating a luscious filling that balances the sweetness of the meringue. Finally, the assorted fruits not only add a burst of flavor but also a refreshing touch to each nest.
- 5 Egg Whites: The base of your meringue, providing structure and stability. Ensure they are at room temperature for the best volume.
- 1/2 teaspoon Cream of Tartar: This helps stabilize the egg whites, allowing for taller peaks.
- Pinch of Salt: Enhances the flavor of the meringue.
- 1 cup Granulated Sugar (superfine): Adds sweetness and helps to create a glossy meringue. If you don’t have superfine, blend regular sugar.
- 1 1/4 cups Heavy Whipping Cream: Whipped to soft peaks for a rich filling.
- 2 tablespoons Powdered Sugar: Sweetens the whipped cream and helps maintain its texture.
- 1/2 teaspoon Vanilla Extract: Adds flavor to the whipped cream.
- 2-3 cups Assorted Fruits: Use your favorite fruits like berries, kiwi, or mango for topping.
Directions for Individual Pavlova Nests
Creating Individual Pavlova Nests is a rewarding process that allows you to showcase your baking skills. Follow these steps closely for the best results.
- Preheat your oven to 225 degrees Fahrenheit. This low temperature is essential for drying out the meringue without browning it.
- Line two baking sheets with parchment paper. To ensure your nests are uniformly sized, draw 3-inch circles on the parchment, then flip it over so the ink is facing down.
- In a clean mixing bowl, beat the egg whites at medium speed until they become foamy. You want to see small bubbles forming, which is a good sign that they’re starting to whip up.
- Add a pinch of salt and the cream of tartar to the foamy egg whites. Increase the speed to medium-high and continue beating until soft peaks form. This means that when you lift the beaters, the egg whites should form peaks that slightly bend over at the tips.
- Gradually add the granulated sugar, one tablespoon at a time. Continue beating on high speed until you achieve stiff peaks. You’ll know it’s ready when the meringue is glossy and holds its shape without drooping.
- Transfer the meringue to a pastry bag fitted with a decorator tip (like Wilton 1M). Start by outlining the nests, following the circles you drew on the parchment paper. Then, fill in the bottoms and build up the sides with two rows of meringue, creating a nest shape.
- Place the baking sheets in the oven and bake for 50 to 60 minutes. The nests should feel dry to the touch when done. Avoid opening the oven door during baking to prevent cracks.
- Once baked, turn off the oven and leave the nests inside for an additional 2 hours to dry out completely. This step is crucial as it ensures the nests maintain their crisp texture.
- While the nests cool, prepare the filling. Beat the heavy whipping cream with powdered sugar and vanilla extract on high speed until soft peaks form. This means you should be able to lift the beaters and have the cream hold its shape but still be spreadable.
- Once the meringue nests are completely cooled, pipe the whipped cream into each nest generously. Top with your choice of assorted fruits. Serve immediately for the best experience, and enjoy the deliciousness of your Individual Pavlova Nests.
Things Worth Knowing
- Use room temperature egg whites for better volume when whipping. Cold eggs can inhibit the formation of peaks.
- Make sure your mixing bowl and beaters are free from grease or oil, as any residue can affect the stability of the meringue.
- For an extra flavor boost, consider infusing the cream with a bit of lemon zest or a splash of almond extract while whipping.
- Store assembled nests in the refrigerator for a short time, but fill them just before serving to keep them from becoming soggy.
Tips and Tricks about Individual Pavlova Nests
When it comes to mastering Individual Pavlova Nests, a few tips can make all the difference. Here’s what I’ve learned over the years:
- Storage: If you have leftover nests, store them in an airtight container at room temperature to maintain their crispness. Avoid refrigeration.
- Freezing: You can freeze unfilled nests. Just ensure they are completely cooled and stored in an airtight container. They can last up to a month.
- Filling Variations: Explore different fillings like lemon curd or chocolate ganache for a twist on the classic.
- Fruit Pairings: Match the fruits you use to the season for the best taste; berries work well in summer, while citrus is perfect in winter.
- Assembly Timing: Assemble the nests just before serving to avoid sogginess. Whip the cream right before you’re ready to fill.
- Perfect Whipping: Ensure the cream is very cold before whipping for better volume and stability.
What to Serve Alongside Individual Pavlova Nests
When serving Individual Pavlova Nests, consider the following ideas to enhance your dessert experience:
- Freshly Brewed Coffee: Pairing these nests with a cup of hot coffee can create a wonderful contrast to the sweetness.
- Herbal Tea: Light herbal teas, such as mint or chamomile, complement the airy texture and flavors of the pavlova.
- Fruit Salad: A side of mixed fruit salad adds freshness and balances the sweetness of the meringue nests.
- Cheese Platter: Offer a selection of cheeses with mild flavors to contrast with the sweetness of the nests.
- Seasonal Berries: Serve the nests with an additional side of seasonal berries for an extra fruity punch.
- Light Sorbet: For a refreshing touch, serve alongside a scoop of fruit sorbet that pairs with the fruits used in the nests.
- Celebratory Toast: For special occasions, consider a light toast with fruit juices or sparkling water to enhance the experience.
FAQ
Conclusion
Individual Pavlova Nests are truly special because they combine a light, airy meringue with luscious cream and vibrant fruits. It’s a dessert that not only satisfies your sweet tooth but also brings joy to any occasion. So go ahead and give this recipe a try; I promise it will become a favorite in your dessert repertoire!
Individual Pavlova Nests
Ingredients
Equipment
Method
- Preheat your oven to 225 degrees Fahrenheit. This low temperature is essential for drying out the meringue without browning it.
- Line two baking sheets with parchment paper. To ensure your nests are uniformly sized, draw 3-inch circles on the parchment, then flip it over so the ink is facing down.
- In a clean mixing bowl, beat the egg whites at medium speed until they become foamy. You want to see small bubbles forming, which is a good sign that they’re starting to whip up.
- Add a pinch of salt and the cream of tartar to the foamy egg whites. Increase the speed to medium-high and continue beating until soft peaks form. This means that when you lift the beaters, the egg whites should form peaks that slightly bend over at the tips.
- Gradually add the granulated sugar, one tablespoon at a time. Continue beating on high speed until you achieve stiff peaks. You’ll know it’s ready when the meringue is glossy and holds its shape without drooping.
- Transfer the meringue to a pastry bag fitted with a decorator tip (like Wilton 1M). Start by outlining the nests, following the circles you drew on the parchment paper. Then, fill in the bottoms and build up the sides with two rows of meringue, creating a nest shape.
- Place the baking sheets in the oven and bake for 50 to 60 minutes. The nests should feel dry to the touch when done. Avoid opening the oven door during baking to prevent cracks.
- Once baked, turn off the oven and leave the nests inside for an additional 2 hours to dry out completely. This step is crucial as it ensures the nests maintain their crisp texture.
- While the nests cool, prepare the filling. Beat the heavy whipping cream with powdered sugar and vanilla extract on high speed until soft peaks form. This means you should be able to lift the beaters and have the cream hold its shape but still be spreadable.
- Once the meringue nests are completely cooled, pipe the whipped cream into each nest generously. Top with your choice of assorted fruits. Serve immediately for the best experience, and enjoy the deliciousness of your Individual Pavlova Nests.
Notes
- Tip 1: If you have leftover nests, store them in an airtight container at room temperature to maintain their crispness. Avoid refrigeration.
- Tip 2: You can freeze unfilled nests. Just ensure they are completely cooled and stored in an airtight container. They can last up to a month.
- Tip 3: Explore different fillings like lemon curd or chocolate ganache for a twist on the classic.
- Tip 4: Match the fruits you use to the season for the best taste; berries work well in summer, while citrus is perfect in winter.
- Tip 5: Assemble the nests just before serving to avoid sogginess. Whip the cream right before you’re ready to fill.
- Tip 6: Ensure the cream is very cold before whipping for better volume and stability.