Yaki Onigiri
There’s something incredibly satisfying about making Yaki Onigiri at home. I remember the first time I tried these flavorful rice balls at a local Japanese festival; they were crispy on the outside, soft and warm on the inside, and bursting with umami flavor. It was a revelation, and I knew I had to learn how to replicate that experience. Now, every time I make Yaki Onigiri, it brings me back to those vibrant street stalls filled with delicious aromas and cheerful chatter. This dish is not just a meal; it’s a journey back to fond memories. Whether you’re hosting a casual gathering or simply craving something comforting, Yaki Onigiri never disappoints.
Recipe Snapshot
20 mins
10 mins
10 mins
Easy
180 kcal
3 g
Vegan, Gluten-Free, Low FODMAP
2 g
Skillet, Frying Pan, Mixing Bowl
The Beauty of This Yaki Onigiri
Deliciously Versatile
What I adore about Yaki Onigiri is its versatility. You can enjoy these rice balls as a snack, a side dish, or even as a light meal. They can be served with various dipping sauces or enjoyed plain, making them adaptable to any occasion.
Perfectly Crispy Exterior
There’s something magical about that golden-brown crust that forms when you pan-fry these rice balls. The combination of soy sauce and toasted sesame oil adds a rich flavor and enhances the crispiness, offering a delightful contrast to the soft interior.
Fun to Make with Family
Making Yaki Onigiri is a fun activity to do with family or friends. Everyone can get involved in shaping the rice into triangles or balls, and you can experiment with different fillings and garnishes. It’s a great way to bond over cooking.
Simple Ingredients
With just a handful of ingredients like sushi rice, soy sauce, and vegetable oil, Yaki Onigiri is an accessible recipe. You don’t need any fancy equipment or hard-to-find items, making it easy to whip up at home.
Great for Meal Prep
If you’re looking to prepare ahead of time, Yaki Onigiri is a fantastic option. They store well and can be reheated, making them perfect for busy weeknights or lunchboxes. Just pack them with your favorite sides for a complete meal.
Family Favorite
Once you serve Yaki Onigiri to your family or friends, I guarantee they’ll fall in love with it. It has that comforting home-cooked feel that resonates deeply, making it a beloved staple in my home. There’s nothing like seeing your loved ones enjoy a dish you made with care!
Main Ingredients for Yaki Onigiri

The ingredients in Yaki Onigiri are simple yet work beautifully together to create a satisfying dish. Each component plays a crucial role in achieving the perfect balance of flavor and texture.
- 1 tablespoon soy sauce: Adds a savory depth of flavor that enhances the overall taste of the rice.
- 3/4 teaspoon toasted sesame oil: Provides a nutty aroma and richness that complements the rice.
- 2 cups cooked sushi rice, warm: This is the main ingredient, giving the dish its signature sticky texture.
- 1 tablespoon vegetable oil: Used for frying, it creates that crispy outer layer.
- Salt to taste: A small addition to enhance the flavors.
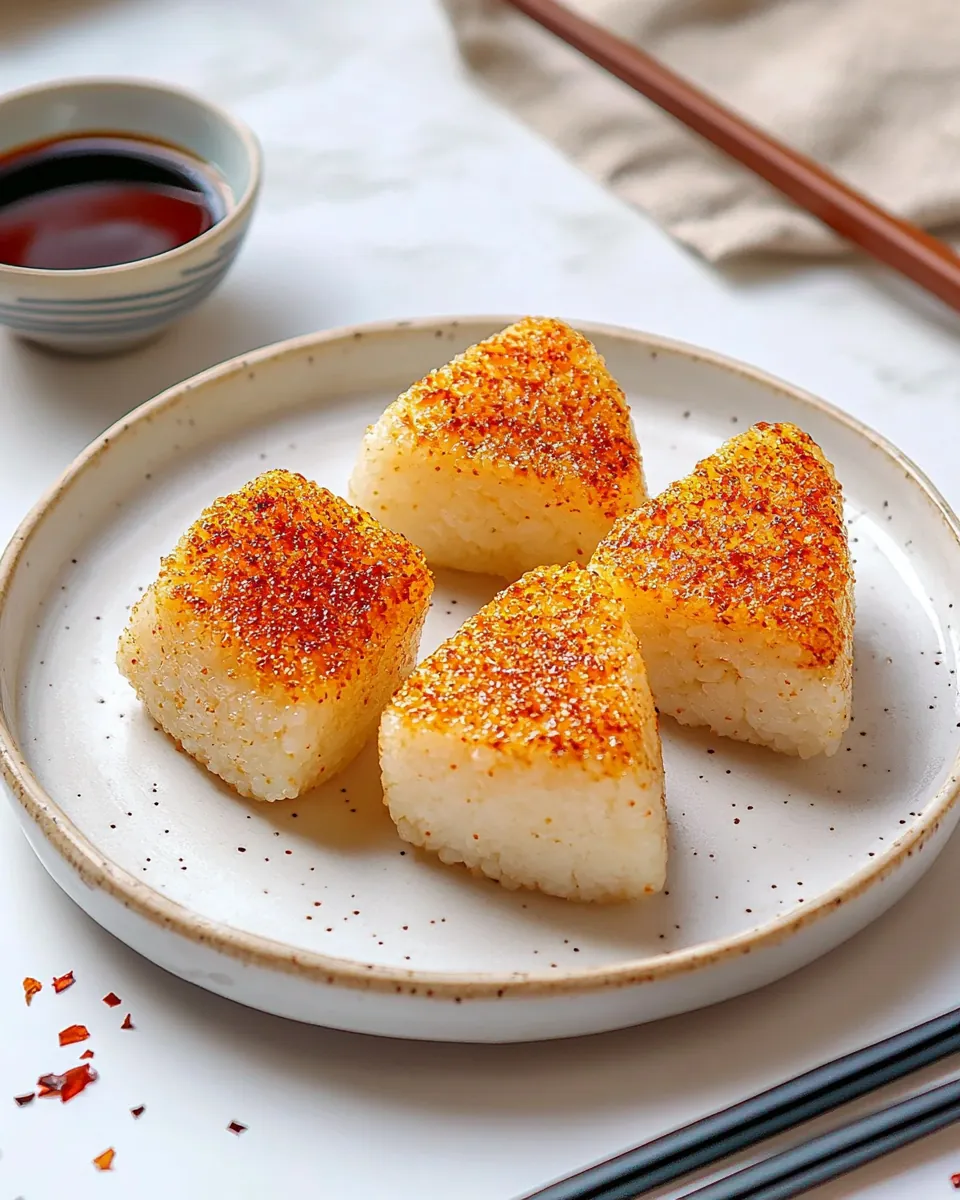
- Furikake for garnish: A Japanese rice seasoning that adds extra flavor and visual appeal.
Making This Yaki Onigiri

Preparing Yaki Onigiri is a fun and engaging process. You’ll love seeing the transformation as simple ingredients come together to create something delicious. Let’s get started!
In a large bowl, drizzle soy sauce and toasted sesame oil over the warm sushi rice. Gently mix until the seasoning is evenly distributed. This step is crucial as it infuses the rice with flavor. Make sure every grain is coated to ensure that each bite is delicious.
Wet your hands with water to prevent sticking. Scoop about 1/2 cup of the seasoned rice and press it firmly into a compact triangle shape. The key here is to apply enough pressure so it holds together when you fry it. This is where you can get creative with the shape!
Heat vegetable oil in a nonstick skillet over medium heat. Once the oil is shimmering, carefully place the shaped rice balls in the pan. Fry for about 3 to 4 minutes on each side. You’ll want to watch for a golden, crispy crust to form that adds texture and flavor.
During the last minute of cooking, if desired, brush a little extra soy sauce on each side of the rice balls. This adds an extra layer of flavor and helps caramelize the exterior, making it even more delicious.
After frying, season with salt and garnish with furikake if desired. This final touch not only adds flavor but also a pop of color, making your Yaki Onigiri visually appealing. Serve hot and enjoy!
Things Worth Knowing
- Use fresh sushi rice: For the best texture, ensure your sushi rice is freshly cooked and still warm. Cold rice won’t hold its shape as well.
- Experiment with fillings: While traditional Yaki Onigiri is often plain, feel free to add fillings like pickled plum or salmon for a twist.
- Heat control is key: Make sure your skillet is preheated but not smoking. Medium heat is ideal for achieving that crispy texture without burning.
- Storage: Keep leftover Yaki Onigiri in an airtight container in the refrigerator for up to 2 days. Reheat in a skillet for best results.
Change It Up

There are countless ways to customize Yaki Onigiri to suit your tastes. Here are some ideas:
- Storage: To store leftovers, place them in an airtight container and refrigerate. They’re best enjoyed fresh, but you can reheat them in a skillet.
- Freezing: You can freeze Yaki Onigiri by wrapping each piece in plastic wrap and placing them in a freezer bag. Thaw before reheating.
- Pairing: Serve with miso soup or a fresh salad for a complete meal.
- Flavor variations: Consider varying the spices or adding fillings to create different flavor profiles.
- Presentation: Serve them on a platter with dipping sauces for an impressive appetizer.
Serving Suggestions
Serving Yaki Onigiri can be a delightful experience. Here are some ideas to elevate your meal:
- As a snack: Perfect for a quick bite or afternoon pick-me-up, Yaki Onigiri can be enjoyed on their own with a sprinkle of furikake.
- At a picnic: These rice balls are easy to transport and make a great addition to any picnic basket, paired with fresh fruit or salad.
- For lunchboxes: Pack Yaki Onigiri in lunchboxes for a tasty school or work lunch. They reheat well and maintain their flavor.
- Dinner parties: Impress guests by serving Yaki Onigiri with various dipping sauces, such as teriyaki or a spicy mayo.
- Seasonal variations: Feel free to incorporate seasonal ingredients into your rice balls or pair them with seasonal dishes for a unique twist.
FAQ
Conclusion
The charm of Yaki Onigiri lies in its simplicity and versatility. It’s a dish that brings warmth and joy, whether enjoyed as a snack, part of a meal, or shared at gatherings. I encourage you to give this recipe a try; I promise you’ll find it as delightful as I do. Once you taste that crispy exterior and soft, flavorful interior, you’ll be hooked!
Yaki Onigiri
Ingredients
Equipment
Method
- In a large bowl, drizzle soy sauce and toasted sesame oil over the warm sushi rice. Gently mix until the seasoning is evenly distributed.
- Wet your hands with water. Scoop about 1/2 cup of the seasoned rice and press it firmly into a compact triangle shape.
- Heat vegetable oil in a nonstick skillet over medium heat. Once the oil is shimmering, carefully place the shaped rice balls in the pan. Fry for about 3 to 4 minutes on each side until a golden, crispy crust forms.
- During the last minute of cooking, brush a little extra soy sauce on each side for added flavor and caramelization.
- After frying, season with salt and garnish with furikake. Serve hot and enjoy!