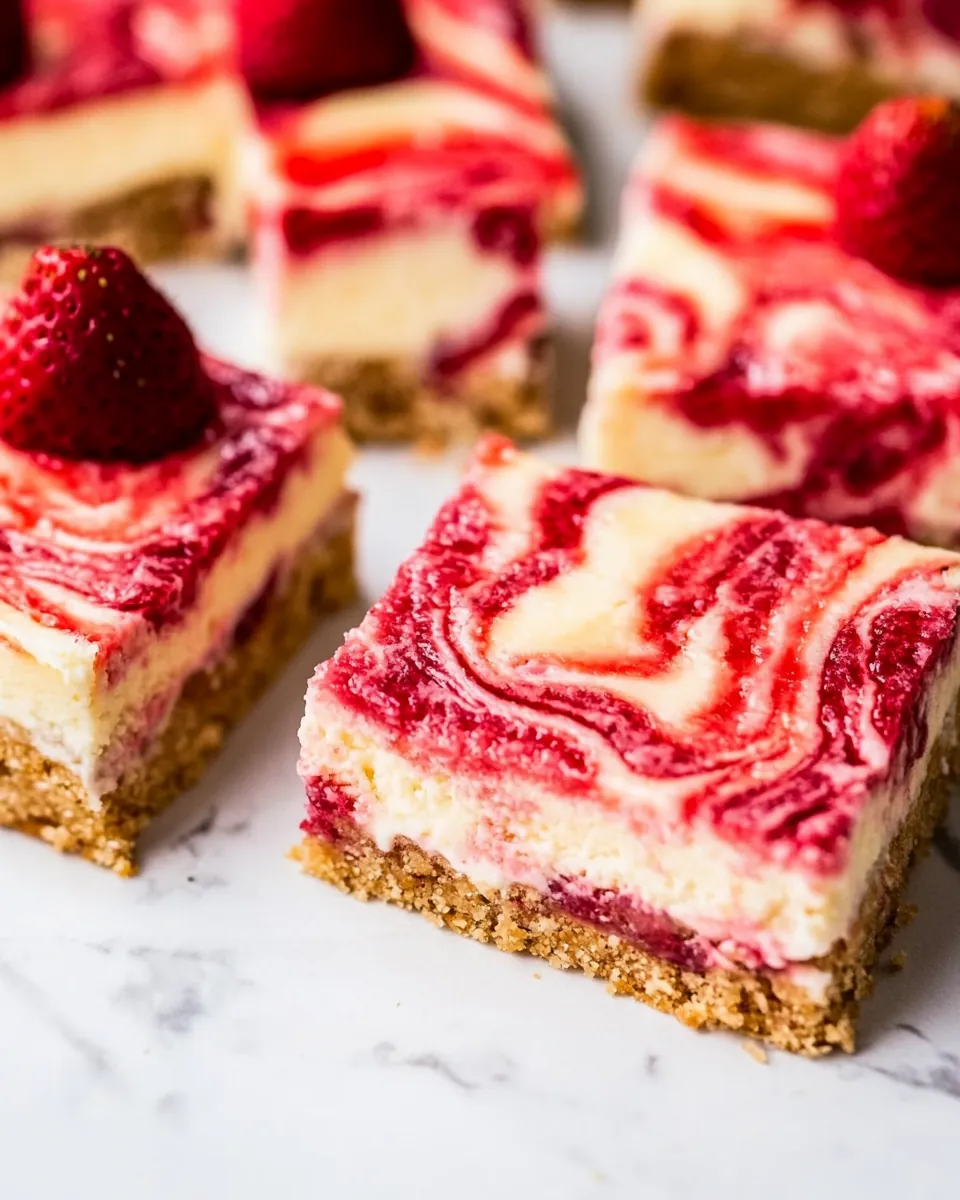
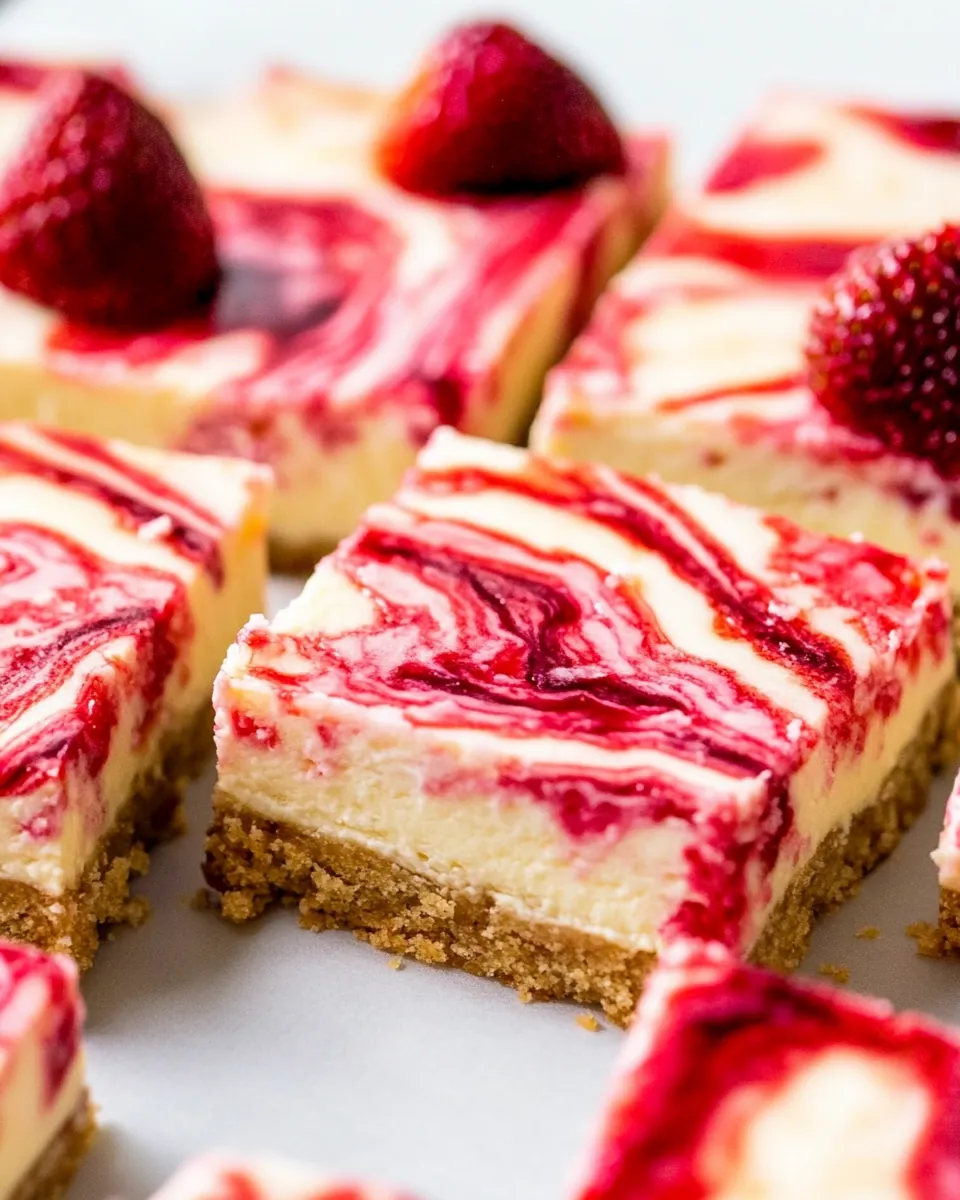
Strawberry Cheesecake Bars
Every summer, as the sun graces us with its warmth, I can’t help but crave the sweet and tangy flavors of Strawberry Cheesecake Bars. There’s something special about blending fresh strawberries with creamy cheesecake that brings back fond memories of family gatherings and sunny afternoons. Picture this: a picnic blanket sprawled across the grass, laughter echoing in the air, and a delicious tray of these bars that everyone can’t resist. That’s how my love for these delightful treats blossomed.
As a child, my grandmother would whip up her famous cheesecake, always topped with a vibrant strawberry sauce. Each bite was a perfectly balanced blend of silky richness and fruity brightness. That’s the essence I’ve tried to capture with my own Strawberry Cheesecake Bars. These bars are not just a dessert; they are a celebration of summer flavors, a sweet treat that beckons you to savor life’s simplest joys.
What I adore about this recipe is its versatility. It’s perfect for any summer gathering or simply enjoying at home with loved ones. The creamy filling nestled on a buttery graham cracker crust, topped with luscious strawberries, is the kind of dessert that leaves you wanting more. Honestly, who can resist a slice? So, grab your ingredients, and let’s make some magic in the kitchen with these Strawberry Cheesecake Bars.
Recipe Snapshot
1 hr 10 mins
25 mins
45 mins
Medium
250 kcal
4 g
Gluten-Free, Low FODMAP
12 g
Food Processor, Oven, Baking Sheet, Frying Pan, Large Pot, Saucepan, Mixing Bowl, Chef’s Knife, Wooden Spoon
Why We Love This Strawberry Cheesecake Bars
1. Irresistible Flavor Combination
The combination of creamy cheesecake and sweet, juicy strawberries creates a symphony of flavors that dance on your palate. The creaminess balances perfectly with the tartness of the strawberries, making each bite a delight.
2. Easy to Make
Don’t let the elegant appearance fool you! Strawberry Cheesecake Bars are surprisingly easy to make. With just a few simple steps, you can whip up a batch in no time, allowing you to spend more time enjoying the day with loved ones.
3. Perfect for Any Occasion
Whether it’s a summer BBQ, a picnic in the park, or simply a family dessert night, these bars are a hit! They not only taste amazing but also look beautiful, making them the perfect centerpiece for any gathering.
4. Customizable Toppings
Feel free to experiment! You can add different fruits, sauces, or even a drizzle of chocolate on top of your Strawberry Cheesecake Bars to personalize them to your taste. The possibilities are endless!
5. Make-Ahead Friendly
These bars can be made ahead of time, making them a wonderful choice for busy days. Just prepare them the day before, let them chill in the fridge, and you’ll have a delicious dessert ready to impress.
6. Family Tradition
This recipe has become a family favorite in my household. It’s not just about the taste; it’s about sharing moments and creating memories together. There’s a special joy in baking these bars with my kids, who love to help with the strawberry topping.
What Goes Into Strawberry Cheesecake Bars
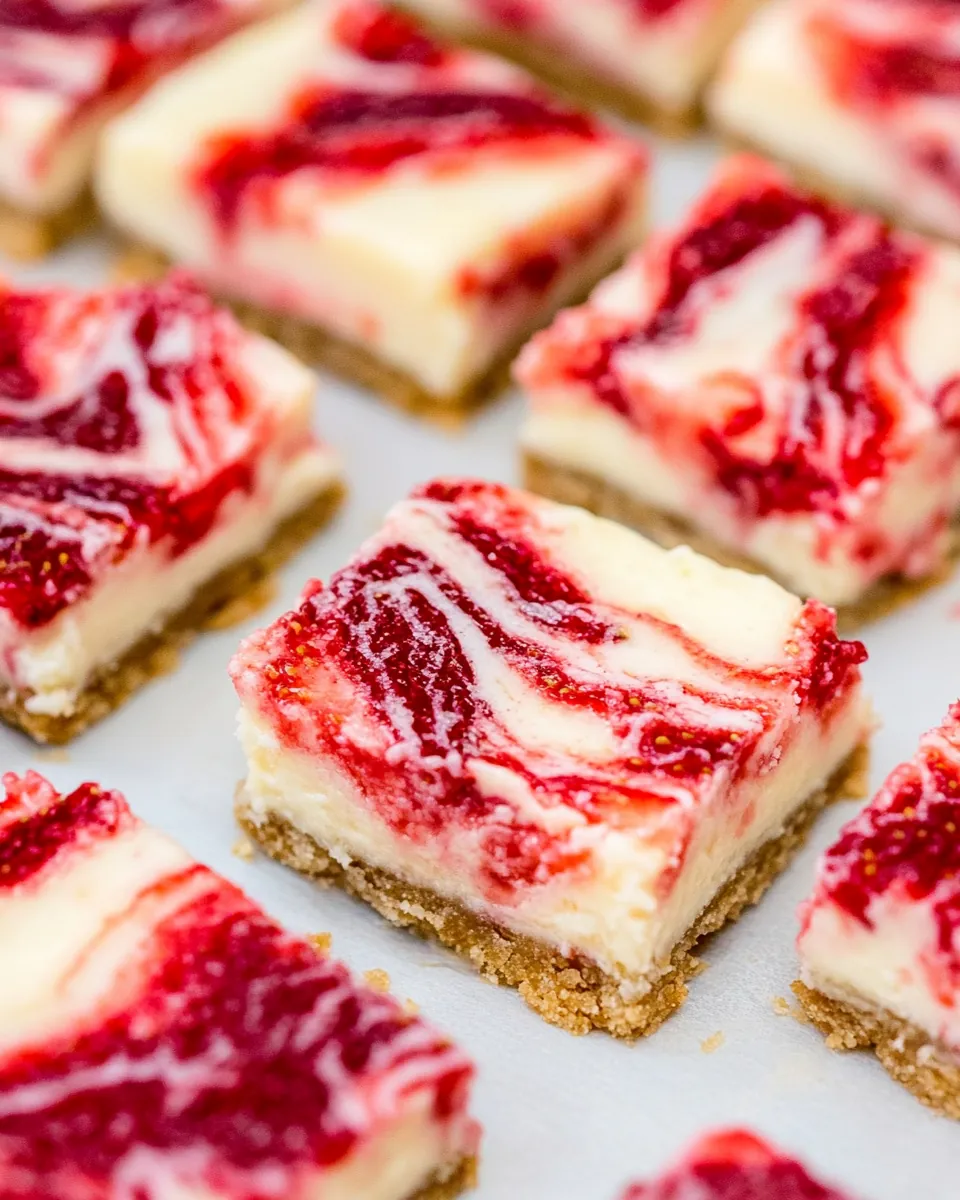
The ingredients for Strawberry Cheesecake Bars blend together beautifully to create a dessert that’s both satisfying and refreshing. Each component plays a crucial role in achieving the perfect balance of flavors and textures. The key players in this recipe include fresh strawberries, rich cream cheese, and a buttery graham cracker crust.
- 12 graham crackers: These form the delightful crust that provides a crunchy texture to contrast with the creamy filling.
- 3 tablespoons brown sugar: This adds a touch of sweetness that elevates the graham cracker crust.
- ½ cup butter, melted: It binds the crust together, giving it a rich flavor and a perfect base for the cheesecake layer.
- 16 ounces cream cheese, room temperature: The star of the show! It creates that silky, creamy filling we all love.
- ¼ cup sour cream: This adds an extra layer of creaminess with a slight tang that enhances the overall flavor of the cheesecake.
- 2 eggs: Essential for setting the cheesecake layer and giving it structure.
- ½ cup sugar: The sugar sweetens the filling, balancing the flavors of the other ingredients.
- 1 teaspoon vanilla extract: This enhances the flavor profile, adding warmth to the creamy filling.
- 2 cups strawberries, quartered: Fresh strawberries provide a vibrant topping and their natural sweetness shines through.
- 1 tablespoon sugar: This is used for the strawberry topping, ensuring the strawberries are sweet and delicious.
- 1 tablespoon water: Helps in cooking down the strawberries for a lovely sauce.
- ¼ teaspoon salt: A pinch to balance the sweetness and enhance flavors.
Preparation Steps for Strawberry Cheesecake Bars

Making Strawberry Cheesecake Bars is an enjoyable process that fills your kitchen with delightful aromas. Follow these steps, and you’ll be on your way to creating something truly special. Let’s dive into the preparation!
Start by preheating your oven to 350 degrees Fahrenheit. This ensures that the bars bake evenly when they go in. While that’s heating up, grab your 8×8 inch baking dish and spray it with non-stick spray. This step is crucial to prevent your bars from sticking to the pan.
Next, take your graham crackers and brown sugar and place them in a food processor. Pulse them for about 20 seconds until they become fine crumbs. This will be the base for your crust.
Now, add the melted butter to the crumb mixture. Pulse again until everything is well combined. It should look like wet sand. Transfer this mixture to the prepared baking dish, using your hands to press down firmly to form an even layer.
In a small saucepan, combine the strawberries, sugar, water, and salt. Turn the heat to medium and bring it to a gentle boil while stirring continuously. After a few minutes, reduce the heat to medium-low and let it simmer for 5 to 10 minutes. This will help to break down the strawberries, creating a lovely sauce.
While the strawberry mixture is cooling, let’s work on the cheesecake layer. In a large mixing bowl, add the cream cheese, sour cream, eggs, sugar, and vanilla. Use a hand mixer or stand mixer to beat everything together until it’s smooth and creamy. You want a fluffy texture with no lumps.
Once your cheesecake mixture is ready, scoop it out onto the prepared graham cracker crust. Use a spatula to smooth it evenly across the top. This layer is going to be rich and creamy, so make sure it’s well spread out.
Now, take the cooled strawberry mixture and pour it over the cheesecake layer. Spread it out evenly with a spatula. If you’d like to create a marbled effect, take a butter knife and swirl it gently into the cream cheese mixture.
Place the baking dish into your preheated oven and let it bake for about 35 minutes. The edges should look set while the center may still be slightly jiggly. This is exactly what you want for a creamy texture.
After baking, remove the pan from the oven and let it cool for 15 minutes at room temperature. Then, transfer the bars to the refrigerator. They need to chill for at least 1 hour to firm up properly.
Once chilled, it’s finally time to slice your Strawberry Cheesecake Bars. Use a sharp knife for clean edges, and enjoy every creamy, fruity bite!
Things Worth Knowing
- Use room temperature ingredients: Let your cream cheese and sour cream sit out for about 30 minutes before mixing. This helps achieve a smoother filling.
- Don’t overmix: When combining the cheesecake ingredients, mix just until smooth to avoid incorporating too much air, which can cause cracks.
- Cool gradually: After baking, allow the bars to cool before refrigerating. This prevents condensation from forming on the surface.
- Chill longer for firmer bars: If you prefer a firmer consistency, let the bars chill for a few hours longer before slicing.
Tips and Tricks about Strawberry Cheesecake Bars
Creating the perfect Strawberry Cheesecake Bars is all about the details. Here are some fantastic tips to ensure that your dessert turns out just right!
- Storage: Transfer leftovers cheesecake bars to an airtight container or tightly cover the 8×8 baking dish with plastic wrap. Store them in the fridge for 3 to 4 days.
- Freezing: You can freeze these easy strawberry cheesecake bars too! Place them in an airtight container or wrap individually and freeze for up to 3 months.
- Serving suggestion: Serve with whipped cream or extra strawberries on top for a beautiful presentation.
- Variations: Try adding a layer of chocolate ganache for a rich twist or use different fruits like blueberries or raspberries.
- Graham cracker alternatives: If you want a gluten-free option, substitute with gluten-free graham crackers or crushed nuts.
Accompaniments for Strawberry Cheesecake Bars
When serving your Strawberry Cheesecake Bars, consider these delightful accompaniments to enhance the experience:
- Fresh fruit: Pair with seasonal fruits like sliced peaches or a berry medley for a refreshing side.
- Ice cream: Serve with a scoop of vanilla or strawberry ice cream for a decadent dessert.
- Chocolate drizzle: A drizzle of chocolate sauce can elevate the flavors, adding a rich contrast to the strawberries.
- Tea or coffee: These bars make a great accompaniment to afternoon tea or coffee gatherings.
- Outdoor picnics: Perfect for summer picnics or gatherings, making them an ideal dessert to share with friends.
- Special occasions: These bars can be the perfect sweet treat for birthdays, holidays, or any celebration.
FAQ
Conclusion
The Strawberry Cheesecake Bars are more than just a dessert; they are a sweet experience that brings joy and flavor to any occasion. Their creamy filling, contrasted with the tartness of fresh strawberries, makes them a favorite among family and friends. I encourage you to try making these bars and see for yourself how they can brighten up your day.
So gather your ingredients and treat yourself to this delightful dessert. You won’t regret it!
Strawberry Cheesecake Bars
Ingredients
Equipment
Method
- Start by preheating your oven to 350 degrees Fahrenheit. This ensures that the bars bake evenly when they go in. While that’s heating up, grab your 8×8 inch baking dish and spray it with non-stick spray. This step is crucial to prevent your bars from sticking to the pan.
- Next, take your graham crackers and brown sugar and place them in a food processor. Pulse them for about 20 seconds until they become fine crumbs. This will be the base for your crust.
- Now, add the melted butter to the crumb mixture. Pulse again until everything is well combined. It should look like wet sand. Transfer this mixture to the prepared baking dish, using your hands to press down firmly to form an even layer.
- In a small saucepan, combine the strawberries, sugar, water, and salt. Turn the heat to medium and bring it to a gentle boil while stirring continuously. After a few minutes, reduce the heat to medium-low and let it simmer for 5 to 10 minutes. This will help to break down the strawberries, creating a lovely sauce.
- While the strawberry mixture is cooling, let’s work on the cheesecake layer. In a large mixing bowl, add the cream cheese, sour cream, eggs, sugar, and vanilla. Use a hand mixer or stand mixer to beat everything together until it’s smooth and creamy. You want a fluffy texture with no lumps.
- Once your cheesecake mixture is ready, scoop it out onto the prepared graham cracker crust. Use a spatula to smooth it evenly across the top. This layer is going to be rich and creamy, so make sure it’s well spread out.
- Now, take the cooled strawberry mixture and pour it over the cheesecake layer. Spread it out evenly with a spatula. If you’d like to create a marbled effect, take a butter knife and swirl it gently into the cream cheese mixture.
- Place the baking dish into your preheated oven and let it bake for about 35 minutes. The edges should look set while the center may still be slightly jiggly. This is exactly what you want for a creamy texture.
- After baking, remove the pan from the oven and let it cool for 15 minutes at room temperature. Then, transfer the bars to the refrigerator. They need to chill for at least 1 hour to firm up properly.
- Once chilled, it’s finally time to slice your Strawberry Cheesecake Bars. Use a sharp knife for clean edges, and enjoy every creamy, fruity bite!
Notes
- Tip 1: Transfer leftovers cheesecake bars to an airtight container or tightly cover the 8×8 baking dish with plastic wrap. Store them in the fridge for 3 to 4 days.
- Tip 2: You can freeze these easy strawberry cheesecake bars too! Place them in an airtight container or wrap individually and freeze for up to 3 months.