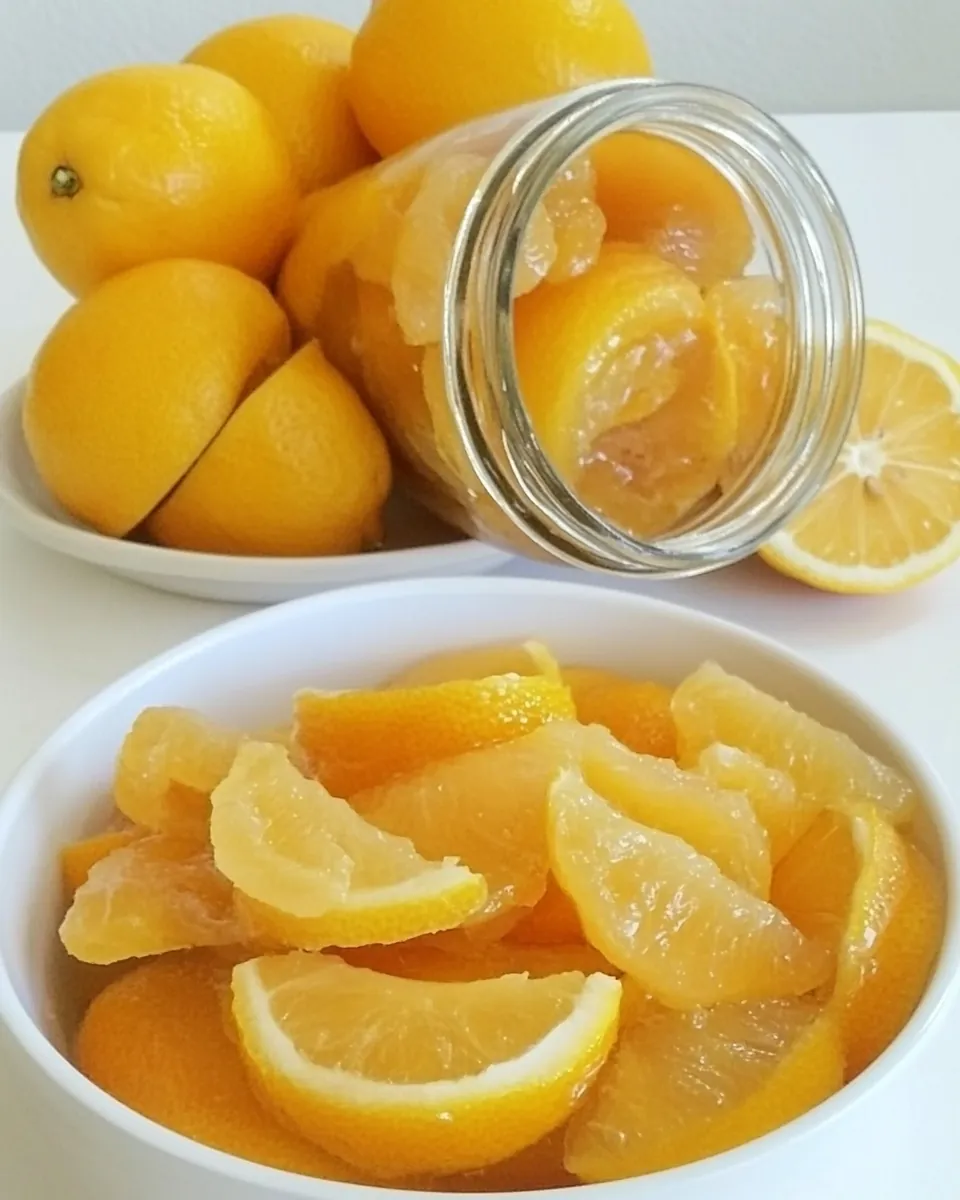
Preserved Lemons
Making Preserved Lemons has become a cherished ritual in my kitchen, marking the start of citrus season. The moment those bright, tangy lemons are transformed into a flavorful condiment, I know I’m onto something special. There’s something magical about the process of preserving; it not only intensifies the flavors but also breathes new life into simple dishes. I remember the first time I tasted preserved lemons in a Moroccan tagine—my taste buds danced with joy! They add a burst of acidity and a unique depth that elevates any meal.
Every time I prepare Preserved Lemons, I’m transported back to sun-soaked days spent in the garden with my grandmother, who taught me the art of preserving. We’d pick organic Meyer lemons, reveling in their aromatic oils. The simple act of quartering them and stuffing them with salt felt like a meditative practice. As the lemons sit and transform, I find myself eagerly anticipating the flavors that will soon grace my favorite dishes.
Whether you’re looking to brighten a salad, add a zesty kick to a savory stew, or even jazz up a dessert, Preserved Lemons are incredibly versatile. They’re a testament to the beauty of simplicity in cooking, turning ordinary meals into extraordinary culinary experiences. Plus, knowing that these little jars of sunshine can last for months in the fridge brings me peace of mind. It’s like bottling up summer!
Join me on this flavorful journey and let’s make Preserved Lemons together. You’ll discover how rewarding it is to preserve your own ingredients, and the best part? It’s surprisingly easy and requires just a few simple steps!
Recipe Snapshot
10 mins
10 mins
0 mins
Medium
5 kcal
0 g
Keto, Paleo, Whole30
0 g
Large Pot, Chef’s Knife
Why This Preserved Lemons Works
Flavors that Brighten Every Dish
There’s something enchanting about the vibrant flavor of Preserved Lemons. Their unique combination of tartness and saltiness adds a depth that is simply irresistible. The moment you bite into a slice, you’ll understand why they’re a staple in many cuisines.
Versatility in the Kitchen
These preserved beauties are incredibly versatile. Use them in salads, tagines, dressings, or even in desserts for an unexpected twist. Their ability to enhance both savory and sweet dishes makes them a must-have ingredient.
Health Benefits
Beyond their delicious flavor, Preserved Lemons offer health benefits too. They’re rich in vitamin C and antioxidants, which can help support your immune system. Plus, their unique properties can aid in digestion.
Simple to Make
The best part about Preserved Lemons is how straightforward the process is. With just a few ingredients and minimal time, you can create a flavorful addition that will last for months. It’s a fun and rewarding kitchen project that anyone can do!
Long Shelf Life
Once you’ve made your Preserved Lemons, they can be stored in the refrigerator for at least six months. This means that with just a little bit of effort now, you’ll have a delicious ingredient ready to enhance your meals later!
Embracing Sustainability
Preserving fruits like lemons is a wonderful way to embrace sustainability in your kitchen. You’re reducing waste and making the most out of seasonal produce. Plus, it’s a fantastic way to share homemade goodness with friends and family.
What’s In This Preserved Lemons

The ingredients for Preserved Lemons are simple yet impactful. Each ingredient plays a crucial role in preserving the lemons and enhancing their flavor. The star of the show, Meyer lemons, are sweeter and less acidic than regular lemons, making them perfect for this recipe. Adding sea salt not only helps in the preservation process but also draws out the natural juices of the lemons, creating a tangy brine. Boiling and cooling water ensures that the environment inside the jar remains sterile, allowing your preserved lemons to flourish. Together, these ingredients create a delightful condiment that will elevate your cooking.
- 3 Meyer lemons (or Eureka, Lisbon, etc.): Organic is recommended for the best flavor and quality. These lemons will be quartered and packed into jars, transforming into preserved delights.
- 5-6 teaspoons sea salt (or kosher salt): This key ingredient acts as a preservative and enhances the flavor of the lemons. Avoid regular table salt as it contains additives that can affect the color.
- An extra lemon for juicing: This will ensure there’s plenty of juice to cover the lemons in the jar, as the brine is essential for preservation.
- Water: Boiled and cooled, this will help fill the jar to the top, ensuring that every lemon is submerged in the salty brine.
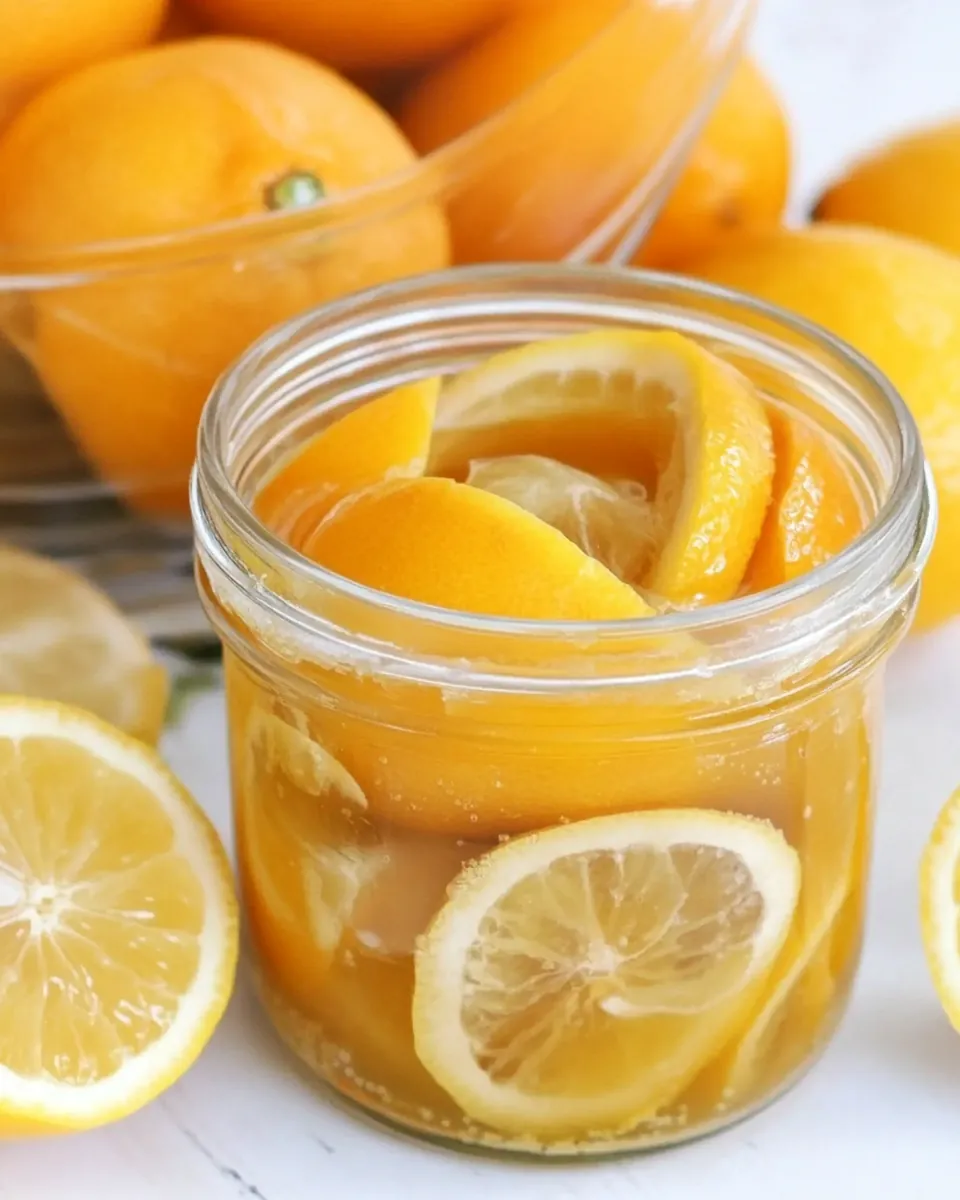
The Process for Making Preserved Lemons
The journey to creating Preserved Lemons is an enjoyable one that will fill your kitchen with sunny aromas. As we go through the steps, pay attention to the texture and colors of the lemons, focusing on their freshness and brightness. Your senses will guide you through this delightful process, ensuring every lemon is perfectly prepared.
- Begin by thoroughly washing the Meyer lemons. If you can’t find organic lemons, soak them in vinegar water for a few minutes, then rinse them well. This step is crucial for removing any pesticides or wax.
- Next, trim the nubs off both ends of each lemon. This will help the salt penetrate better while preserving the lemons. You should see the bright yellow flesh of the lemons, which signifies freshness.
- Quarter each lemon, slicing them down just over three-fourths of the way, ensuring the slices remain attached at the end. This will create pockets for the salt and lemon juice to infuse into the flesh.
- Take one teaspoon of sea salt and place it into the cavity of each lemon. This is where the magic begins as the salt draws out the juices and flavors.
- Now, place one teaspoon of salt at the bottom of a clean pint-sized jar. This will keep the first lemon elevated and ensure proper fermentation.
- Insert the first lemon into the jar, cut-side down, and press firmly to squish out some lemon juice. The juice will mix with the salt, creating a lovely brine.
- Add another teaspoon of salt on top of the first lemon. This layer of salt will continue to enhance the flavor of the lemons.
- Firmly press the second lemon down on top of the first one, repeating the process of squeezing out juice and adding salt. You’re building flavor and texture with each layer!
- Repeat with the third lemon, pressing down firmly and topping it with another teaspoon of salt. You should notice the jar starting to fill with lemon juice.
- Ensure the jar is at least halfway full with lemon juice. If necessary, squeeze additional juice from an extra lemon to bring it to the halfway point. Don’t waste that lemon—slice it and stuff the slices into the jar!
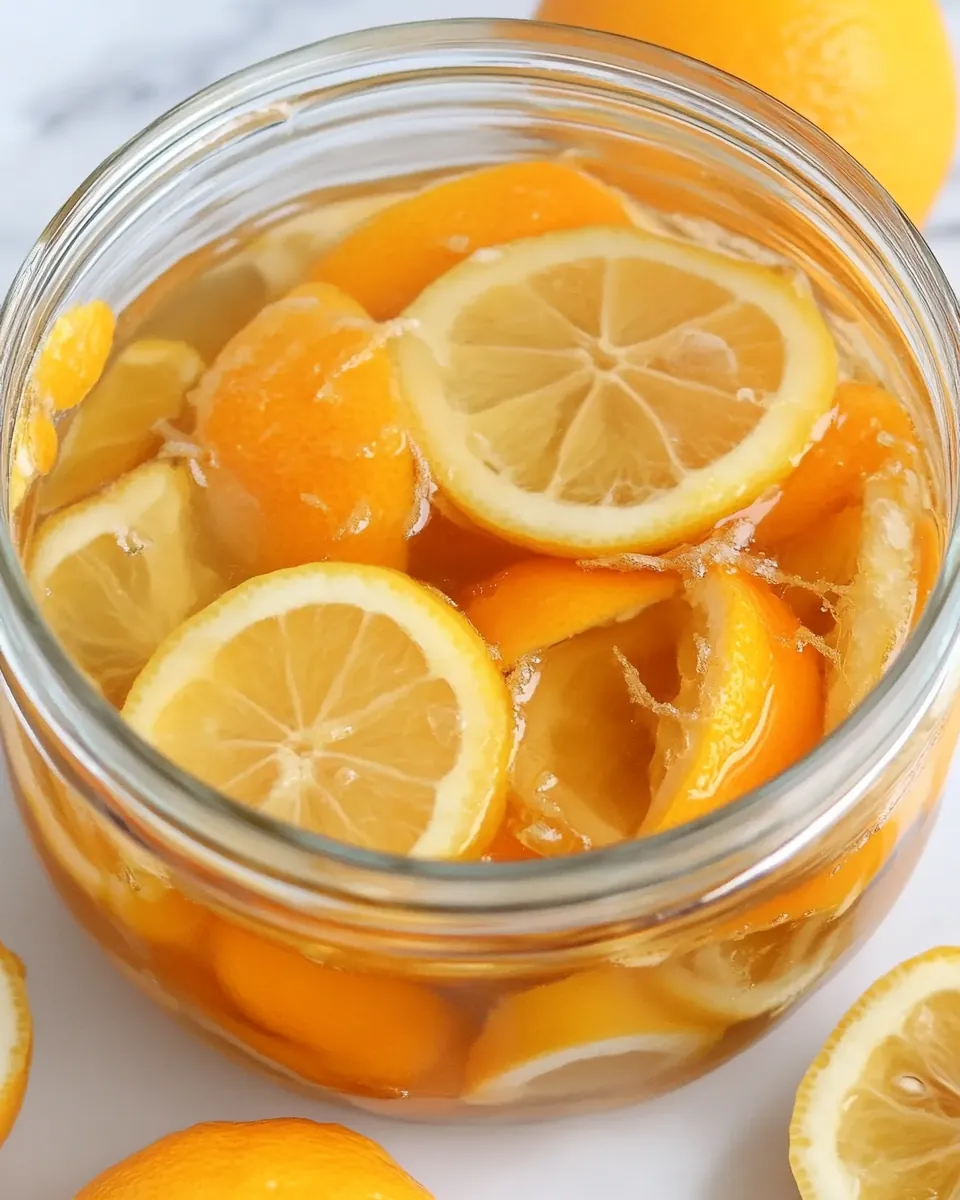
- Pour the boiled and cooled water into the jar to fill it to the top, ensuring all lemons are submerged. This step is vital to prevent spoilage.
- Screw the lid on tightly and place the jar at room temperature for three days. Remember to shake and rotate the jar upside-down and right-side up a few times daily to mix the salt and juices.
- After three days, transfer the jar to the refrigerator and let it sit for at least three weeks before using. The longer you wait, the more pronounced the flavor will be.
- Stored in the fridge, your Preserved Lemons will keep for at least six months, ready to enhance your meals whenever you desire!
Things Worth Knowing
- Storage: In most places, preserved lemons are kept in a cool, dark place, but they last longer in the fridge.
- Discard the pulp: When using preserved lemons, discard the pulp and wash the peel to remove excess salt.
- Using other citrus: Explore preserving other citrus fruits like limes, oranges, or grapefruits; the process is identical.
- Experiment with flavors: Feel free to add spices like bay leaves, cloves, or black peppercorns for an extra kick!
- Make in bulk: You can make multiple jars at once; they make fantastic gifts for friends and family.
How to Switch It Up
Even though Preserved Lemons are fantastic on their own, there are plenty of ways to switch things up and get creative with this recipe. Here are some fun ideas to inspire you.
- Storage: Keep your Preserved Lemons in the refrigerator for extended freshness. They can last up to six months if stored correctly.
- Freezing: Yes, you can freeze preserved lemons! Cut them into wedges and store them in an airtight container for later use.
- Pairing: Preserved Lemons pair beautifully with grains like quinoa or couscous, adding a zesty element to your dishes.
- Flavor variations: Try adding herbs like thyme or rosemary to the jar for a unique twist on the classic flavor.
- Experiment: Use preserved lemons in salad dressings, marinades, or dips for an unexpected punch of flavor.
Great Combinations for Preserved Lemons
When it comes to serving Preserved Lemons, the options are truly endless! Here are some delightful combinations and serving suggestions to elevate your meals.
- With grilled meats: Preserved Lemons add a bright acidity when served alongside grilled chicken or fish, enhancing the overall flavor profile.
- In salads: Toss them into green salads or grain salads to add a zesty kick. They pair wonderfully with greens and nuts.
- On sandwiches: Add slices of preserved lemon to sandwiches or wraps for a burst of flavor that will surprise your taste buds.
- In Mediterranean dishes: Incorporate them into Middle-Eastern recipes like tagines, stews, or grain bowls for a true taste of the Mediterranean.
- As a garnish: Use them as a garnish for soups or stews, giving your dishes a vibrant pop of color and flavor.
- Cooking sauces: Blend or chop preserved lemons into sauces for fish or chicken, creating a deliciously complex layer of flavor.
- Sharing with friends: A jar of homemade Preserved Lemons makes a wonderful gift. Share the love of cooking and preserving!
FAQ
Conclusion
The process of making Preserved Lemons is not only easy but incredibly rewarding. Filled with bright, zesty flavors, they can elevate any dish and bring a taste of the Mediterranean into your kitchen. I encourage you to give this recipe a try and experience the joy of preserving your own ingredients. Trust me, once you taste the difference, you’ll never want to go back to store-bought versions. Enjoy the journey and the delicious results that come with it!
Preserved Lemons
Ingredients
Equipment
Method
- Thoroughly wash the Meyer lemons. If you can’t find organic lemons, soak them in vinegar water for a few minutes, then rinse them well.
- Trim the nubs off both ends of each lemon. This will help the salt penetrate better while preserving the lemons.
- Quarter each lemon, slicing them down just over three-fourths of the way, ensuring the slices remain attached at the end.
- Take one teaspoon of sea salt and place it into the cavity of each lemon.
- Place one teaspoon of salt at the bottom of a clean pint-sized jar.
- Insert the first lemon into the jar, cut-side down, and press firmly to squish out some lemon juice.
- Add another teaspoon of salt on top of the first lemon.
- Firmly press the second lemon down on top of the first one, repeating the process of squeezing out juice and adding salt.
- Repeat with the third lemon, pressing down firmly and topping it with another teaspoon of salt.
- Ensure the jar is at least halfway full with lemon juice.
- Pour the boiled and cooled water into the jar to fill it to the top.
- Screw the lid on tightly and place the jar at room temperature for three days.
- After three days, transfer the jar to the refrigerator and let it sit for at least three weeks before using.
- Stored in the fridge, your Preserved Lemons will keep for at least six months.
Notes
- Tip 1: In most countries, preserved lemons are not stored in the refrigerator; they’re simply kept in a cool, dark place.
- Tip 2: Whatever dish you use them in, discard the pulp and wash the peel to remove excess salt.
- Tip 3: You can also make preserved limes, oranges, grapefruit, and kumquats!