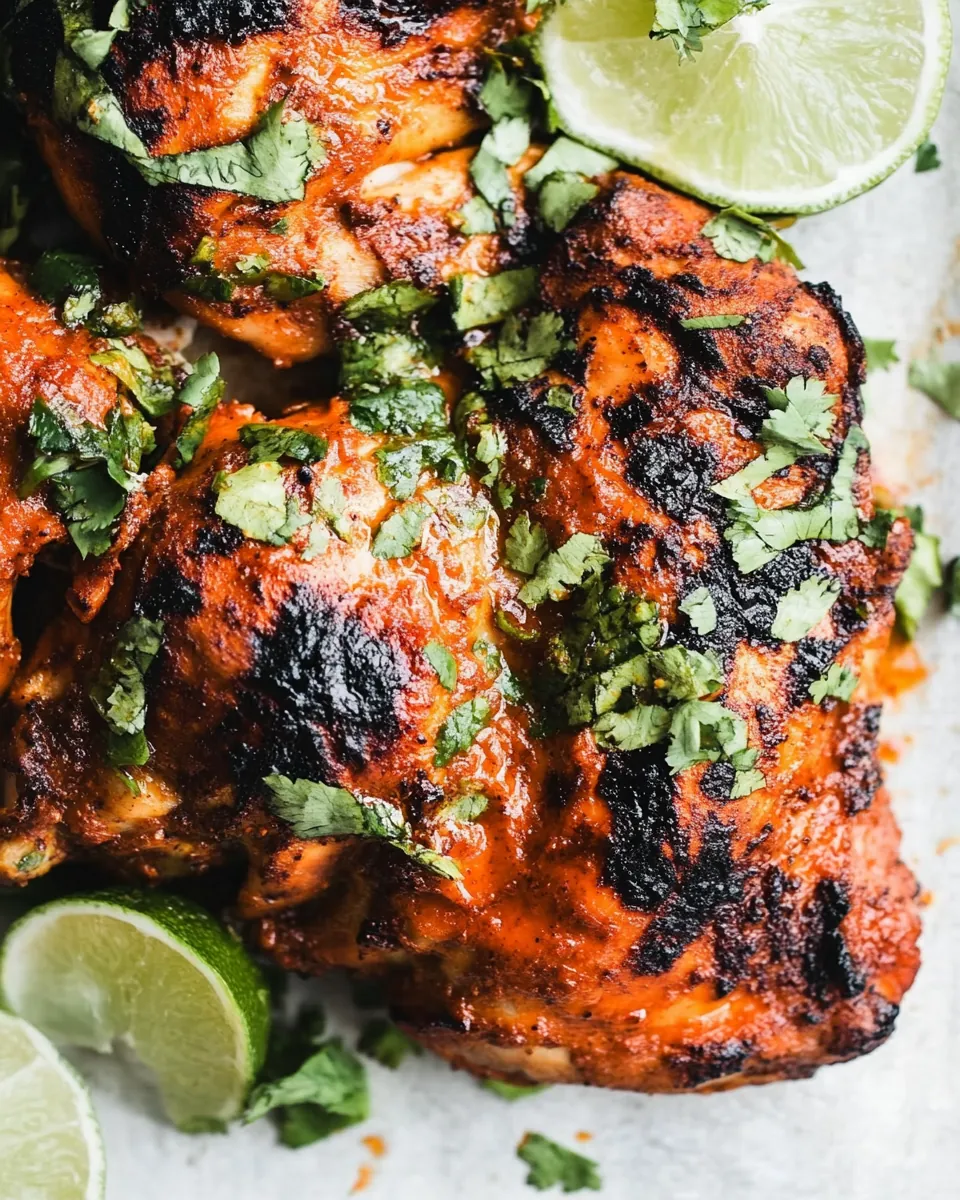
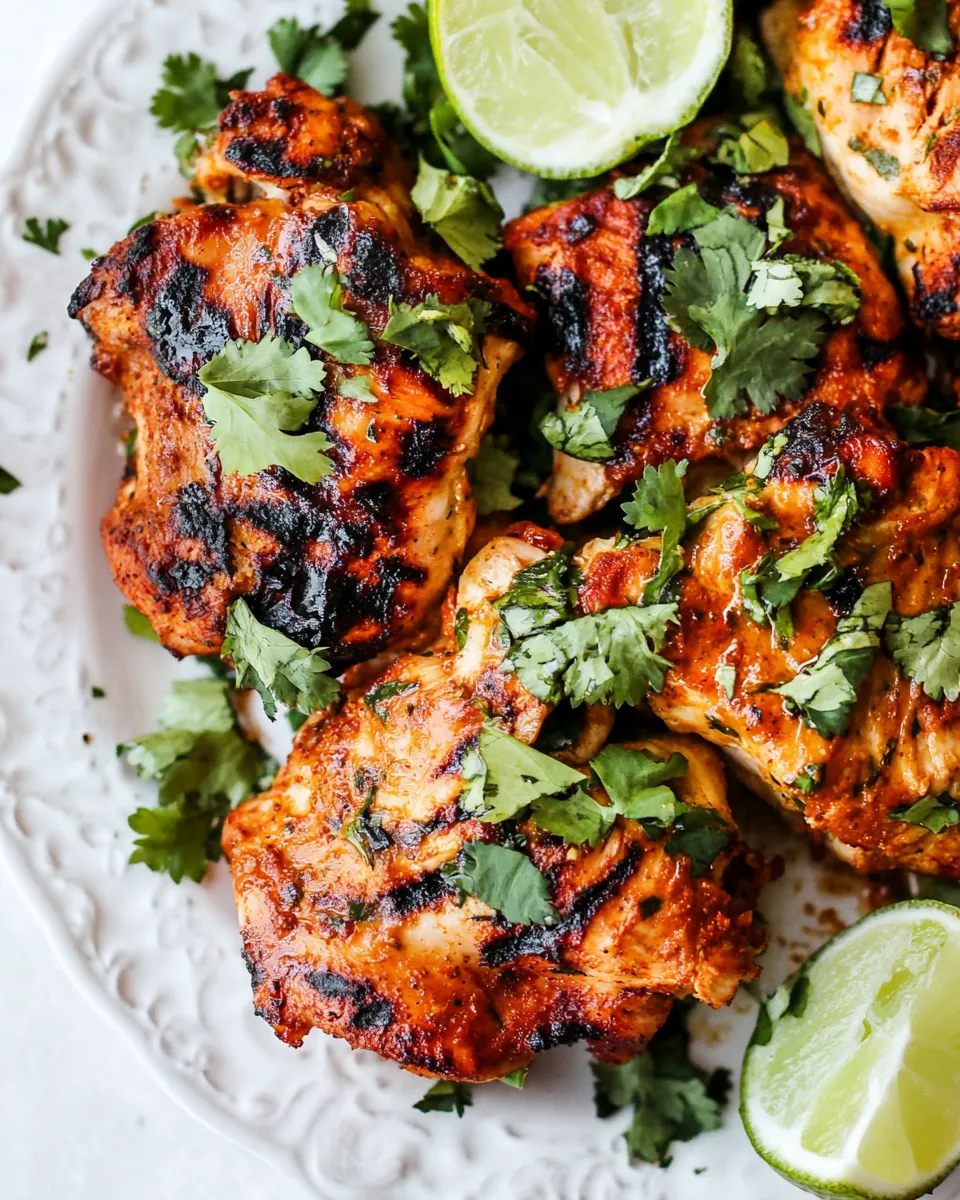
Peruvian Chicken
I’ve always had a fondness for flavors that transport me to different corners of the world, and Peruvian Chicken does just that. The first time I had this dish, it was at a small Peruvian restaurant where the aroma of spices filled the air, pulling me in like a warm embrace. The moment I took my first bite, I was captivated by the unique combination of tangy lime, zesty garlic, and smoky spices that danced on my palate. It’s a dish that feels like a celebration, one that brings together family and friends, and it never fails to impress. Whether it’s a cozy weeknight dinner or a gathering of loved ones, Peruvian Chicken has become a staple in my kitchen, and I can’t wait to share it with you!
Recipe Snapshot
45 mins
15 mins
30 mins
Medium
450 kcal
38 g
Keto, Whole30, Gluten-Free
30 g
Chef’s Knife, Blender, Oven, Mixing Bowl, Frying Pan, Baking Sheet, Food Processor
Why This Peruvian Chicken Is So Good
Rich Cultural Heritage
Peruvian Chicken is more than just a meal; it’s a cultural experience. Its roots trace back to the vibrant culinary traditions of Peru, which blend indigenous ingredients with Spanish influences. This dish encapsulates the spirit of Peru, showcasing the country’s rich history and diverse flavors.
Flavorful Marination
The secret to the deliciousness of Peruvian Chicken lies in its marinade. Combining ingredients like lime juice, garlic, and spices creates a flavor profile that penetrates the meat, making it juicy and tender. The marinating process can take hours, but it’s well worth the wait, as it allows the flavors to deepen and intensify.
Healthier Option
This dish is not only mouth-watering but also offers a healthier alternative to traditional fried chicken. By baking the chicken instead, you retain all the flavors while keeping it lighter. Pair it with fresh vegetables or a side salad, and you have a wholesome meal that doesn’t skimp on taste!
Versatile Pairings
Peruvian Chicken is incredibly versatile. It pairs beautifully with a variety of side dishes, from zesty rice to roasted vegetables. You can even serve it with a simple green salad for a light meal or alongside some homemade tortillas for a more traditional feast.
Perfect for Any Occasion
Whether it’s a casual family dinner, a potluck, or a festive gathering, this dish fits right in. Its vibrant colors and enticing aroma make it a centerpiece at the table, inviting everyone to dig in and enjoy. Sharing Peruvian Chicken with others is a joyous experience that brings people together.
Simple Yet Impressive
One of the best things about Peruvian Chicken is how simple it is to make yet how impressive it looks and tastes. With minimal ingredients and straightforward steps, you can create a restaurant-quality dish that will leave your guests raving. It’s a true crowd-pleaser!
What You Need for Peruvian Chicken
When it comes to crafting the perfect Peruvian Chicken, the ingredients play a crucial role in creating that signature flavor. Each component is thoughtfully selected, working together to create a harmonious blend of tastes. The marinade is the hero, bringing together key players like olive oil, lime juice, and a medley of spices that truly embody the essence of Peru.
- ¼ cup extra-virgin olive oil: This adds richness and depth, serving as the base of the marinade.
- 2 tablespoons lime juice: Freshly squeezed for a bright, tangy flavor that cuts through the richness of the chicken.
- 6 garlic cloves, roughly chopped: Infuses the dish with a robust aroma and flavor.
- 1 tablespoon kosher salt, divided: Essential for seasoning and enhancing all other flavors.
- ½ teaspoon ground black pepper: Adds a mild heat and balances the flavors.
- 2 teaspoons ground cumin: A warm spice that brings earthiness and depth.
- ½ teaspoon chili powder: Provides a touch of warmth and a hint of smokiness.
- 2 teaspoons paprika: Adds vibrant color and a mild sweetness.
- 1 teaspoon dried oregano: A fragrant herb that complements the other spices.
- 1 ½ teaspoons sriracha or Sambal: For those who love a bit of heat!
- 1 tablespoon white vinegar: Brightens the marinade and adds a little acidity.
- ½ teaspoon honey: Balances the acidity with a touch of sweetness.
- 4 pounds bone-in, skin-on chicken thighs and breasts: The main event, providing juicy and flavorful meat.
- 3 roughly chopped jalapeño peppers: These bring a fresh, spicy kick to the green sauce.
- 1 cup packed cilantro: Adds a refreshing herbaceous note to the dish.
- 2 cloves garlic, roughly chopped: Extra flavor for the green sauce.
- ¼ cup whole milk plain Greek yogurt: Creamy base for the sauce; can substitute with mayo for a dairy-free version.
- ¼ cup extra-virgin olive oil: Adds richness to the green sauce.
- 2 tablespoons lime juice: Enhances the freshness of the sauce.
- 1 teaspoon white vinegar: Adds acidity to balance the flavors.
- 1 ½ teaspoons kosher salt: For seasoning the green sauce.
- 1 teaspoon honey: A touch of sweetness for balance.
How to Prepare Peruvian Chicken

Now that you’ve gathered all your ingredients, let’s dive into the preparation of Peruvian Chicken. Follow these steps for a dish that’s bursting with flavor! Get ready for a culinary adventure that will have your kitchen smelling heavenly.
- Start by preparing the marinade. In a mini food processor or high-speed blender, combine the olive oil, lime juice, garlic, 1 ½ teaspoons of salt, ¼ teaspoon of black pepper, cumin, chili powder, paprika, oregano, honey, sriracha, and white vinegar. Blend until the mixture is mostly smooth.
- While the marinade is blending, take your chicken pieces and pat them dry with paper towels. This step is crucial as it helps the marinade adhere better and ensures crispy skin.
- If you’re using a whole chicken breast, feel free to split it in half; this helps it cook more evenly. Sprinkle the chicken on all sides with the remaining 1 ½ teaspoons of salt and ¼ teaspoon of black pepper.
- Gently loosen the skin of the chicken using your fingers or a spoon. Spread about half of the marinade underneath the skin, ensuring each piece is generously coated.
- Next, place the chicken and any remaining marinade into a zip-top bag or a large bowl. Mix well to fully coat the chicken and cover it. Allow it to marinate in the refrigerator for at least 4 hours, or if you can, up to 8 hours for maximum flavor.
- While the chicken marinates, prepare the green sauce. In a blender, add the jalapeño and cilantro. Blend in long pulses until finely chopped.
- Then, throw in the remaining sauce ingredients: garlic, yogurt, olive oil, lime juice, vinegar, salt, and honey. Blend for about 2 minutes until the mixture is smooth. Cover and refrigerate until you’re ready to serve.
- When you’re ready to cook the chicken, adjust your oven racks to the upper third and center positions. Preheat your oven to 425°F (220°C) and let the chicken come to room temperature for about 15 minutes.
- Using tongs, remove the chicken from the marinade and place it skin side up on a rimmed baking sheet. Discard any excess marinade remaining in the bag or bowl.
- Bake the chicken on the center rack for 15 minutes, then reduce the oven temperature to 375°F (190°C) and continue baking for another 15 minutes. Use an instant-read thermometer to ensure the chicken reaches an internal temperature of 160°F (71°C) to 165°F (74°C).
- If some pieces finish cooking early, transfer them to a plate and tent with foil while the others finish baking.
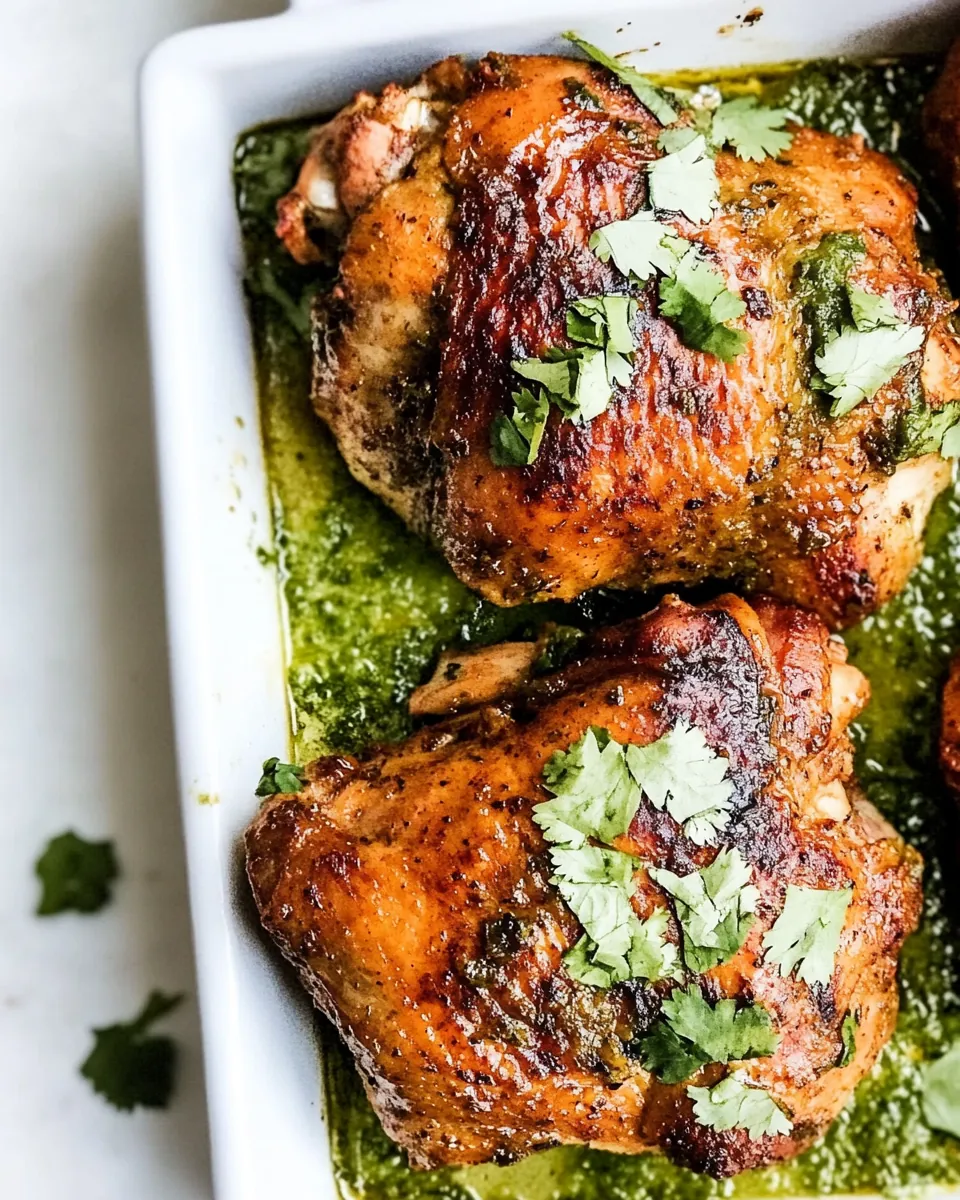
- Finally, turn the oven to broil. Return any chicken you removed early to the pan. Broil for 1 to 2 minutes until the skin becomes golden and crispy. Keep a close eye on it to prevent burning.
- Once done, remove the pan from the oven and let the chicken rest for about 10 minutes before serving. Pair it with the green sauce for an explosion of flavor!
Things Worth Knowing
- Marinating Time: Allowing the chicken to marinate for several hours enhances the flavor significantly. The longer, the better!
- Oven Temperature: Make sure your oven is fully preheated before adding the chicken to ensure even cooking and that crispy skin.
- Resting Time: Letting the chicken rest after cooking helps retain its juices, keeping it moist and tender.
- Spice Levels: Adjust the amount of jalapeño and sriracha based on your heat preference. Remember, fresh ingredients can vary in spiciness!
Recipe Variations about Peruvian Chicken
There’s so much room for creativity when it comes to Peruvian Chicken. Here are some variations and tips to inspire your culinary adventures!
- Grilled Version: For a smoky flavor, try grilling the marinated chicken instead of baking. The char will add an extra layer of deliciousness.
- Spicy Twist: If you love heat, consider adding more jalapeño or even some crushed red pepper flakes to the marinade for an extra kick.
- Cilantro-Lime Rice: Serve your Peruvian Chicken with a side of cilantro-lime rice to complement the flavors beautifully.
- Vegetable Additions: Feel free to toss some seasonal vegetables, like bell peppers and zucchini, on the baking sheet with the chicken for a complete meal.
- Storage: Leftover chicken can be kept in an airtight container for up to 3 days in the fridge. It’s great for meal prep!
- Freezing: If you want to keep it longer, freeze the cooked chicken for up to 3 months, and reheat it when you’re ready to enjoy.
- Pairing: Peruvian Chicken goes incredibly well with a side of roasted potatoes or a fresh green salad. It’s all about balance!
Perfect Pairings for Peruvian Chicken
- Traditional Sides: Serve your Peruvian Chicken with classic sides like rice and beans, which complement the dish wonderfully.
- Fresh Salads: A simple green salad with a zesty vinaigrette pairs perfectly, cutting through the richness of the chicken.
- Weekend Gatherings: This dish is ideal for gatherings, be it a weekend barbecue or a family dinner. It’s sure to be a hit!
- Seasonal Veggies: Roasted seasonal vegetables, such as asparagus or carrots, make for a beautiful presentation alongside the chicken.
- Leftover Magic: The leftovers are just as delicious! Use them in a wrap or salad for easy lunches throughout the week.
- Storage Tips: Store any leftover chicken in sealed containers in the fridge and enjoy within 3 days for the best taste.
- Freezing Recommendations: For longer storage, freeze portions of chicken in airtight containers. Thaw overnight in the fridge before reheating.
FAQ
Conclusion
The beauty of Peruvian Chicken lies in its bold flavors and the joy it brings to the table. It’s a dish that not only satisfies hunger but also creates memories with loved ones. I encourage you to try making it at home; it’s simpler than you might think, and the results are absolutely rewarding. So gather your ingredients, unleash your inner chef, and enjoy this delightful culinary journey!
Peruvian Chicken
Ingredients
Equipment
Method
- 1. Start by preparing the marinade. In a mini food processor or high-speed blender, combine the olive oil, lime juice, garlic, 1 ½ teaspoons of salt, ¼ teaspoon of black pepper, cumin, chili powder, paprika, oregano, honey, sriracha, and white vinegar. Blend until the mixture is mostly smooth.
- 2. While the marinade is blending, take your chicken pieces and pat them dry with paper towels. This step is crucial as it helps the marinade adhere better and ensures crispy skin.
- 3. If you’re using a whole chicken breast, feel free to split it in half; this helps it cook more evenly. Sprinkle the chicken on all sides with the remaining 1 ½ teaspoons of salt and ¼ teaspoon of black pepper.
- 4. Gently loosen the skin of the chicken using your fingers or a spoon. Spread about half of the marinade underneath the skin, ensuring each piece is generously coated.
- 5. Next, place the chicken and any remaining marinade into a zip-top bag or a large bowl. Mix well to fully coat the chicken and cover it. Allow it to marinate in the refrigerator for at least 4 hours, or if you can, up to 8 hours for maximum flavor.
- 6. While the chicken marinates, prepare the green sauce. In a blender, add the jalapeño and cilantro. Blend in long pulses until finely chopped.
- 7. Then, throw in the remaining sauce ingredients: garlic, yogurt, olive oil, lime juice, vinegar, salt, and honey. Blend for about 2 minutes until the mixture is smooth. Cover and refrigerate until you’re ready to serve.
- 8. When you’re ready to cook the chicken, adjust your oven racks to the upper third and center positions. Preheat your oven to 425°F (220°C) and let the chicken come to room temperature for about 15 minutes.
- 9. Using tongs, remove the chicken from the marinade and place it skin side up on a rimmed baking sheet. Discard any excess marinade remaining in the bag or bowl.
- 10. Bake the chicken on the center rack for 15 minutes, then reduce the oven temperature to 375°F (190°C) and continue baking for another 15 minutes. Use an instant-read thermometer to ensure the chicken reaches an internal temperature of 160°F (71°C) to 165°F (74°C).
- 11. If some pieces finish cooking early, transfer them to a plate and tent with foil while the others finish baking.
- 12. Finally, turn the oven to broil. Return any chicken you removed early to the pan. Broil for 1 to 2 minutes until the skin becomes golden and crispy. Keep a close eye on it to prevent burning.
- 13. Once done, remove the pan from the oven and let the chicken rest for about 10 minutes before serving. Pair it with the green sauce for an explosion of flavor!
Notes
- Authentic Peruvian Chicken: Use the same amounts of aji panca paste in place of the chili powder and aji amarillo paste in place of the sriracha.
- Split Chicken Breast: If your split chicken breasts are HUGE compared to the thighs, you can cut them in half crosswise down through the bone into 2 smaller pieces so all of the chicken cooks in roughly the same amount of time.
- Jalapeños and Spiciness Level: Wear gloves or wash your hands immediately after handling jalapeños, being careful not to touch your eyes too! Adjusting the sauce spice level: For max spicy, keep the seeds of 1 jalapeño; for medium spicy, keep the seeds of 1/2 jalapeño. For the least spice, omit the seeds entirely.
- TO STORE: Refrigerate leftover chicken and sauce separately in airtight storage containers for up to 3 days.
- TO REHEAT: Rewarm chicken on a baking sheet in the oven at 350°F or in the microwave.
- TO FREEZE: Freeze chicken in an airtight, freezer-safe storage container for up to 3 months. Let thaw overnight in the refrigerator before reheating.