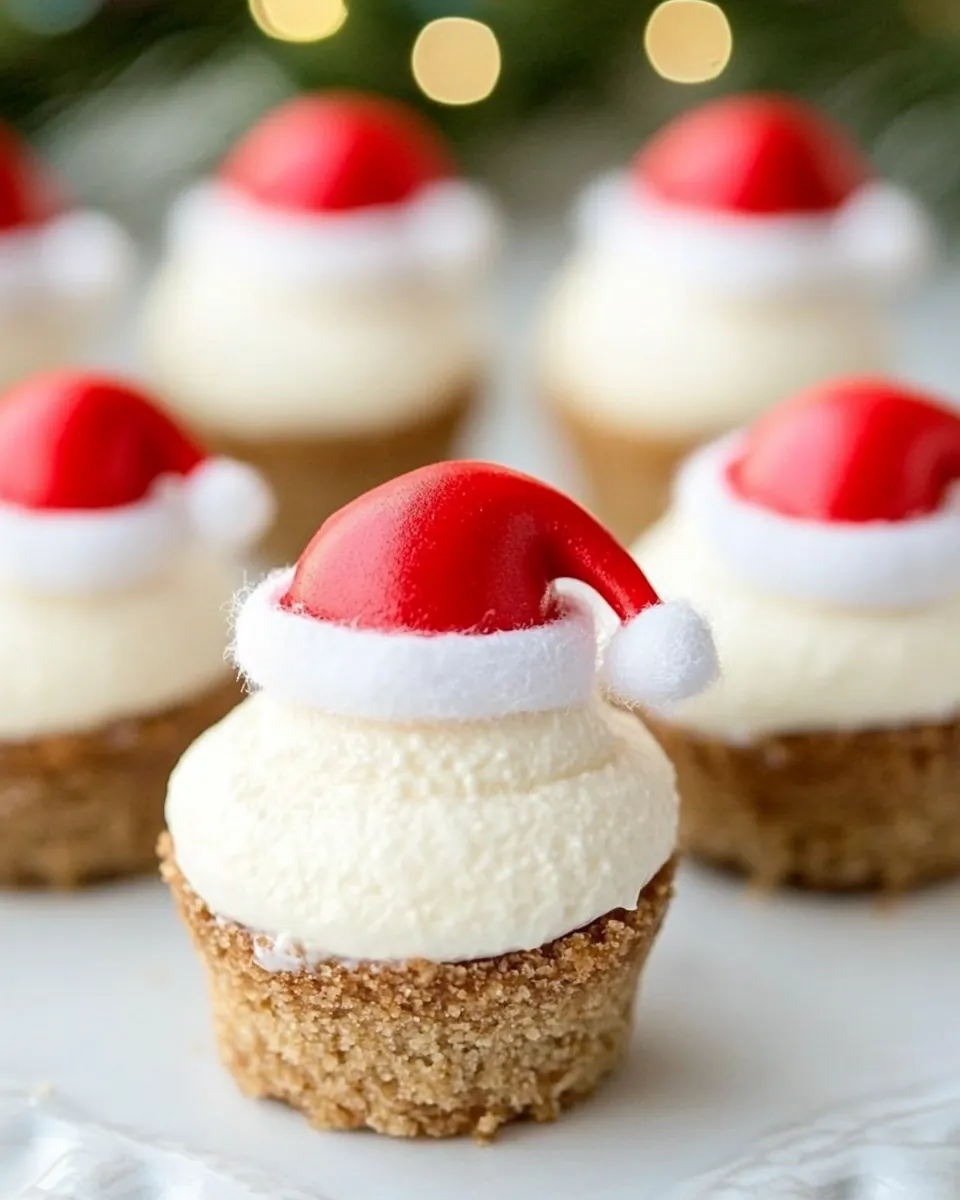
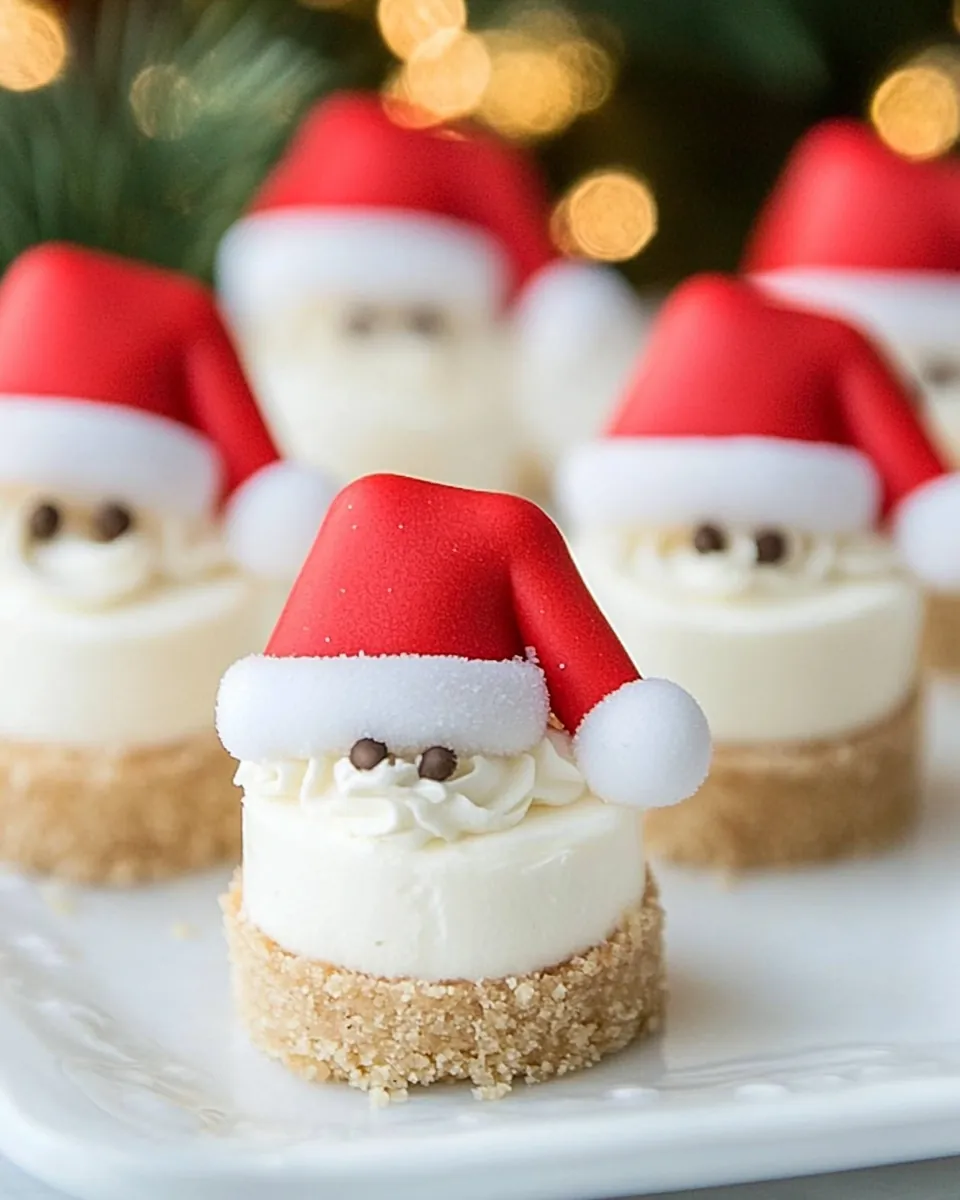
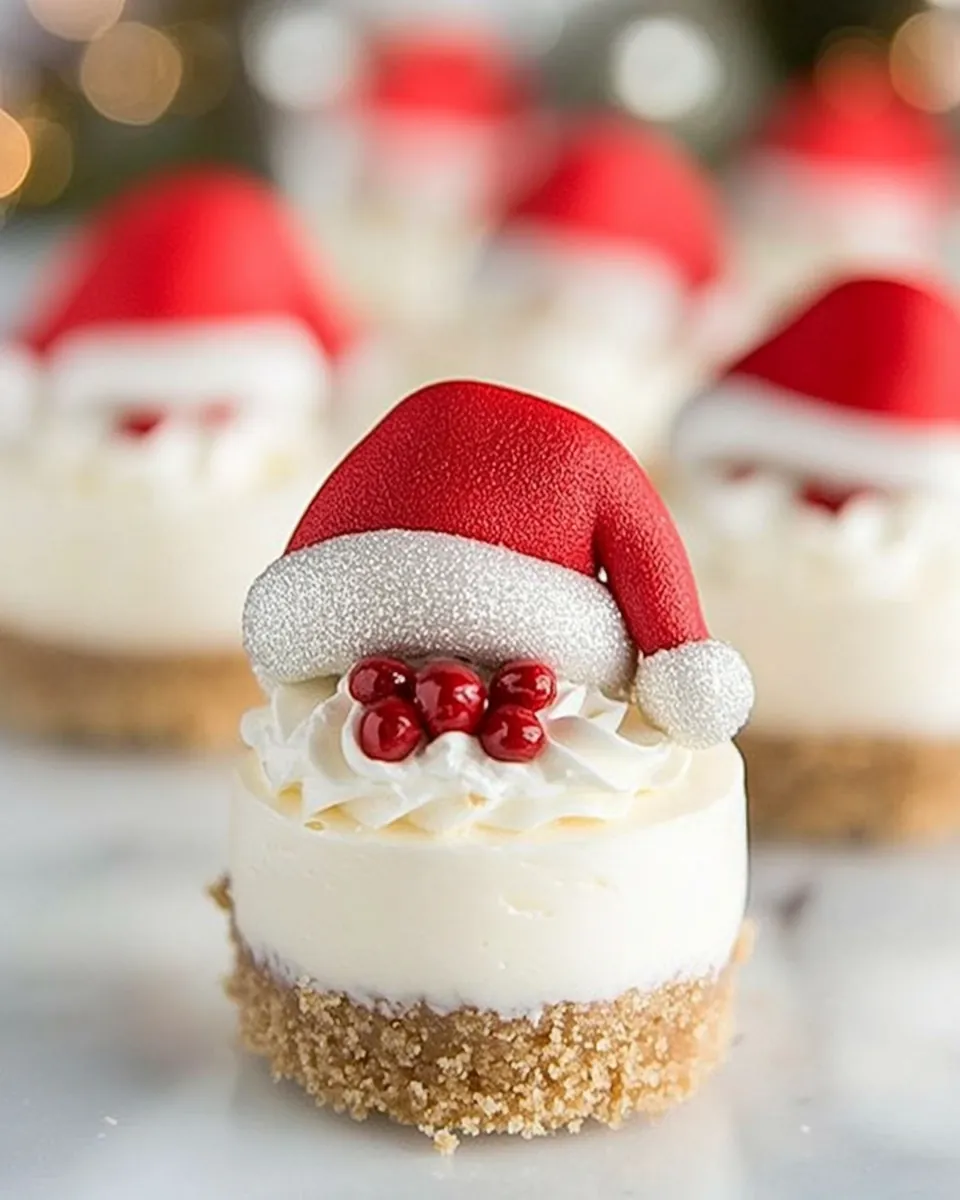
Mini No Bake Santa Cheesecakes
Every year, as the holiday season approaches, I find myself craving something festive yet delightful. That’s when I decided to whip up these Mini No Bake Santa Cheesecakes. They are not just desserts; they are little bites of joy that bring the spirit of Christmas right to your table. Picture this: a gathering with family, laughter filling the air, and you serve these adorable cheesecakes that look just like Santa himself. The excitement on everyone’s faces, especially the kids, is priceless. These tasty treats are perfect for holiday parties, and they require no baking, making them incredibly simple to prepare. I remember the first time I made them; my niece helped decorate them, and we had such a blast. The combination of creamy filling, sweet strawberries, and a crunchy base is truly magical.
Recipe Snapshot
15 mins
15 mins
0 mins
Medium
180 kcal
2 g
Keto, Gluten-Free, Low FODMAP
9 g
Food Processor, Frying Pan, Blender, Mixing Bowl, Chef’s Knife
What’s Great About This Mini No Bake Santa Cheesecakes
They’re Adorably Festive
One of the best things about Mini No Bake Santa Cheesecakes is their festive look. Each mini cheesecake resembles Santa’s hat, making them perfect for holiday gatherings. When you present these to your guests, they’ll not only be impressed by your creativity but also excited to dig in. It’s a fantastic way to bring a smile to everyone’s face during the festive season.
No Baking Required!
If you’re like me and sometimes dread the thought of turning on the oven during the busy holiday season, you’ll appreciate how easy this recipe is. With no baking involved, you can assemble them quickly and enjoy the extra time celebrating with your loved ones. Just mix, assemble, and chill!
Perfect for Kids
Making these Mini No Bake Santa Cheesecakes is a wonderful activity to do with kids. They love helping out in the kitchen, and they’ll enjoy the task of topping the cheesecakes with strawberries to create Santa’s hat. It’s a great way to bond and create memories while getting into the holiday spirit.
Versatile and Adaptable
This recipe can easily be adapted to suit different tastes. Try swapping the filling ingredients or the crust for something new. Whether you prefer a chocolate crust or a different fruit on top, the possibilities are endless. You can even experiment with different flavored cheesecakes to surprise your guests!
A Great Make-Ahead Dessert
Another reason to love these Mini No Bake Santa Cheesecakes is that they can be made in advance. Prepare them a day ahead of your gathering, and let them chill in the refrigerator. This way, you can focus on other dishes or enjoy your time with guests without the stress of last-minute preparations.
Impressive Presentation
These little cheesecakes not only taste great but also look stunning on any dessert table. Their vibrant colors and festive theme make them stand out. Your friends and family will be impressed with your charming presentation, and they won’t believe how easy they were to make!
Ingredients for Mini No Bake Santa Cheesecakes
To create these delightful Mini No Bake Santa Cheesecakes, we rely on a few key ingredients that complement each other perfectly. The combination of creamy cream cheese and Greek yogurt gives the filling a rich, smooth texture, while the Teddy Graham crackers create a delightful crunch. Fresh strawberries not only add a pop of color but also provide a fruity sweetness that balances the creamy filling.
- 1 cup Teddy Graham crackers (chocolate) – These sweet, crunchy cookies form the base of our cheesecakes, giving them a delightful texture and flavor.
- 3 tablespoons coconut oil – Used to bind the crust, coconut oil adds a subtle coconut flavor while providing a smooth consistency.
- 8 ounces cream cheese (low fat) – The star ingredient for our filling, cream cheese makes it creamy and decadent.
- 1/2 container (4 oz) Greek Yogurt – This adds a tangy flavor and lightens the filling, making it feel less heavy.
- 1 1/2 tablespoons honey – A natural sweetener that enhances the flavor of the filling beautifully.
- 1/2 tablespoon lemon juice – Adds a touch of acidity to brighten up the flavors.
- 1 teaspoon vanilla extract – A must-have for flavor, it complements the sweetness perfectly.
- 1 dash salt – Just a pinch enhances all the flavors in the filling.
- 24 medium strawberries (1-1/4 inches diameter) – These will serve as the adorable Santa hats on top of each cheesecake.
How to Cook Mini No Bake Santa Cheesecakes
Making these Mini No Bake Santa Cheesecakes is an enjoyable and straightforward process. You’ll love how quickly they come together, and the result is absolutely charming. Follow these simple steps for a festive treat your family will adore.
- Start by finely crushing the Teddy Graham crackers in a blender or food processor until they resemble fine crumbs. You want them to be small enough to mix easily with the other ingredients.
- Next, melt the coconut oil in the microwave or on the stove, and then combine it with the crushed Teddy Graham crackers. Mix until the crumbs are well coated and resemble wet sand.
- Grease a mini cupcake pan to ensure easy removal later. Spoon a heaping teaspoon of the crust mixture into each well, pressing it down firmly with your fingers or the back of a spoon. It’s crucial to create an even layer for the base of your cheesecakes.
- Once you’ve filled the cupcake pan, place it into the freezer for about 10 to 15 minutes to let the crust firm up while you prepare the filling.
- In a large bowl, combine the softened cream cheese, Greek yogurt, honey, lemon juice, vanilla extract, and a dash of salt. Use an electric mixer to blend until smooth and creamy. Scrape down the sides of the bowl to ensure everything is well mixed.
- Once the filling is ready, take the crust out of the freezer. Spoon about 1 tablespoon of the filling into each well of the mini cupcake pan. Smooth the tops with the back of a spoon or a small spatula to make them nicely even.
- If you choose to make Santa’s hat tops, use any extra filling you have left. You can roll little balls and set them aside, or you can prepare whipped cream for topping.
- Carefully place the mini cupcake pan back into the freezer and chill the cheesecakes for at least 15 minutes until they are firm enough to pop out.
- When you’re ready to serve, gently use a butter knife to pop the cheesecakes out of the pan. They should come out easily if you greased the pan well.
- To finish, take your strawberries and chop off the stems. Place one on top of each cheesecake to mimic Santa’s hat. If you prepared small balls of extra filling or whipped cream, place those on top as well.
Things Worth Knowing
- Crust Texture: Ensure the crust is well-pressed down; this helps hold everything together when you pop them out of the pan.
- Filling Consistency: Blend the filling until it’s completely smooth for the best texture. A few lumps can affect the creamy experience.
- Chilling Time: Don’t skip the chilling step; it’s essential for the filling to set correctly.
- Ingredient Quality: Using fresh ingredients will enhance the overall flavor, especially with the strawberries.
Pro Tips and Tweaks
To ensure your Mini No Bake Santa Cheesecakes turn out perfectly every time, here are some helpful tips and tweaks you might consider. These pointers will help you make the most of your festive dessert.
- Storage: Keep any leftovers in an airtight container in the fridge. They’re best enjoyed within three days for optimal freshness.
- Freezing: You can freeze these mini cheesecakes for up to a month. Just make sure they are well-wrapped to prevent freezer burn.
- Pairing: Serve with a dusting of cocoa or alongside a scoop of vanilla ice cream for added indulgence.
- Variations: Feel free to swap out the strawberries for other fruits like raspberries or blueberries for a different flavor profile.
- Extra Toppings: Try adding crushed nuts or sprinkles on top for added texture and flavor.
Serving Suggestions
These Mini No Bake Santa Cheesecakes are perfect for a variety of festive occasions. They can brighten up any dessert table with their charming look and delicious flavor. Here are some serving suggestions:
- Holiday Parties: These mini cheesecakes are a great addition to your holiday party spread. Their cute appearance will surely impress your guests.
- Family Gatherings: Serve them during family get-togethers, where everyone can enjoy their festive flair.
- Office Celebrations: They make for an excellent treat to share with coworkers during the holiday season.
- Seasonal Dinners: Pair these cheesecakes with your holiday meals as a sweet ending.
- Gift Giving: Consider packaging them in festive boxes to gift to friends and family as a homemade treat.
- Storage Tips: If you have leftovers, simply store them in the refrigerator, and they’ll be ready to enjoy later!
FAQ
Conclusion
The Mini No Bake Santa Cheesecakes are not just a treat; they are a delightful way to celebrate the holiday season. Their charming appearance and delightful taste make them an instant favorite at any gathering. I encourage you to give this recipe a try; you won’t be disappointed! It’s a fun, festive dessert that brings joy and sweetness to your table.

Mini No Bake Santa Cheesecakes
Ingredients
Equipment
Method
- Start by finely crushing the Teddy Graham crackers in a blender or food processor until they resemble fine crumbs. You want them to be small enough to mix easily with the other ingredients.
- Next, melt the coconut oil in the microwave or on the stove, and then combine it with the crushed Teddy Graham crackers. Mix until the crumbs are well coated and resemble wet sand.
- Grease a mini cupcake pan to ensure easy removal later. Spoon a heaping teaspoon of the crust mixture into each well, pressing it down firmly with your fingers or the back of a spoon. It’s crucial to create an even layer for the base of your cheesecakes.
- Once you’ve filled the cupcake pan, place it into the freezer for about 10 to 15 minutes to let the crust firm up while you prepare the filling.
- In a large bowl, combine the softened cream cheese, Greek yogurt, honey, lemon juice, vanilla extract, and a dash of salt. Use an electric mixer to blend until smooth and creamy. Scrape down the sides of the bowl to ensure everything is well mixed.
- Once the filling is ready, take the crust out of the freezer. Spoon about 1 tablespoon of the filling into each well of the mini cupcake pan. Smooth the tops with the back of a spoon or a small spatula to make them nicely even.
- If you choose to make Santa's hat tops, use any extra filling you have left. You can roll little balls and set them aside, or you can prepare whipped cream for topping.
- Carefully place the mini cupcake pan back into the freezer and chill the cheesecakes for at least 15 minutes until they are firm enough to pop out.
- When you’re ready to serve, gently use a butter knife to pop the cheesecakes out of the pan. They should come out easily if you greased the pan well.
- To finish, take your strawberries and chop off the stems. Place one on top of each cheesecake to mimic Santa’s hat. If you prepared small balls of extra filling or whipped cream, place those on top as well.