French Dip Sliders
The first time I made French Dip Sliders, I was hosting a casual game night with friends. Everyone was excited, and I wanted to serve something hearty yet easy to prepare. As soon as I pulled these sliders out of the oven, the aroma of melted cheese and savory roast beef filled the room, drawing everyone to the kitchen like moths to a flame. They couldn’t wait to dig in! The beauty of French Dip Sliders lies in their simplicity. You just layer the ingredients, bake, and they’re ready to be devoured. It’s one of those dishes that feels like a warm hug after a long day, perfect for gatherings or just a cozy night at home with family.
Recipe Snapshot
40 mins
10 mins
30 mins
Medium
350 kcal
20 g
Keto, Gluten-Free
15 g
Oven, Baking Sheet, Frying Pan, Mixing Bowl, Chef’s Knife, Wooden Spoon
What You’ll Enjoy About This French Dip Sliders
Comforting and Satisfying
There’s something incredibly comforting about French Dip Sliders. The combination of tender roast beef, gooey cheese, and soft, sweet rolls is truly irresistible. Each bite is a delightful explosion of flavor that warms you from the inside out. This recipe is a go-to for satisfying cravings and pleasing a crowd.
Easy to Prepare
If you’re looking for a recipe that doesn’t demand hours of your time, this is it. The prep is straightforward—just slice the rolls, layer the ingredients, and pop them in the oven. You can whip these up in no time, allowing you to spend more time enjoying your event and less time in the kitchen.
Perfect for Any Occasion
Whether it’s a game day, a casual dinner with friends, or even a family gathering, French Dip Sliders fit the bill! They’re versatile enough to serve as a main dish or as part of a spread with sides. Your guests will love them, and you’ll love how easy they are to make.
Customizable and Fun
One of the best parts about French Dip Sliders is how easy it is to tailor them to your taste. Want extra cheese? Go for it! Feel like adding some sautéed peppers or mushrooms? That works too! You can personalize these sliders to make them truly your own.
Great for Leftovers
If you somehow have any leftovers (which is rare), they store beautifully! Just reheat them in the oven for a quick meal, and they’ll taste just as delicious as the first time. This makes French Dip Sliders ideal for meal prep or a cozy dinner later in the week.
What’s In This French Dip Sliders
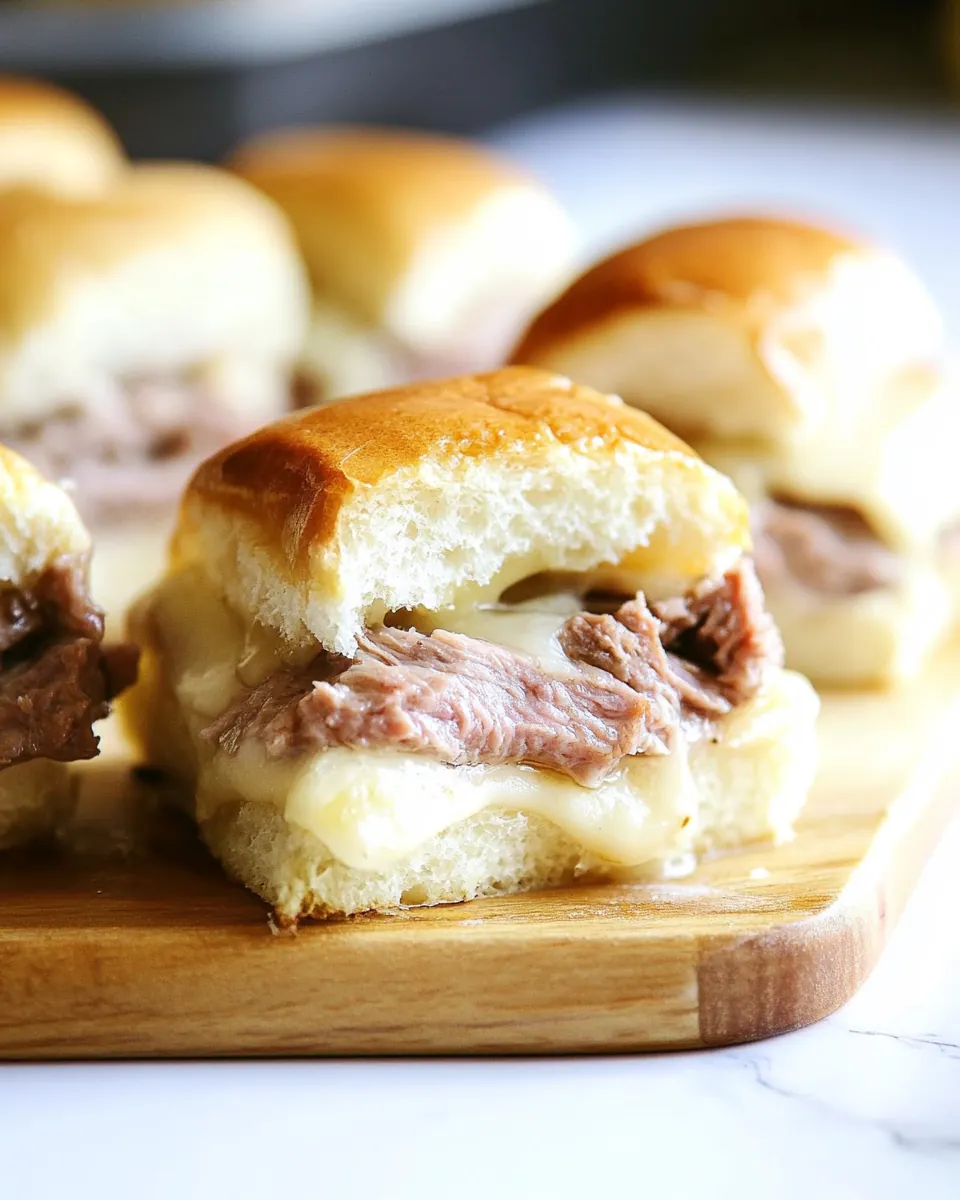
The ingredients for French Dip Sliders are simple yet perfect together. Each component plays a crucial role in delivering that mouthwatering flavor we all crave. The Hawaiian sweet rolls provide a soft, sweet base that contrasts beautifully with the savory roast beef and rich provolone cheese. With just a few additional ingredients, you can elevate this dish to a crowd-pleaser.
- 1 package Hawaiian sweet rolls (12 rolls): These soft, sweet rolls are the perfect base for the sliders. Their slight sweetness balances the savory flavors of the filling.
- 1 pound deli roast beef: The star of the dish, tender roast beef adds a rich, meaty flavor that’s essential for a satisfying bite.
- 6 slices provolone cheese: Creamy and melty, provolone cheese brings a deliciously gooey texture that complements the beef beautifully.
- 4 Tablespoons butter: Used to coat the rolls, butter adds richness and helps achieve a golden, crispy top.
- 1/4 teaspoon garlic powder: A touch of garlic powder adds depth and enhances the overall flavor of the sliders.
- 1 Tablespoon dried onion flakes: These flakes offer a sweet onion flavor that blends wonderfully with the other ingredients.
- 1 package au jus sauce mix: This is the finishing touch for dipping, bringing a savory, flavorful sauce to complement each slider.
How to Prepare French Dip Sliders
Making French Dip Sliders is a breeze! You’ll love how quickly they come together. Just follow these steps, and soon you’ll have a plate of delicious sliders ready to share. Let’s dive into the cooking process!
- Preheat your oven to 350°F (175°C). This is the perfect temperature for getting the rolls golden brown and the cheese melted.
- In a baking dish, melt 2 Tablespoons of butter and pour it evenly across the bottom. This will create a delicious buttery layer that flavors the rolls.
- Remove the package of Hawaiian sweet rolls from its bag carefully. Without separating the rolls, use a serrated knife to slice the entire batch in half horizontally, creating a top and bottom layer.
- Place the bottom half of the rolls in the baking dish, sitting on top of the melted butter. Ensure they are snug and touching for that perfect slider texture.
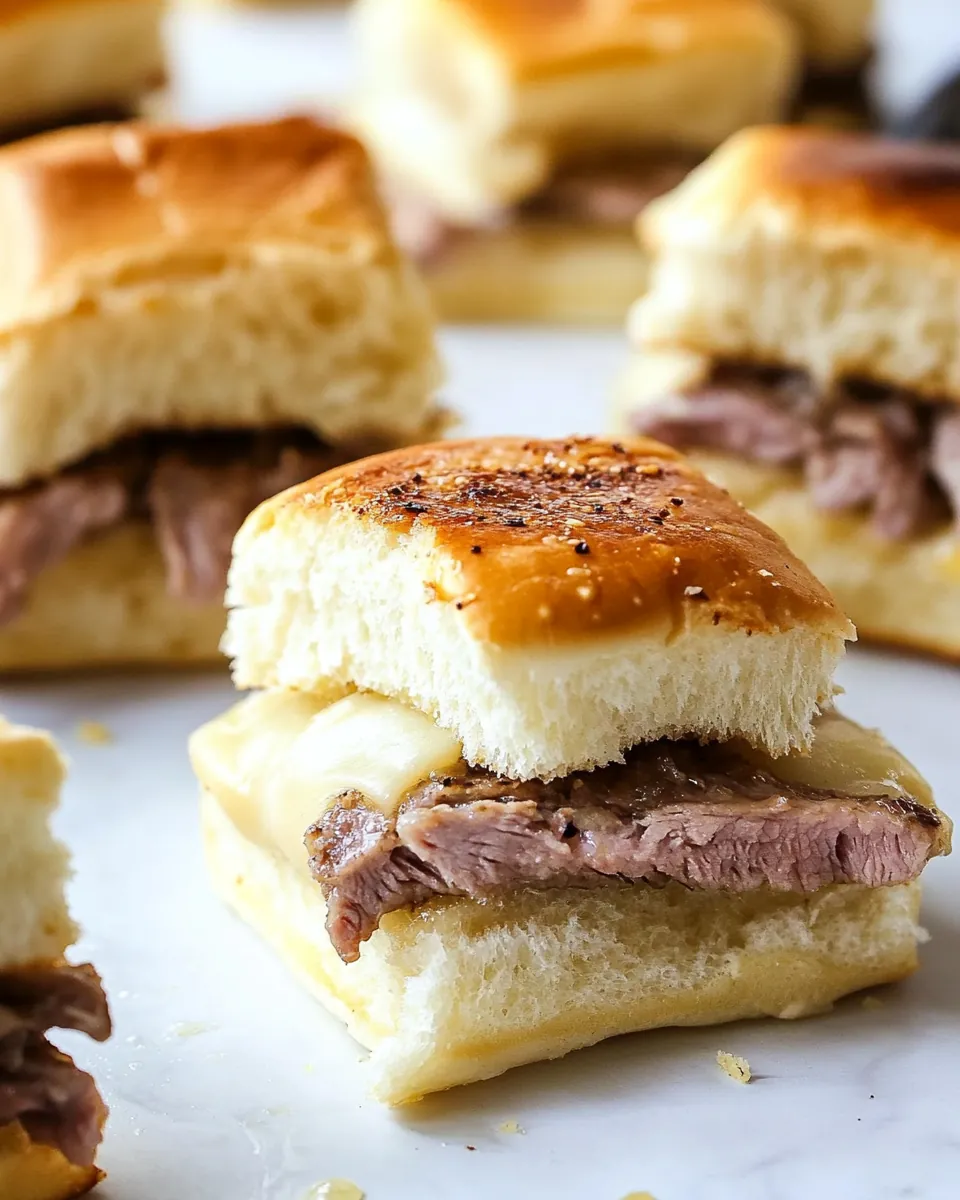
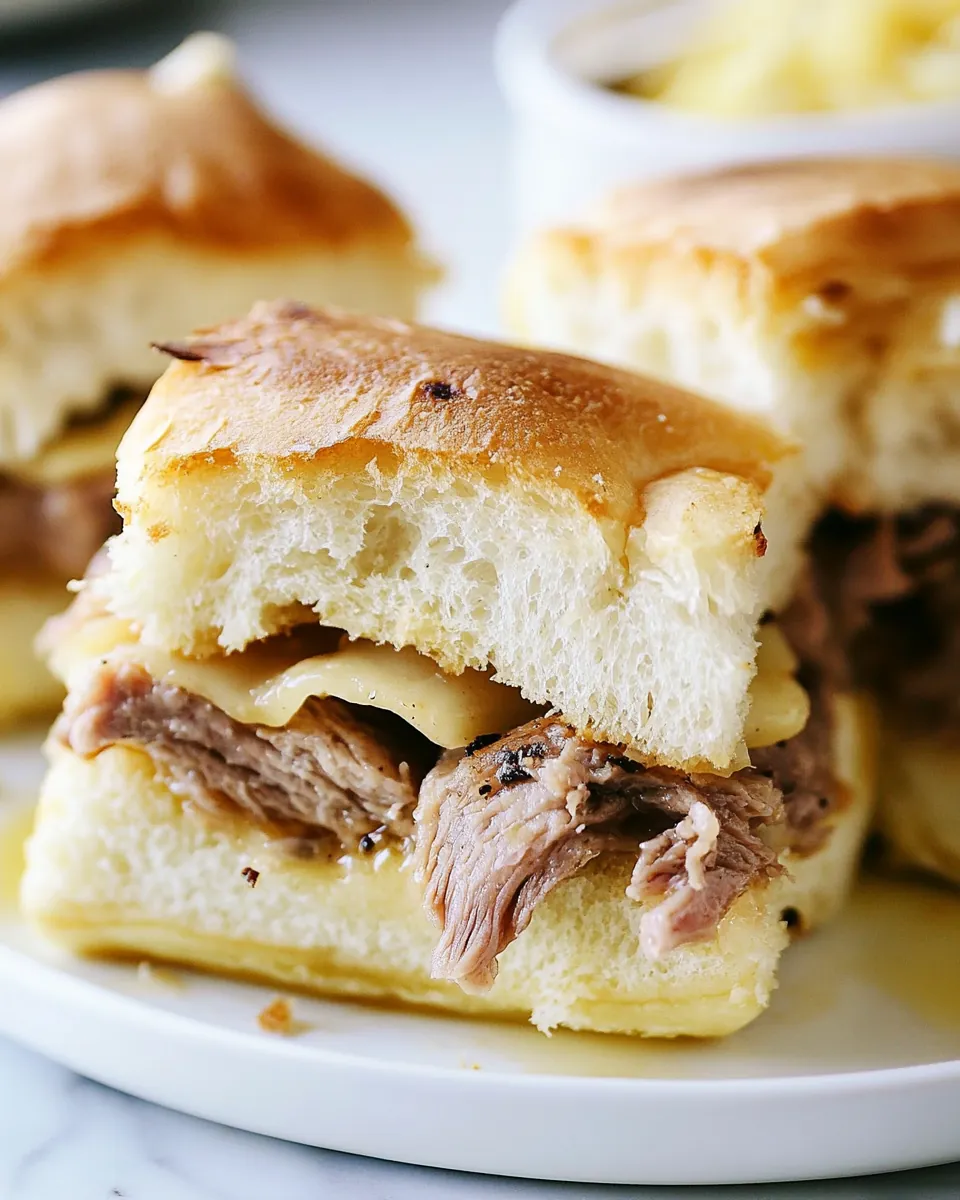
- Evenly layer the provolone cheese slices on top of the rolls, covering them generously with the creamy goodness.
- Next, pile on the roast beef slices, ensuring each slider is hearty and filled. You can be generous here; no one likes a skimpy slider!
- Gently place the top half of the rolls over the beef. This will create the sandwich structure needed for baking.
- In a microwave-safe bowl, melt the remaining 2 Tablespoons of butter. Once melted, stir in the garlic powder and dried onion flakes until well combined.
- Use a brush to apply the butter mixture generously over the tops of the rolls, ensuring they’re coated for that golden finish.
- Cover the dish with foil and bake for 25 minutes. You’re looking for the cheese to melt and the beef to be warmed through. The aroma will be irresistible!
- Remove the foil and bake for an additional 5 minutes. This will allow the tops to become slightly crispy while keeping the insides nice and gooey.
- Prepare the au jus sauce according to the package directions while the sliders are cooling slightly.
- Cut the rolls into individual sliders and serve warm with the au jus sauce on the side for dipping. Enjoy!
Things Worth Knowing
- Don’t rush the baking: Ensure you bake the sliders long enough for the cheese to melt properly. The flavors deepen with each minute in the oven.
- Experiment with cheeses: While provolone is amazing, feel free to try other cheeses like cheddar or Swiss for different flavors.
- Let them rest: After baking, let the sliders sit for a few minutes before serving. This helps them hold together better when you cut them.
- Serve immediately: These sliders are best enjoyed fresh out of the oven, so make sure to serve them right away for the ultimate experience!
Variations to Try
If you want to mix things up with your French Dip Sliders, there are plenty of fun variations to explore! Here are some ideas:
- Different meats: Try using turkey, chicken, or even a vegetarian option like grilled portobello mushrooms for a different twist.
- Add veggies: Sautéed peppers and mushrooms can add extra flavor and texture to your sliders. Just layer them in with the roast beef.
- Cheese overload: Don’t hold back! Adding an extra layer of cheese on top of the beef makes for an even gooier experience.
- Spicy kick: If you enjoy some heat, add sliced jalapeños or a dash of hot sauce to the beef layer.
- Storage: Store leftovers in an airtight container in the fridge. They can last up to three days, but trust me, they’ll be gone before then!
- Freezing: You can freeze assembled sliders before baking. Just wrap them tightly and freeze. When ready to eat, bake from frozen, adding a few extra minutes to the cooking time.
- Pairing: Serve with a side of crispy potato wedges or a fresh garden salad for a complete meal.
What Complements This French Dip Sliders
When it comes to serving French Dip Sliders, there are plenty of delicious options to enhance your meal:
- Side salads: A crisp green salad with a light vinaigrette pairs beautifully with the rich flavors of the sliders.
- Potato wedges: Crispy, golden potato wedges or sweet potato fries are always a hit and make for a hearty side.
- Pickles: A side of dill pickles adds a tangy crunch that beautifully complements the savory sliders.
- Game day snacks: These sliders are perfect for game day, so serve them alongside your favorite chips and dips for a complete spread.
- Casual gatherings: They’re ideal for barbecues, potlucks, or any casual get-together, ensuring everyone leaves satisfied.
- Storage tips: If you have leftovers, store them in an airtight container in the refrigerator. To reheat, pop them back in the oven for a few minutes.
FAQ
Conclusion
The French Dip Sliders combine simplicity with comfort, making them a standout dish for any gathering. Their delicious flavor and easy preparation ensure they’re a hit every time. I encourage you to try making these sliders for your next get-together or family dinner. You won’t be disappointed!

French Dip Sliders
Ingredients
Equipment
Method
- Preheat your oven to 350°F (175°C). This is the perfect temperature for getting the rolls golden brown and the cheese melted.
- In a baking dish, melt 2 Tablespoons of butter and pour it evenly across the bottom. This will create a delicious buttery layer that flavors the rolls.
- Remove the package of Hawaiian sweet rolls from its bag carefully. Without separating the rolls, use a serrated knife to slice the entire batch in half horizontally, creating a top and bottom layer.
- Place the bottom half of the rolls in the baking dish, sitting on top of the melted butter. Ensure they are snug and touching for that perfect slider texture.
- Evenly layer the provolone cheese slices on top of the rolls, covering them generously with the creamy goodness.
- Next, pile on the roast beef slices, ensuring each slider is hearty and filled. You can be generous here; no one likes a skimpy slider!
- Gently place the top half of the rolls over the beef. This will create the sandwich structure needed for baking.
- In a microwave-safe bowl, melt the remaining 2 Tablespoons of butter. Once melted, stir in the garlic powder and dried onion flakes until well combined.
- Use a brush to apply the butter mixture generously over the tops of the rolls, ensuring they’re coated for that golden finish.
- Cover the dish with foil and bake for 25 minutes. You’re looking for the cheese to melt and the beef to be warmed through. The aroma will be irresistible!
- Remove the foil and bake for an additional 5 minutes. This will allow the tops to become slightly crispy while keeping the insides nice and gooey.
- Prepare the au jus sauce according to the package directions while the sliders are cooling slightly.
- Cut the rolls into individual sliders and serve warm with the au jus sauce on the side for dipping. Enjoy!
Notes
- Tip 1: Use any type of cheese you prefer!
- Tip 2: You can also do a second layer of cheese on top of the meat if you like it extra cheesy.