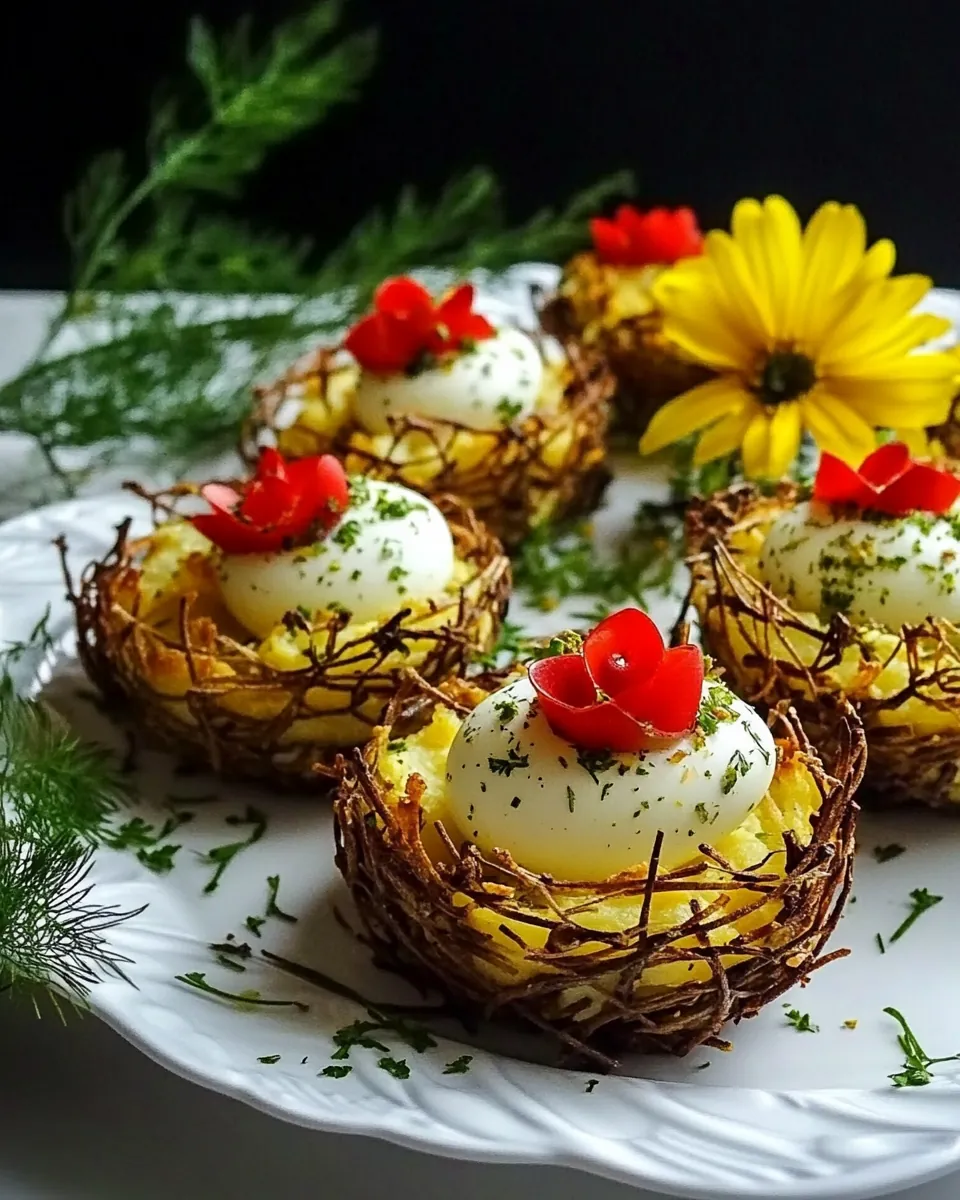
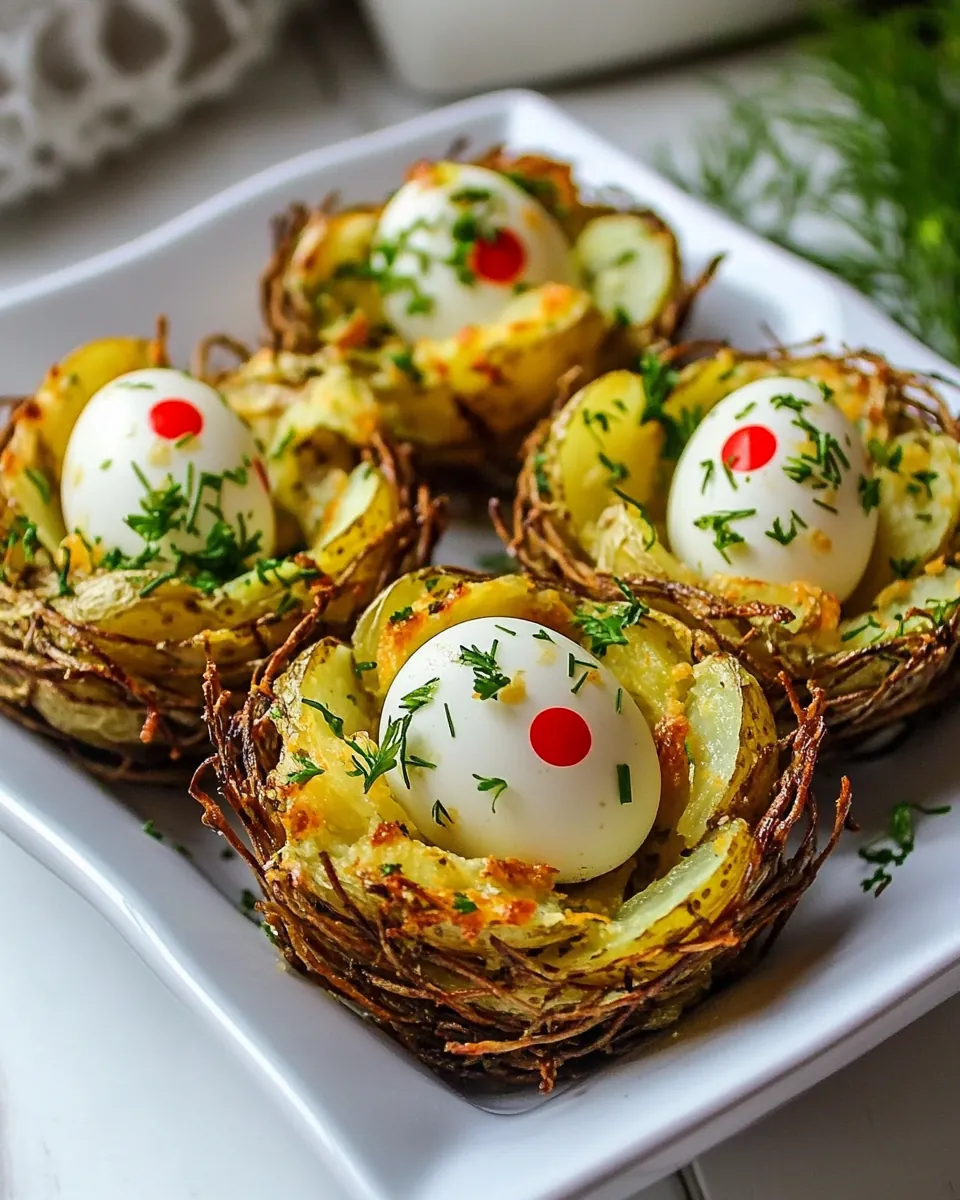
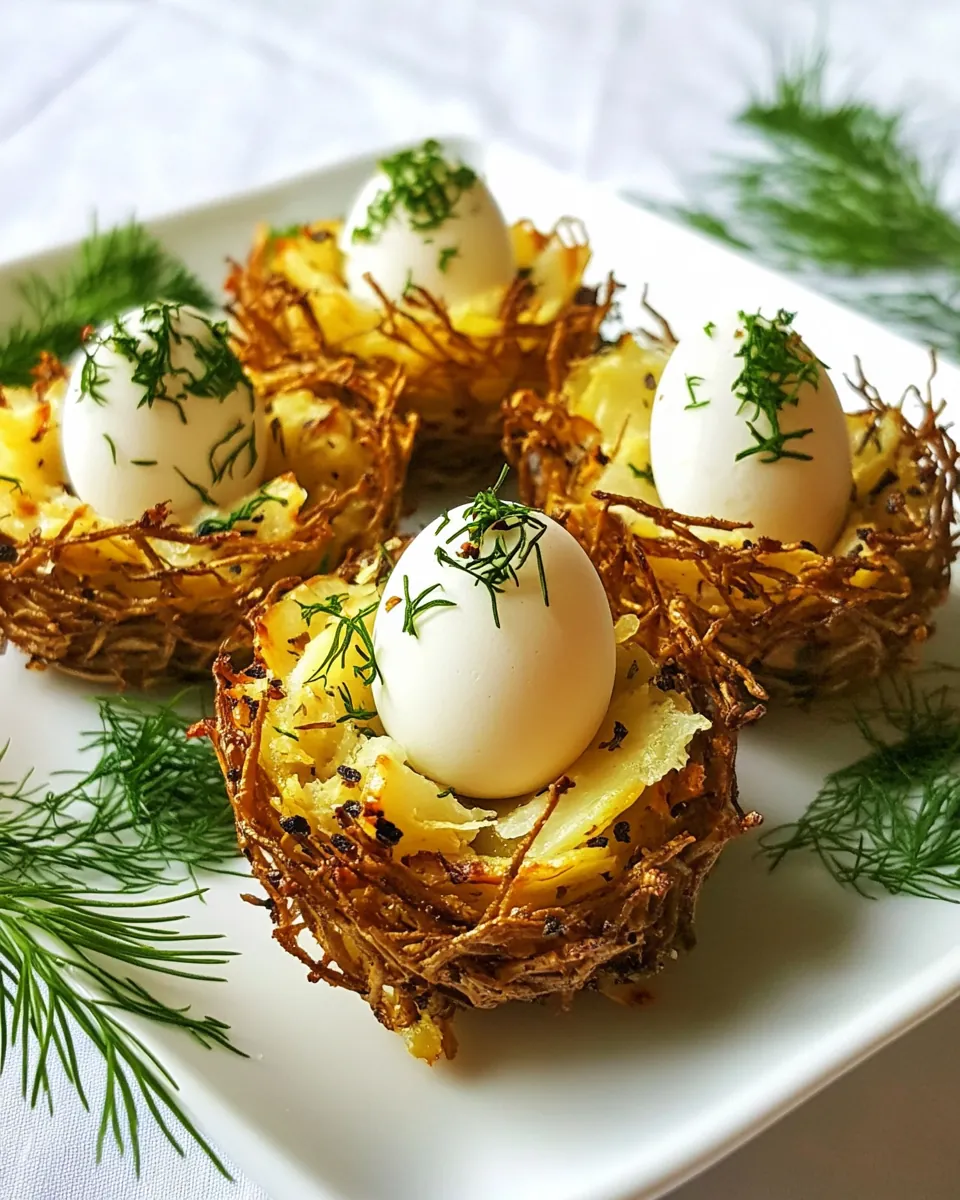
Easter Egg Tart Potato Nests
There’s something magical about springtime and the joy of creating festive dishes, especially when it comes to celebrating Easter. This year, I’ve decided to whip up a batch of Easter Egg Tart Potato Nests. As the sun shines brighter and flowers bloom, I find myself yearning for vibrant flavors and colorful presentations that reflect the season. Imagine family and friends gathered around the table, their eyes lighting up as they see these charming nests filled with creamy goodness and vibrant egg slices. Each bite is not just a treat for the palate but also a feast for the eyes. These little nests have a lovely story to tell; they remind us of the rebirth and renewal that spring brings, making them perfect for our Easter celebrations. It’s a culinary adventure that brings together the simplicity of potatoes and the rich flavors of cream cheese, topped with the freshness of dill and vibrant cherry tomatoes. So, let’s dive into this delightful recipe that’s bound to become a favorite at our holiday table!
Recipe Snapshot
25 mins
10 mins
15 mins
Medium
150 kcal
5 g
Gluten-Free
6 g
Oven, Baking Sheet, Frying Pan, Large Pot, Mixing Bowl, Peeler, Chef’s Knife
The Appeal of This Easter Egg Tart Potato Nests
They’re Adorable
First and foremost, who can resist the visual charm of these little potato nests? The Easter Egg Tart Potato Nests are not just delicious; they’re a feast for the eyes! Their delicate, golden-brown edges and deep wells waiting to be filled make them irresistibly cute. When you place them on a platter, they instantly become the centerpiece, drawing everyone’s attention and making your holiday table even more festive.
Versatile and Customizable
Another reason I adore this recipe is its versatility. You can easily customize the fillings according to your taste or dietary needs. While I love using cream cheese as a base, feel free to swap it out for your favorite spread or even a vegan alternative. The fresh herbs can also be adjusted; the addition of chives or even a sprinkle of smoked paprika can elevate the flavor profile significantly!
Perfect for Meal Prep
These nests can be prepared ahead of time, which is a lifesaver during the busy holiday season. You can make the nests a couple of days in advance and store them in the refrigerator. Just remember to re-crisp them in the oven before serving for that delightful crunch. This way, you can enjoy the festivities without the stress of last-minute cooking!
Fun for All Ages
Making Easter Egg Tart Potato Nests is an excellent activity for the whole family. Kids can get involved by helping to press the potato mixture into the muffin pans or decorating the nests with the egg slices and tomatoes. It’s a wonderful way to bond and create lasting memories while preparing a meal together.
Deliciously Tasty
Let’s not forget the flavor! The combination of crispy potato, creamy filling, and fresh herbs results in a mouthwatering experience. Each bite is a perfect balance of textures and tastes that will have your guests asking for seconds. These nests are not only beautiful but also packed with flavor!
Healthier Option
Finally, these nests serve as a healthier alternative to traditional Easter dishes. Made primarily from potatoes and fresh ingredients, they are naturally lower in calories compared to many other festive options. You can enjoy these guilt-free, knowing that you’re still treating yourself to something special.
Main Ingredients for Easter Egg Tart Potato Nests
The ingredients for the Easter Egg Tart Potato Nests are not only simple but also essential for creating that delightful combination of flavors. The key players include the humble potato, which forms the perfect crisp base, and the creamy filling that adds richness. Fresh herbs like thyme and dill elevate the taste, ensuring each bite bursts with flavor. Together, these ingredients create a harmonious blend that captures the essence of spring.
- 3 large Russet potatoes – Peeled and shredded, these potatoes form the base of the nests, providing a crispy texture that’s simply irresistible.
- 1/4 teaspoon salt – Just a dash enhances the flavors and brings out the best in the potatoes.
- 1/4 teaspoon black pepper – A pinch adds a subtle kick to the otherwise mellow flavors.
- 1 teaspoon olive oil – This helps to achieve that golden-brown color while adding richness.
- 2 teaspoons fresh thyme leaves – Thyme introduces a delightful earthiness that complements the potatoes beautifully.
- 1 tablespoon minced parsley leaves – Fresh parsley adds a burst of color and a hint of freshness.
- 1/2 cup garlic lemon herb cream cheese – This creamy filling is the star of the show, bringing all the flavors together.
- 6 hard-boiled eggs – Sliced for decoration, these eggs symbolize Easter and add protein to the dish.
- Cherry tomatoes – Their vibrant color and juicy sweetness provide a refreshing contrast.
- Fresh dill – Dill adds a burst of flavor, elevating the dish to new heights.
- Dill brush (optional but recommended) – For brushing on the eggs for an extra layer of flavor.
- 2 teaspoons fresh dill leaves minced – A sprinkle of this fresh herb enhances the overall taste.
- 1 teaspoon fresh parsley leaves minced – Another layer of freshness and color.
- Pinch of salt – To taste, enhancing the overall flavor of the nests.
- Pinch of pepper – A slight kick to balance the dish.
- 2 tablespoons melted butter (or olive oil) – For added richness and flavor.
Recipe Directions for Easter Egg Tart Potato Nests
Now, let’s dive into the exciting part – creating these delightful nests! The process is straightforward and rewarding, leading to beautiful results.
- Preheat your oven to 400 degrees F (200 degrees C). This step ensures that your nests will cook evenly and get that nice golden color we all love.
- In a large bowl, mix the shredded potatoes with salt, black pepper, olive oil, fresh thyme, and parsley. The mixture should be well combined, allowing the flavors to meld together.
- Take a standard muffin pan and brush the inside of each cavity with olive oil. Alternatively, you can line it with baking paper for easier removal later. Make sure to coat it well so the nests don’t stick.
- Using a 1/4 cup measuring scoop, take a scant scoop of the potato mixture and place it in each muffin cavity. Press down firmly with your fingers to ensure they stick together.
- With your thumb, create a dent in the center of each potato mixture. This will hold the cream cheese mixture later.
- Bake the nests in the preheated oven for about 15 minutes until they are golden on the outside and soft on the inside. Keep an eye on them to avoid burning!
- Once baked, remove the muffin pan from the oven and let the potato nests cool for a few minutes. This makes it easier to remove them from the pan without breaking.
- In the meantime, let’s prepare the eggs. Place your hard-boiled eggs in a pot filled with cold water and bring it to a boil.
- Once the water reaches a rolling boil, turn off the heat, cover the pot, and let the eggs sit in the hot water for 15 minutes. This method ensures they cook perfectly without overcooking.
- After 15 minutes, slice the eggs into approximately 1/4th of an inch thick slices. Be careful not to slice them too thin, as the yolk and white might separate during assembly.
- Remove the potato nests from the pan. Assemble your appetizer by placing a teaspoon of the cream cheese in the center of each nest and arrange the sliced hard-boiled eggs around it in the shape of a flower.
- Place a cherry tomato in the center of each nest, and add a sprig of dill on the side for that fresh touch.
- For finishing, combine all the dill brush ingredients in a small bowl, and use a brush to coat the eggs and tomatoes with this mixture. It adds an extra layer of flavor and makes everything look stunning.
- Finally, serve your beautiful Easter Egg Tart Potato Nests with a smile and enjoy the delightful flavors!
Things Worth Knowing
- Importance of Temperature: Ensure your potatoes are at room temperature before using them. This will help them mix better with the other ingredients, ensuring a uniform texture.
- Press Firmly: When pressing the potato mixture into the muffin pan, make sure to pack it tightly. This prevents them from falling apart when baking.
- Experiment with Toppings: Don’t hesitate to try different toppings. You can add olives, capers, or even a sprinkle of cheese for added flavor.
- Check for Doneness: The nests should be golden and firm to the touch when done. If they look pale, give them a few extra minutes in the oven.
Make It Your Own
There’s always room for creativity in cooking! Here are some tips to help you personalize your Easter Egg Tart Potato Nests.
- Storage: If you have leftovers, store the nests in an airtight container in the refrigerator. They should last for up to three days.
- Freezing: You can freeze the assembled nests before baking. Just ensure to wrap them tightly. Bake from frozen, adding a few extra minutes to the cooking time.
- Pairing: These nests pair beautifully with a crisp green salad or a light soup. They make a perfect starter or a side dish!
- Herb Variations: Feel free to experiment with herbs! Basil, oregano, or even a little bit of sage can add a unique twist.
- Cheese Options: If you’re feeling indulgent, try adding a bit of shredded cheese to the cream cheese mixture for extra richness.
- Make it Spicy: Add a dash of hot sauce or some diced jalapeños to the filling for a spicy kick!
Serve This Easter Egg Tart Potato Nests With
When it comes to serving your Easter Egg Tart Potato Nests, the options are delightful and endless. Here are some ideas to complement your dish:
- Fresh Green Salad: A light salad with mixed greens, cherry tomatoes, and a tangy vinaigrette makes a perfect pairing.
- Roasted Vegetables: Serve alongside a medley of roasted vegetables for a colorful and nutritious side.
- Spring Soup: A light, broth-based soup can also be a refreshing accompaniment, enhancing the overall meal experience.
- Picnic Style: These nests are great for casual gatherings. Serve them on a picnic table with fresh fruits and sparkling drinks.
- Abrupt Light Bites: Perfect for brunch or as appetizers, these nests can be easily handled and enjoyed without cutlery.
- Seasonal Dips: Consider pairing with a light yogurt dip or tzatziki for an extra layer of flavor.
- Festive Occasions: Ideal for Easter brunch, spring gatherings, or any festive occasion when you want to impress guests.
FAQ
Conclusion
The Easter Egg Tart Potato Nests bring a touch of whimsy and flavor to your spring celebrations. They’re not just appetizers; they symbolize the joy and warmth of the season. I encourage you to give them a try—they’re bound to impress your family and friends! The delightful combination of flavors and textures will leave everyone craving more, making your gatherings even more memorable.

Easter Egg Tart Potato Nests
Ingredients
Equipment
Method
- Preheat your oven to 400 degrees F (200 degrees C). This step ensures that your nests will cook evenly and get that nice golden color we all love.
- In a large bowl, mix the shredded potatoes with salt, black pepper, olive oil, fresh thyme, and parsley. The mixture should be well combined, allowing the flavors to meld together.
- Take a standard muffin pan and brush the inside of each cavity with olive oil. Alternatively, you can line it with baking paper for easier removal later. Make sure to coat it well so the nests don’t stick.
- Using a 1/4 cup measuring scoop, take a scant scoop of the potato mixture and place it in each muffin cavity. Press down firmly with your fingers to ensure they stick together.
- With your thumb, create a dent in the center of each potato mixture. This will hold the cream cheese mixture later.
- Bake the nests in the preheated oven for about 15 minutes until they are golden on the outside and soft on the inside. Keep an eye on them to avoid burning!
- Once baked, remove the muffin pan from the oven and let the potato nests cool for a few minutes. This makes it easier to remove them from the pan without breaking.
- In the meantime, let’s prepare the eggs. Place your hard-boiled eggs in a pot filled with cold water and bring it to a boil.
- Once the water reaches a rolling boil, turn off the heat, cover the pot, and let the eggs sit in the hot water for 15 minutes. This method ensures they cook perfectly without overcooking.
- After 15 minutes, slice the eggs into approximately 1/4th of an inch thick slices. Be careful not to slice them too thin, as the yolk and white might separate during assembly.
- Remove the potato nests from the pan. Assemble your appetizer by placing a teaspoon of the cream cheese in the center of each nest and arrange the sliced hard-boiled eggs around it in the shape of a flower.
- Place a cherry tomato in the center of each nest, and add a sprig of dill on the side for that fresh touch.
- For finishing, combine all the dill brush ingredients in a small bowl, and use a brush to coat the eggs and tomatoes with this mixture. It adds an extra layer of flavor and makes everything look stunning.
- Finally, serve your beautiful Easter Egg Tart Potato Nests with a smile and enjoy the delightful flavors!
Notes
- Prepare Ahead: These nests can be prepared in advance but should only be assembled on the same day for best results.
- Re-crisping: If you make the nests ahead of time, re-crisp them for 10 minutes in a 350-degree oven before serving.
- Boiling Eggs: For perfectly boiled eggs, place them in cold water, bring to a boil, turn off the heat, and cover for 15 minutes.