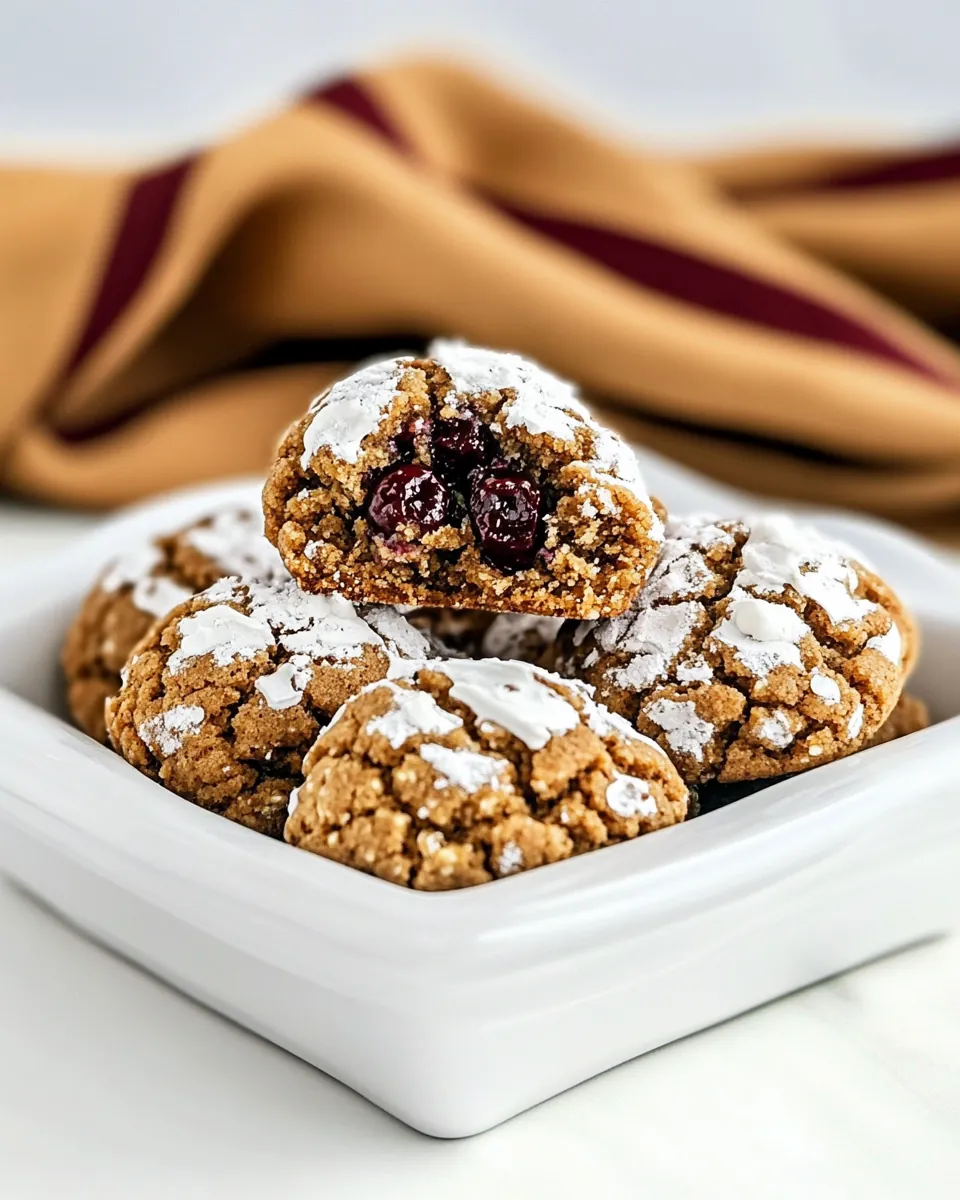
Cherry Blossom Cookies
There’s something magical about making Cherry Blossom Cookies that always takes me back to springtime nostalgia. I recall the first time I baked them in my cozy kitchen, the air filled with the sweet scent of cherries and spices wafting through the house. As the cookies baked, I watched the golden edges form, and the anticipation grew! They’re perfect for sharing during family gatherings or simply indulging in with a cup of tea. The vibrant colors and delightful flavors remind me of blooming cherry blossom trees, capturing all the joy of the season in one delicious bite.
Recipe Snapshot
42 mins
30 mins
12 mins
Medium
180 kcal
3 g
Gluten-Free, Low FODMAP
8 g
Oven, Baking Sheet, Whisk, Mixing Bowl, Chef’s Knife, Wooden Spoon
What Makes This Cherry Blossom Cookies Special
Seasonal Delight
There’s nothing quite like enjoying Cherry Blossom Cookies during the spring season. They evoke memories of picnics in parks under blooming trees, making them the perfect treat to celebrate the beauty of nature’s rebirth. The combination of tart cherries and warming spices creates a taste that perfectly complements the season’s freshness.
Textural Harmony
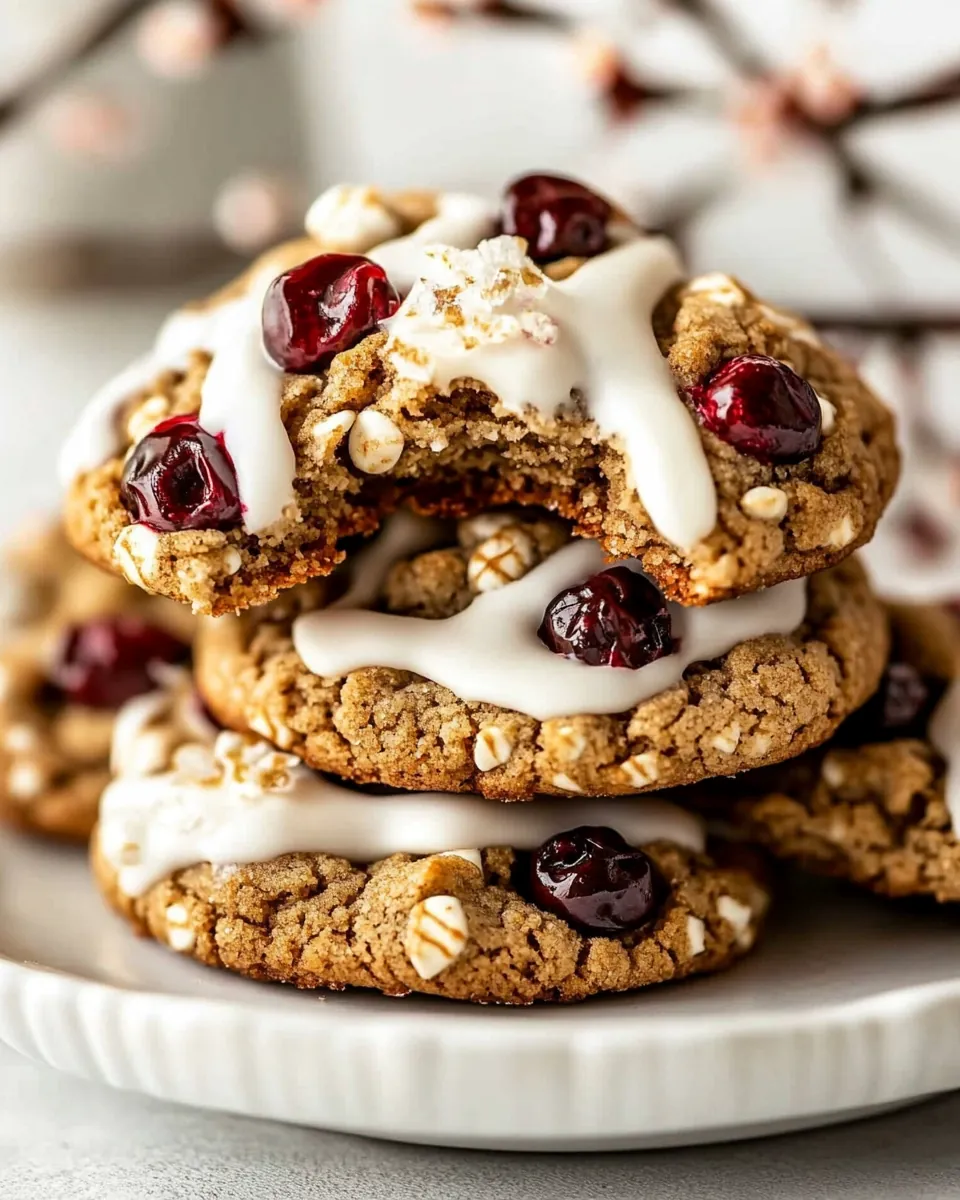
What sets these cookies apart is the delightful contrast between the chewy texture of the oats and the burst of sweetness from the soft, tart cherries. Each bite is a journey of flavors and textures that keeps you coming back for more, making them a true crowd-pleaser.
Versatility
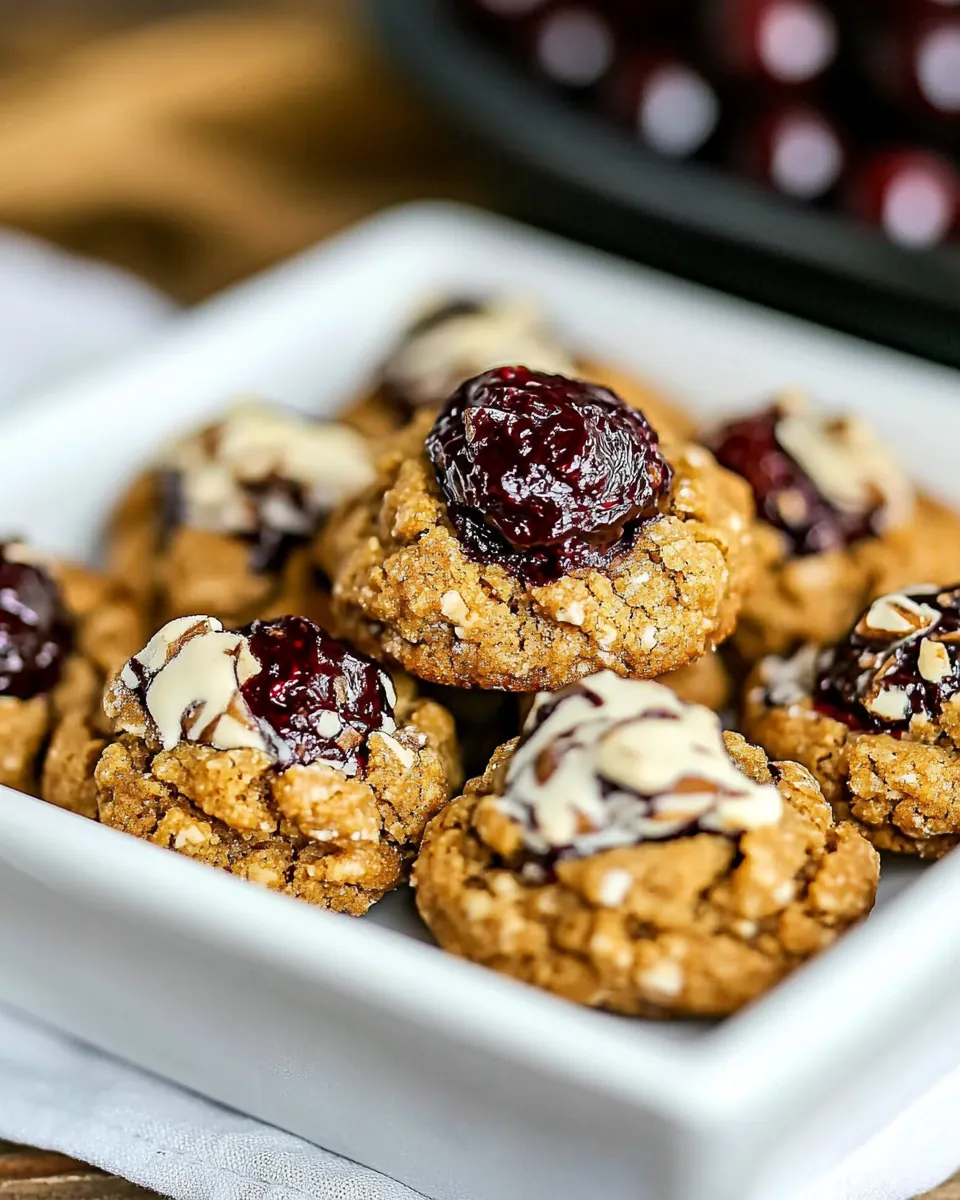
These cookies are incredibly versatile! Whether you enjoy them as a midday snack, a sweet treat for a gathering, or as part of a festive occasion, they fit in beautifully. You can also experiment by adding different toppings, such as a drizzle of melted vanilla almond bark, to elevate their presentation and flavor.
Family Tradition
Making Cherry Blossom Cookies has become a cherished family tradition in my home. I love involving my kids in the process, from measuring the ingredients to rolling the dough. It’s a wonderful way to teach them about baking while creating lasting memories together. The joy on their faces as they press chocolate kisses into the warm cookies is priceless.
What Goes Into Cherry Blossom Cookies
The ingredients in Cherry Blossom Cookies come together to create a symphony of flavors and textures. Each component plays a crucial role, from the hearty oats that provide chewiness to the sweet cherries that infuse the cookies with a burst of flavor. Let’s explore each ingredient’s contribution to this delightful treat.
- 2 3/4 cups old-fashioned whole rolled oats – These oats give the cookies their hearty texture and nutty flavor, making them satisfying and delicious.
- 1 2/3 cups all-purpose flour – This is the base that brings everything together, providing the structure that allows the cookies to hold their shape.
- 1 teaspoon baking soda – A leavening agent that helps the cookies rise and become light and fluffy.
- 1 teaspoon ground cinnamon – This warming spice adds depth and a cozy aroma, making the cookies even more inviting.
- 1/2 teaspoon salt – Enhances the flavors of the other ingredients, balancing sweetness with a touch of savory.
- 1/4 teaspoon each ground cloves, ground nutmeg, and ground ginger – These spices add complexity and a hint of warmth, perfect for a comforting cookie.
- 1 cup unsalted butter, softened to room temperature – This is essential for creating a rich and buttery flavor, ensuring the cookies are melt-in-your-mouth good.
- 1 cup packed light or dark brown sugar – Adds moisture and a deep, caramel-like sweetness that complements the tart cherries.
- 1/4 cup granulated sugar – Provides a touch of added sweetness and a little crunch to the cookie surface.
- 2 large eggs, at room temperature – Help bind the ingredients together, providing structure and moisture.
- 1 tablespoon vanilla extract – Adds a lovely aromatic sweetness that enhances the overall flavor profile.
- 1 tablespoon unsulphured molasses – Contributes a rich flavor and a deep color, making the cookies even more appealing.
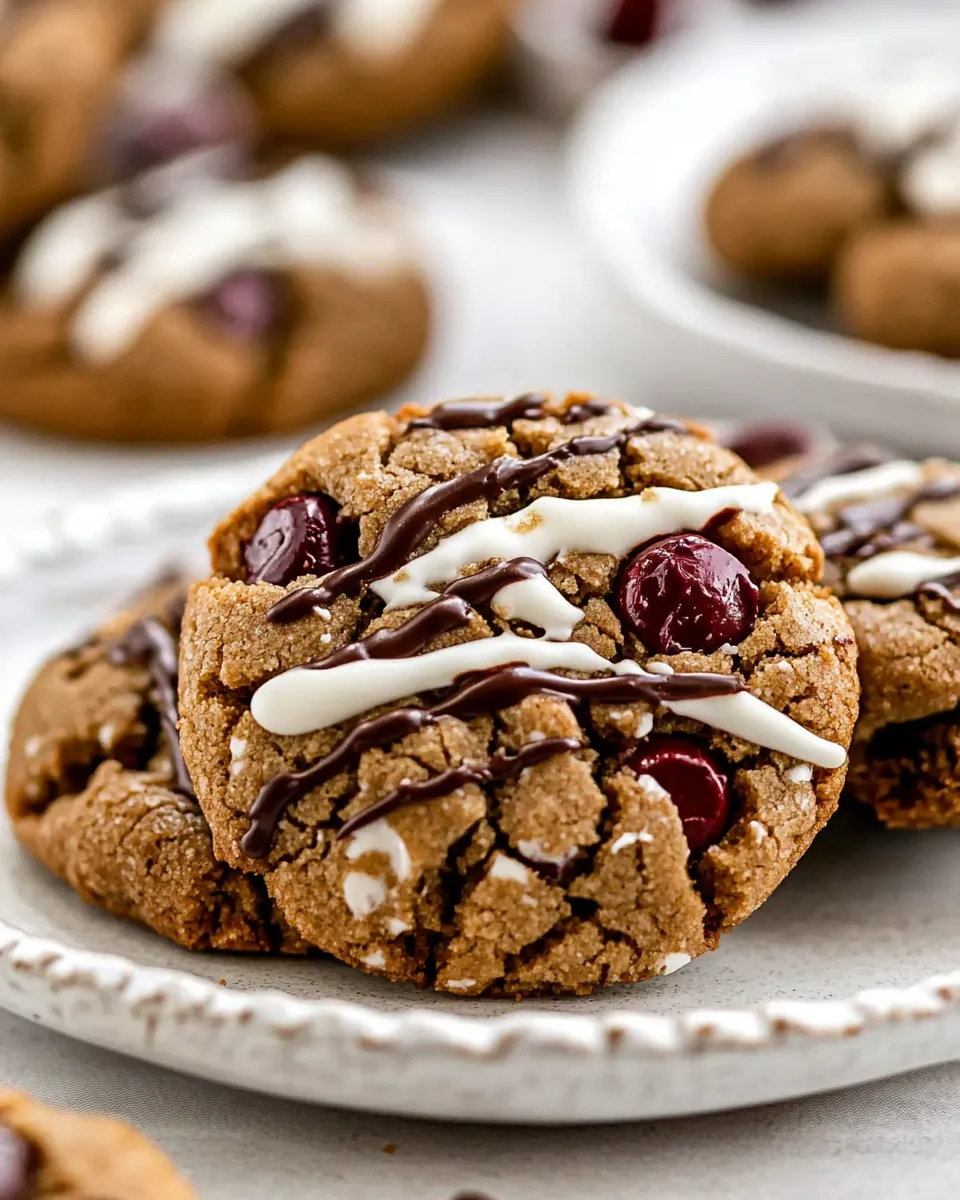
- 1 cup dried tart cherries – The star of the show, these cherries add a delightful chewiness and burst of flavor that elevates the entire cookie.
- 26-28 chocolate kisses – A sweet surprise in each cookie, these add a delightful chocolatey richness that pairs perfectly with the cherries.
- 3 ounces vanilla almond bark, chopped – Optional, but this adds a beautiful drizzle that makes the cookies look extra special.
- 1/4 teaspoon coconut oil or vegetable shortening – Used to help melt the almond bark smoothly.
Recipe Steps for Cherry Blossom Cookies
Making Cherry Blossom Cookies is a delightful process that fills your kitchen with wonderful aromas. Each step is a chance to embrace the joy of baking, and soon, you’ll be rewarded with a tray of delicious cookies. Let’s get started!
Mix Dry Ingredients: In a large bowl, whisk together the old-fashioned rolled oats, flour, baking soda, and spices. This step is essential as it evenly distributes the leavening agent and spices throughout the mix. Set this bowl aside for later.
Cream Butter & Sugars: In a stand mixer fitted with the paddle attachment, cream the unsalted butter and both types of sugar together at medium speed for about two minutes. You’re aiming for a fluffy, light texture. Keep an eye on the color; it should turn from yellow to pale creamy.
Add Eggs: Once the butter and sugars are creamed, add the eggs one at a time, mixing on high just until combined. Follow this with the vanilla extract and unsulphured molasses, mixing just until incorporated. Scrape down the sides of the bowl to ensure everything is well mixed.
Combine: Gently fold the oat mixture into the wet ingredients on low speed. Be careful not to overmix; just until you no longer see any dry flour. Next, beat in the dried tart cherries. Their bright color and tart flavor will be a wonderful addition to the dough.
Chill: It’s important to refrigerate the dough for 30 to 60 minutes. This step allows the oats to absorb moisture and makes the dough easier to work with. Just be cautious not to chill for too long, as this can affect the cookie texture.
Preheat: While the dough chills, preheat your oven to 350°F. Line two baking sheets with parchment paper or non-slip mats. This will prevent the cookies from sticking and help them bake evenly.
Roll Balls: After chilling, use a cookie scoop to roll the dough into two-tablespoon balls. The dough may be sticky, so consider spraying your hands with cooking spray for easier handling. Place the balls about two inches apart on the prepared baking sheets.
Bake: Bake the cookies for 10 to 12 minutes, or until the edges are lightly browned. The centers will appear very soft and under-baked, but they will firm up as they cool.
Add Kisses: After removing the cookies from the oven, let them cool on the baking sheet for about eight minutes. While they’re still warm, gently press a chocolate kiss into the center of each cookie. This adds a delicious chocolatey surprise!
Melt Vanilla Almond Bark (Optional): If you choose to add the drizzle, place the chopped vanilla almond bark and coconut oil in a microwave-safe bowl. Microwave at 50% power for thirty seconds, then stir. Continue microwaving in fifteen-second increments until melted and smooth.
Drizzle: Transfer the melted almond bark to a Ziploc bag and snip a tiny hole in one corner. Drizzle this over the cooled cookies for a beautiful finish.
Things Worth Knowing
- Chilling the Dough: This step is essential for the best texture. Chilled dough helps maintain the cookie shape and prevents spreading during baking.
- Baking Temperature: Ensure your oven is fully preheated before placing the cookies inside. Consistent temperature leads to evenly baked cookies.
- Keeping Cookies Fresh: Store baked cookies in an airtight container at room temperature to keep them soft for several days.
- Using Quality Ingredients: Opt for high-quality cherries and chocolate kisses to elevate the overall flavor of your cookies.
- Experimenting with Add-ins: Feel free to mix in other ingredients like nuts or dried fruits to make the recipe your own!
Variations to Try
If you’re looking to switch things up with Cherry Blossom Cookies, there are plenty of fun variations you can try! With just a few tweaks, you can create a delicious twist on this classic recipe.
- Storage: Store leftover cookies in an airtight container at room temperature for up to one week. They’ll maintain their chewy texture!
- Freezing: You can freeze cookie dough balls for later use. Just place them on a baking sheet, freeze until solid, then transfer to a zip-top bag for up to three months.
- Chocolate Variations: Instead of using chocolate kisses, consider mixing in chocolate chips or chunks for an extra chocolatey experience.
- Sugar Substitutes: You can experiment with different sugars such as coconut sugar or maple sugar for a unique flavor profile.
- Nuts: Chopped nuts like walnuts or pecans can be added for a delightful crunch.
- Flavors: Try adding a hint of almond extract for a different spin on flavor.
- Decorate: Use icing or colored sprinkles to decorate the cookies for special occasions!
Serve This Cherry Blossom Cookies With
When it comes to enjoying Cherry Blossom Cookies, the possibilities are endless! Here are some ideas on how to serve them for various occasions:
- Afternoon Snack: Pair these cookies with a cup of tea or coffee for a delightful afternoon pick-me-up.
- Picnics: Pack these cookies in your picnic basket along with fresh fruits and refreshing drinks for a lovely outdoor meal.
- Cookies for Gifts: These cookies make fantastic gifts! Package them in a decorative box or tin for a thoughtful surprise.
- Spring Celebrations: Serve these cookies at spring parties, baby showers, or Easter celebrations to add a festive touch.
- With Ice Cream: For a decadent treat, serve warm cookies with a scoop of vanilla ice cream on top.
- Seasonal Pairings: Complement these cookies with seasonal fruits like strawberries or raspberries for a fresh touch.
- Leftover Cookies: Keep leftover cookies stored in an airtight container and enjoy them as a late-night snack or dessert!
FAQ
Conclusion
Cherry Blossom Cookies are truly a delightful treat that encapsulates the essence of spring. With their chewy texture and burst of flavor from tart cherries, they are sure to please everyone who tries them. I encourage you to bake a batch soon and share them with loved ones. There’s nothing quite like the joy of homemade cookies!
Cherry Blossom Cookies
Ingredients
Equipment
Method
- Mix Dry Ingredients: In a large bowl, whisk together the old-fashioned rolled oats, flour, baking soda, and spices. This step is essential as it evenly distributes the leavening agent and spices throughout the mix. Set this bowl aside for later.
- Cream Butter & Sugars: In a stand mixer fitted with the paddle attachment, cream the unsalted butter and both types of sugar together at medium speed for about two minutes. You’re aiming for a fluffy, light texture. Keep an eye on the color; it should turn from yellow to pale creamy.
- Add Eggs: Once the butter and sugars are creamed, add the eggs one at a time, mixing on high just until combined. Follow this with the vanilla extract and unsulphured molasses, mixing just until incorporated. Scrape down the sides of the bowl to ensure everything is well mixed.
- Combine: Gently fold the oat mixture into the wet ingredients on low speed. Be careful not to overmix; just until you no longer see any dry flour. Next, beat in the dried tart cherries. Their bright color and tart flavor will be a wonderful addition to the dough.
- Chill: It’s important to refrigerate the dough for 30 to 60 minutes. This step allows the oats to absorb moisture and makes the dough easier to work with. Just be cautious not to chill for too long, as this can affect the cookie texture.
- Preheat: While the dough chills, preheat your oven to 350°F. Line two baking sheets with parchment paper or non-slip mats. This will prevent the cookies from sticking and help them bake evenly.
- Roll Balls: After chilling, use a cookie scoop to roll the dough into two-tablespoon balls. The dough may be sticky, so consider spraying your hands with cooking spray for easier handling. Place the balls about two inches apart on the prepared baking sheets.
- Bake: Bake the cookies for 10 to 12 minutes, or until the edges are lightly browned. The centers will appear very soft and under-baked, but they will firm up as they cool.
- Add Kisses: After removing the cookies from the oven, let them cool on the baking sheet for about eight minutes. While they’re still warm, gently press a chocolate kiss into the center of each cookie. This adds a delicious chocolatey surprise!
- Melt Vanilla Almond Bark (Optional): If you choose to add the drizzle, place the chopped vanilla almond bark and coconut oil in a microwave-safe bowl. Microwave at 50% power for thirty seconds, then stir. Continue microwaving in fifteen-second increments until melted and smooth.
- Drizzle: Transfer the melted almond bark to a Ziploc bag and snip a tiny hole in one corner. Drizzle this over the cooled cookies for a beautiful finish.
Notes
- Tip 1: Store leftover cookies in an airtight container at room temperature for up to one week.
- Tip 2: You can freeze cookie dough balls for later use. Just place them on a baking sheet, freeze until solid, then transfer to a zip-top bag for up to three months.
- Tip 3: Instead of using chocolate kisses, consider mixing in chocolate chips or chunks for an extra chocolatey experience.
- Tip 4: You can experiment with different sugars such as coconut sugar or maple sugar for a unique flavor profile.
- Tip 5: Chopped nuts like walnuts or pecans can be added for a delightful crunch.