Pavlova Peeps Nests
Growing up, one of my favorite things about springtime was the arrival of Easter treats. Among them, nothing captured my heart quite like Pavlova Peeps Nests. These fluffy, sweet confections are not only a treat for the taste buds but also a feast for the eyes. I remember the first time I made them; I was in my kitchen, surrounded by colorful decorations and the scent of whipped cream filling the air. The excitement of creating these delightful nests, topped with cheerful Peeps, instantly transported me back to my childhood, where every egg hunt was an adventure filled with sugary surprises.
As I whisked the egg whites, I could feel the anticipation building. Would they achieve that perfect, glossy finish? Would the nests hold their shape? With each dollop of meringue, I envisioned the vibrant colors and textures that would come alive as I topped them off with luscious whipped cream and playful candy eggs. Every step of the process was a delightful experience, bringing joy not only to my palate but also to my heart. This recipe is more than just a dessert; it’s a celebration of spring, creativity, and the joy of sharing sweet moments with loved ones. So, whether you’re hosting a gathering or simply indulging in a personal treat, the Pavlova Peeps Nests will surely add a dash of magic to your table.
Recipe Snapshot
60 mins
0 mins
0 mins
Medium
110 kcal
1 g
Gluten-Free, Low FODMAP
6 g
Oven, Baking Sheet, Frying Pan, Mixing Bowl, Wooden Spoon
Why You’ll Love This Pavlova Peeps Nests
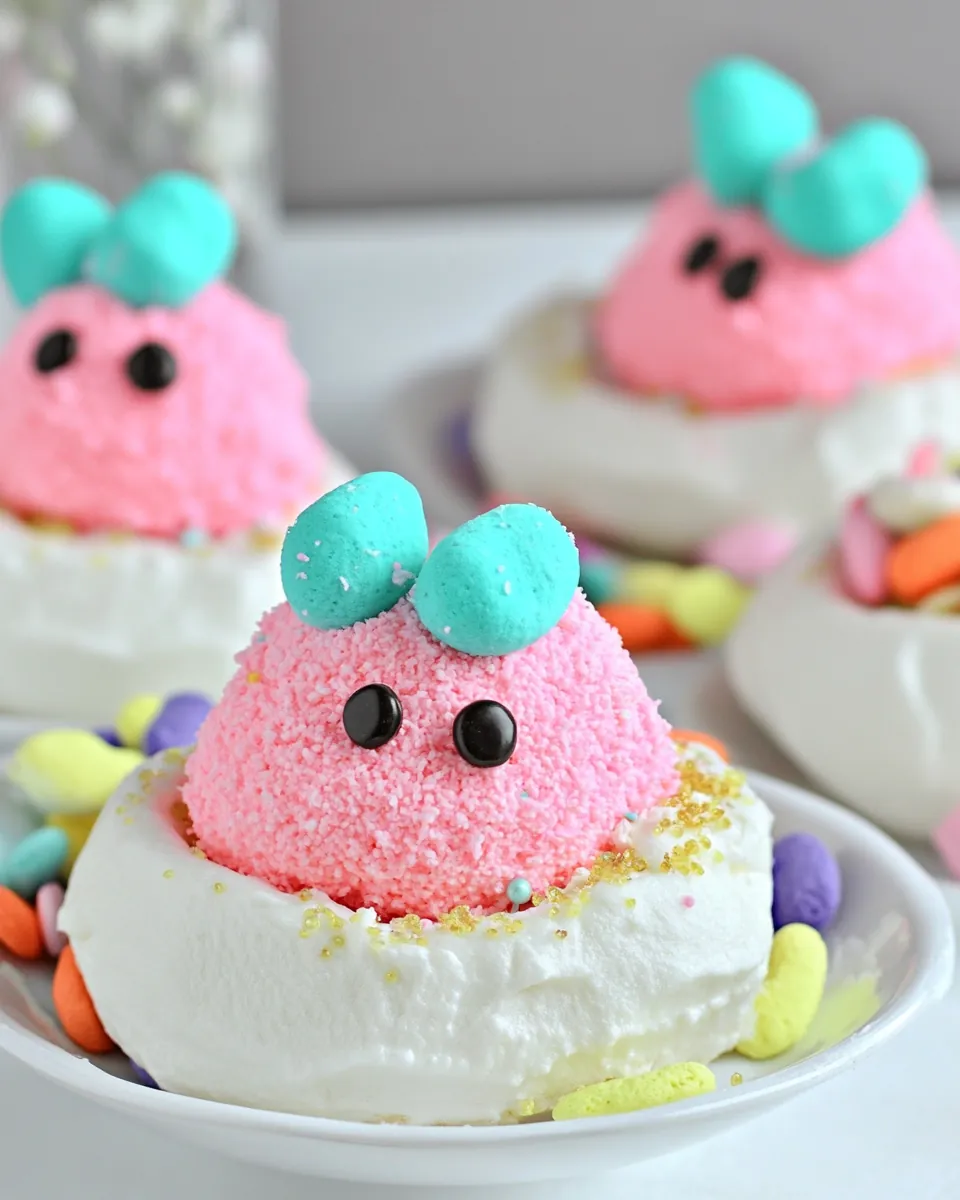
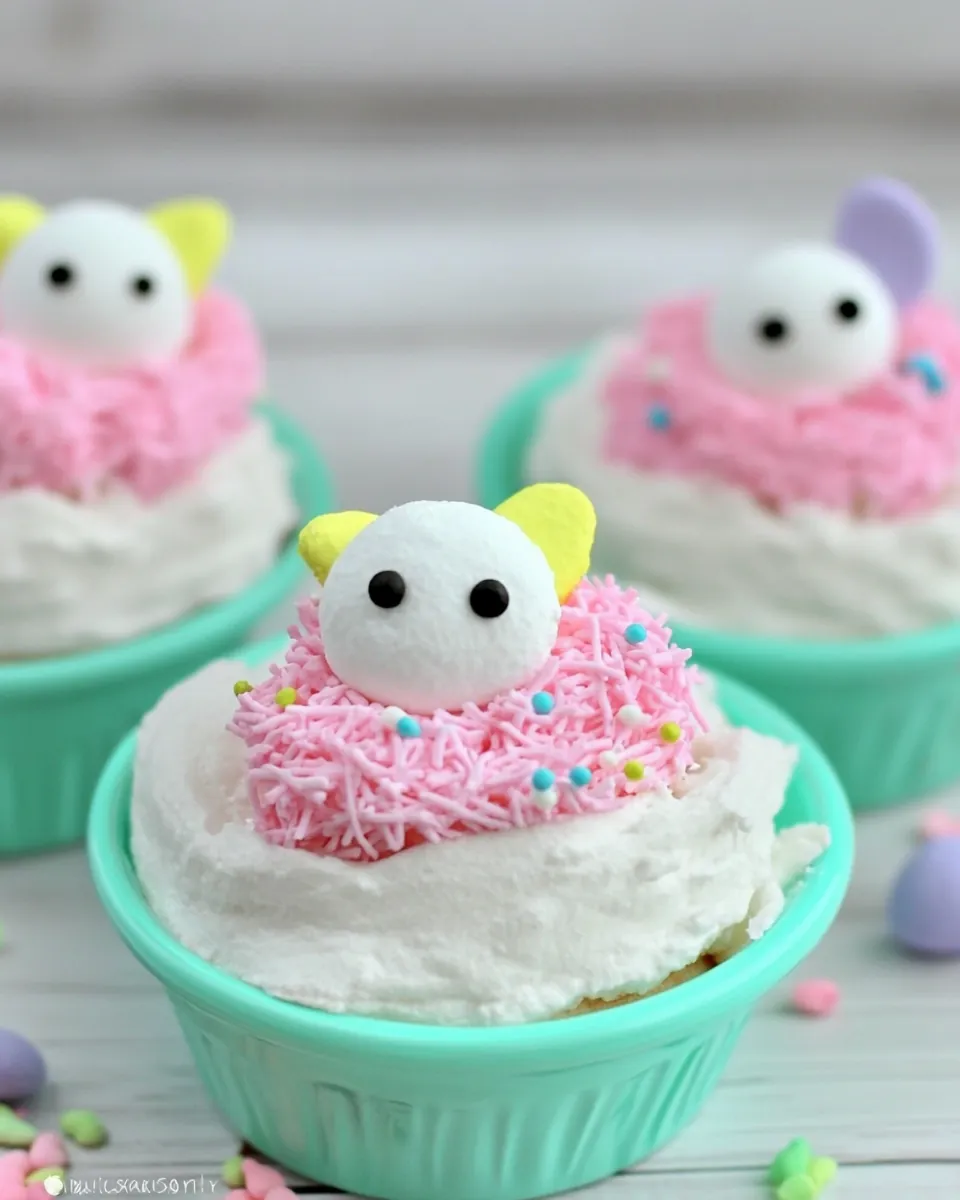
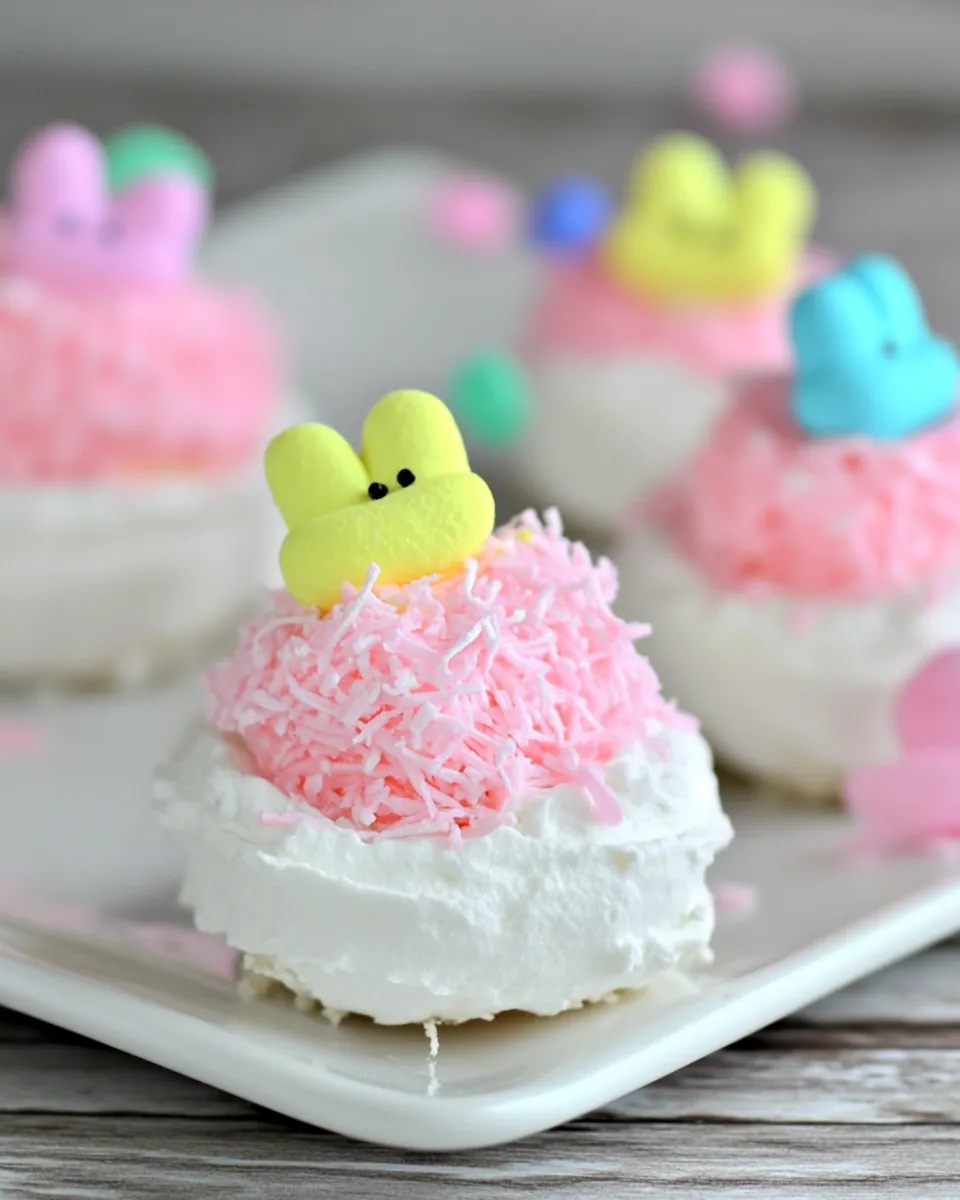
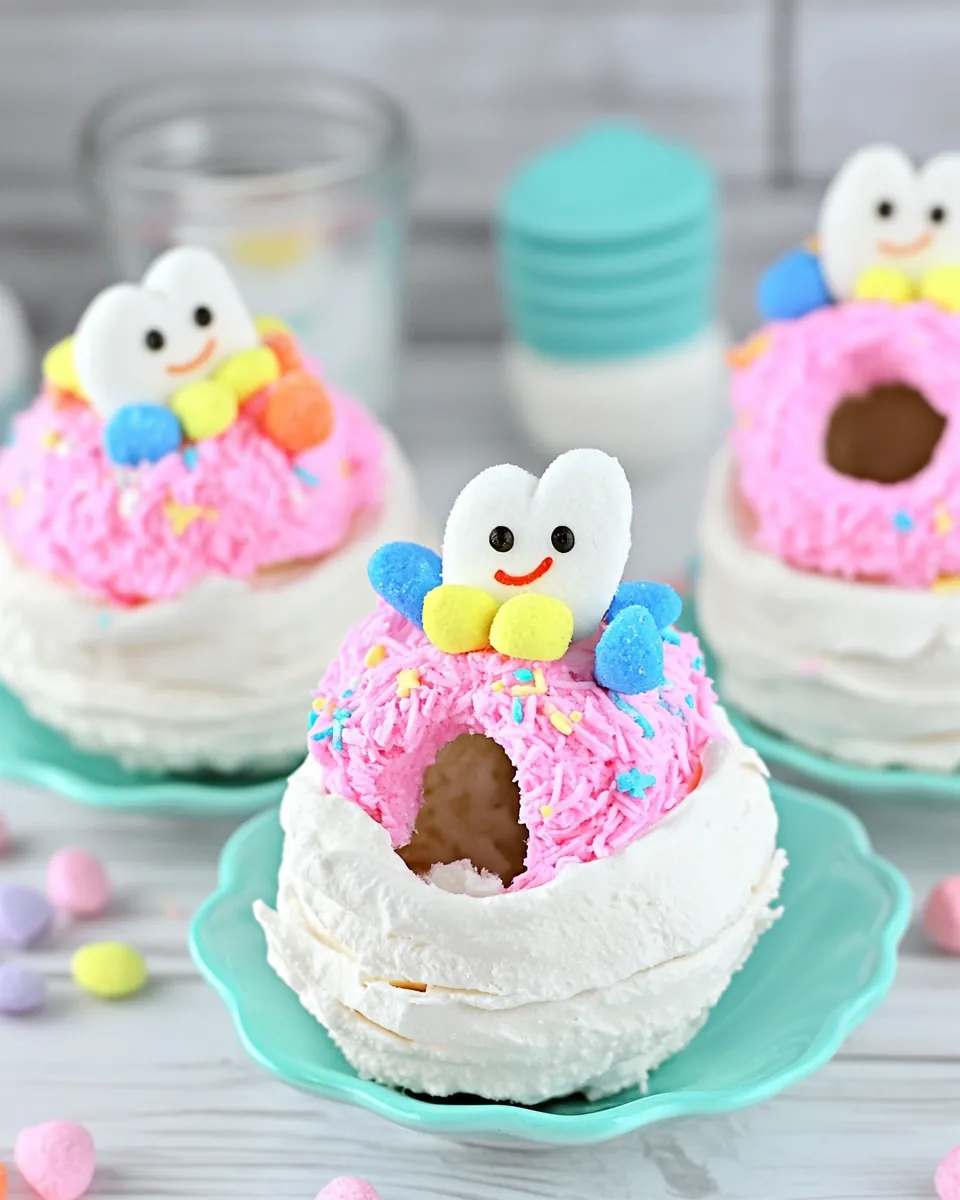
Whimsical Presentation
One of the reasons I adore Pavlova Peeps Nests is their whimsical presentation. The soft, airy meringue nests resemble tiny clouds, and when topped with colorful Peeps, they become an enchanting centerpiece for any spring celebration. They look just as delightful as they taste!
Fun for All Ages
This recipe is an excellent activity for families, especially during Easter. Kids love helping out, whether it’s whipping the egg whites or decorating the nests with candy. It becomes a fun bonding experience, creating sweet memories along the way.
Versatile Toppings
Another highlight is the versatility of toppings. Beyond the iconic Peeps, you can experiment with different candies and sprinkles, allowing your creativity to shine. It’s a fun way to personalize your Pavlova Peeps Nests for any occasion!
Light and Airy Texture
The texture of the meringue itself is something to rave about. The outer layer is crisp, while the inside remains soft and chewy. Each bite is an explosion of sweet flavor that melts in your mouth, making it impossible to resist coming back for more.
Perfect for Spring Celebrations
Spring is the time for renewal, and what better way to celebrate than with a dessert that embodies the spirit of the season? The Pavlova Peeps Nests are perfect for Easter brunches, garden parties, or simply as a delightful sweet treat to brighten your day.
Easy to Make
Don’t let the fancy appearance fool you; this recipe is surprisingly easy to make. With just a handful of ingredients and straightforward steps, you’ll have a stunning dessert ready to impress your guests in no time!
Recipe Ingredients for Pavlova Peeps Nests
When crafting Pavlova Peeps Nests, the ingredients are simple yet crucial for achieving that perfect texture and flavor. Each component plays a vital role in creating those delightful nests. Let’s dive into what makes these ingredients special.
- 3 large egg whites – Fresh egg whites are essential for the meringue’s stability and volume. Ensure they’re at room temperature for the best results.
- 1/8 teaspoon cream of tartar – This acid helps stabilize the egg whites, ensuring they whip up to stiff peaks.
- 1/2 cup sugar – Granulated sugar sweetens the meringue and contributes to its glossy finish.
- 1 teaspoon pure vanilla – Pure vanilla adds a delicious depth of flavor to the meringue.
- 1 1/2 cups unsweetened whipped cream – Light and airy, the whipped cream is the perfect topping for your nests.
- 1/2 teaspoon vanilla – Enhances the flavor of the whipped cream.
- 1 tablespoon powdered sugar – A touch of powdered sugar sweetens the whipped cream without weighing it down.
- 3-4 drops green food coloring – This adds a festive touch to your whipped cream, making it look like a spring garden.
- About 8 Peeps – Iconic and colorful, these marshmallow treats make for a fun and festive decoration.
- Candy eggs and/or sprinkles – Optional, but highly encouraged for an extra splash of color and fun!
Step by Step Instructions for Pavlova Peeps Nests
Creating Pavlova Peeps Nests is a delightful process that’s easy to follow. Let’s take this journey together, step by step, and soon you’ll have your beautiful nests ready to impress!
- Preheat your oven to 200 degrees Fahrenheit. Line two baking sheets with parchment paper or a silpat mat to ensure your meringues don’t stick.
- In a mixing bowl, beat the egg whites using an electric mixer on high speed. This will take about 2 minutes until stiff peaks form. You want the egg whites to be firm enough to hold their shape.
- As you continue to beat, gradually add the sugar, one tablespoon at a time. This slow addition is key to dissolving the sugar completely, which will create a smooth meringue. Continue to beat for about 5 minutes until the mixture is stiff, glossy, and there is no grittiness when you rub it between your fingers.
- Next, gently fold in the vanilla, being careful not to deflate your meringue. This is where the flavor magic happens!
- Using two spoons, scoop dollops of the meringue onto the prepared baking sheets. Aim for small circles about 3 inches in diameter. You can also use a piping bag to achieve perfect shapes.
- With the back of one spoon, create an indent in the center of each dollop to form a nest shape. This will hold your delightful fillings later.
- Bake the meringues for 50 to 60 minutes, rotating the baking sheets halfway through. The meringues are done when they’re no longer sticky to the touch but still soft inside.
- Once baked, turn off the oven and let the meringues cool completely inside. This slow cooling helps them maintain their structure.
- Once cooled, gently remove the meringues from the baking sheets and place them on a serving plate. They should come off easily.
- Now it’s time to prepare the whipped cream. In a separate bowl, combine the whipped cream, powdered sugar, vanilla, and a few drops of green food coloring. Whip until soft peaks form, creating a light, airy topping.
- Top each meringue nest with about 2 tablespoons of whipped cream and finish with a Peep and a sprinkle of candy eggs or sprinkles for that fun touch.
- Serve immediately and watch as everyone delights in these whimsical Pavlova Peeps Nests!
Things Worth Knowing
- Air Temperature: Ensure your egg whites are at room temperature for better volume when whipping.
- Storing Meringues: Store any leftover meringues in an airtight container at room temperature. They can become sticky if exposed to moisture.
- Whipping Technique: When whipping the cream, avoid over-whipping; you want it fluffy, not grainy.
- Temperature Control: Make sure not to open the oven door while baking, as this can cause the meringues to crack.
Ways to Customize
There are plenty of ways to make your Pavlova Peeps Nests uniquely yours. Here are some fun ideas to take this delightful dessert to the next level!
- Storage: To store leftovers, keep them in an airtight container to prevent moisture from softening the meringues.
- Freezing: You can freeze the baked meringues for up to a month. Just ensure they are completely cooled and stored properly.
- Flavor Variations: Add a splash of coconut extract or a hint of lemon juice to the whipped cream for a refreshing twist.
- Alternative Toppings: Try different candies like chocolate eggs or seasonal fruits for a fresh take.
- Color Themes: Use different food coloring to match your celebrations, like pastels for spring or vibrant colors for a birthday party.
- Mini Nests: Create smaller versions for bite-sized desserts, perfect for parties or gatherings.
Serving Suggestions
When it comes to serving Pavlova Peeps Nests, the possibilities are endless! Here are some delightful ideas for presenting this whimsical dessert:
- Celebrate with Style: Serve these nests at an Easter brunch alongside fresh fruits and pastries for a festive spread.
- Picnic Perfect: Pack them for a picnic, where their charm will surely impress friends and family.
- Pair with Coffee: These sweet treats pair wonderfully with a strong cup of coffee or tea, balancing the sweetness perfectly.
- Decorative Platter: Arrange them on a decorative platter with edible flowers for a stunning display at any spring event.
- Individual Servings: For a more formal event, serve them on individual plates, garnished with additional whipped cream and sprinkles.
- Storage Tips: If you have leftovers, keep them in an airtight container at room temperature to maintain the meringue’s texture.
FAQ
Conclusion
The Pavlova Peeps Nests are a delightful way to celebrate the spring season with their light, airy texture and playful presentation. These nests are not just a treat for your taste buds; they’re also a visually stunning addition to any gathering. I encourage you to give them a try and make some sweet memories with your loved ones. It’s a fun and festive way to indulge this Easter and beyond.
Pavlova Peeps Nests
Ingredients
Equipment
Method
- Preheat your oven to 200 degrees Fahrenheit. Line two baking sheets with parchment paper or a silpat mat to ensure your meringues don’t stick.
- In a mixing bowl, beat the egg whites using an electric mixer on high speed. This will take about 2 minutes until stiff peaks form. You want the egg whites to be firm enough to hold their shape.
- As you continue to beat, gradually add the sugar, one tablespoon at a time. This slow addition is key to dissolving the sugar completely, which will create a smooth meringue. Continue to beat for about 5 minutes until the mixture is stiff, glossy, and there is no grittiness when you rub it between your fingers.
- Next, gently fold in the vanilla, being careful not to deflate your meringue. This is where the flavor magic happens!
- Using two spoons, scoop dollops of the meringue onto the prepared baking sheets. Aim for small circles about 3 inches in diameter. You can also use a piping bag to achieve perfect shapes.
- With the back of one spoon, create an indent in the center of each dollop to form a nest shape. This will hold your delightful fillings later.
- Bake the meringues for 50 to 60 minutes, rotating the baking sheets halfway through. The meringues are done when they’re no longer sticky to the touch but still soft inside.
- Once baked, turn off the oven and let the meringues cool completely inside. This slow cooling helps them maintain their structure.
- Once cooled, gently remove the meringues from the baking sheets and place them on a serving plate. They should come off easily.
- Now it’s time to prepare the whipped cream. In a separate bowl, combine the whipped cream, powdered sugar, vanilla, and a few drops of green food coloring. Whip until soft peaks form, creating a light, airy topping.
- Top each meringue nest with about 2 tablespoons of whipped cream and finish with a Peep and a sprinkle of candy eggs or sprinkles for that fun touch.
- Serve immediately and watch as everyone delights in these whimsical Pavlova Peeps Nests!