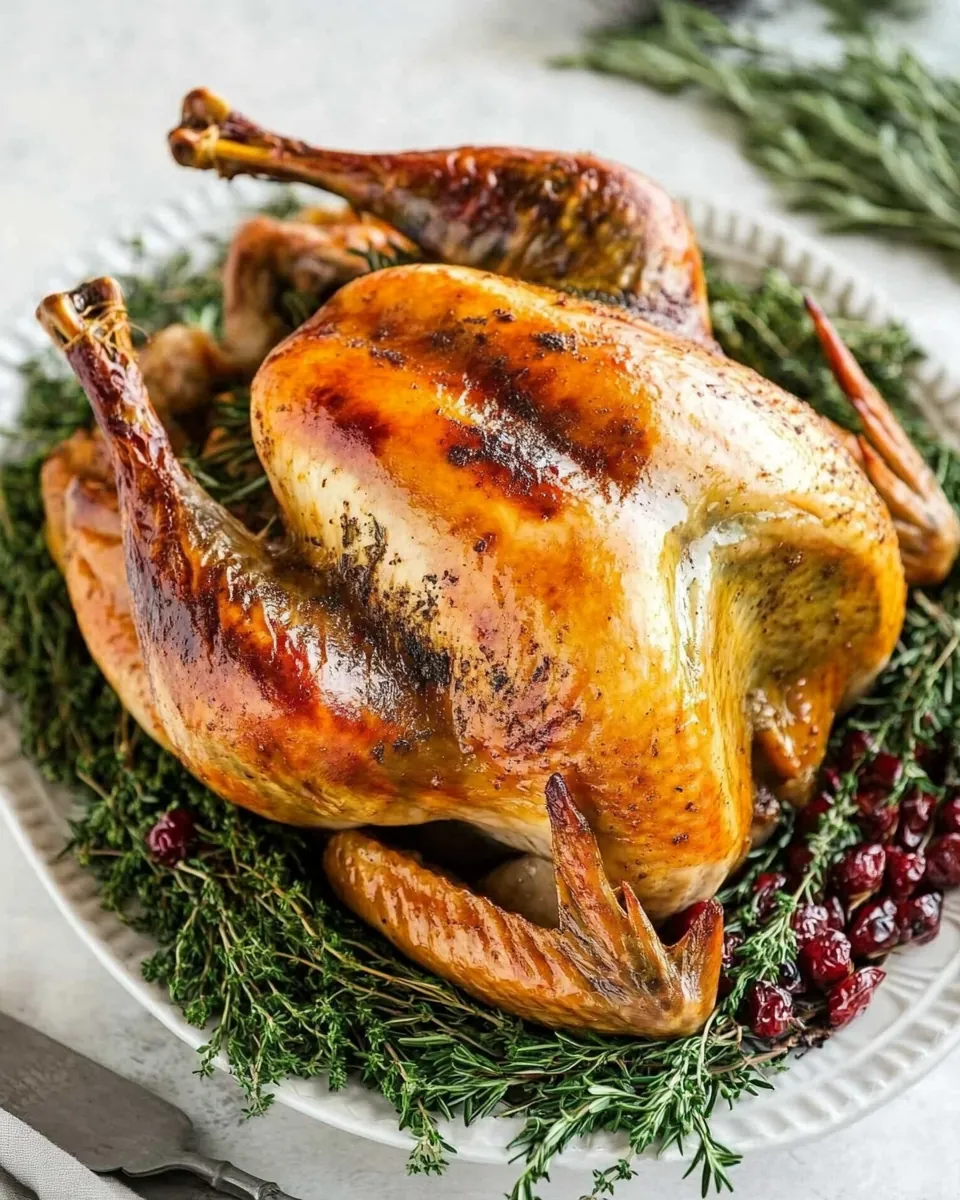
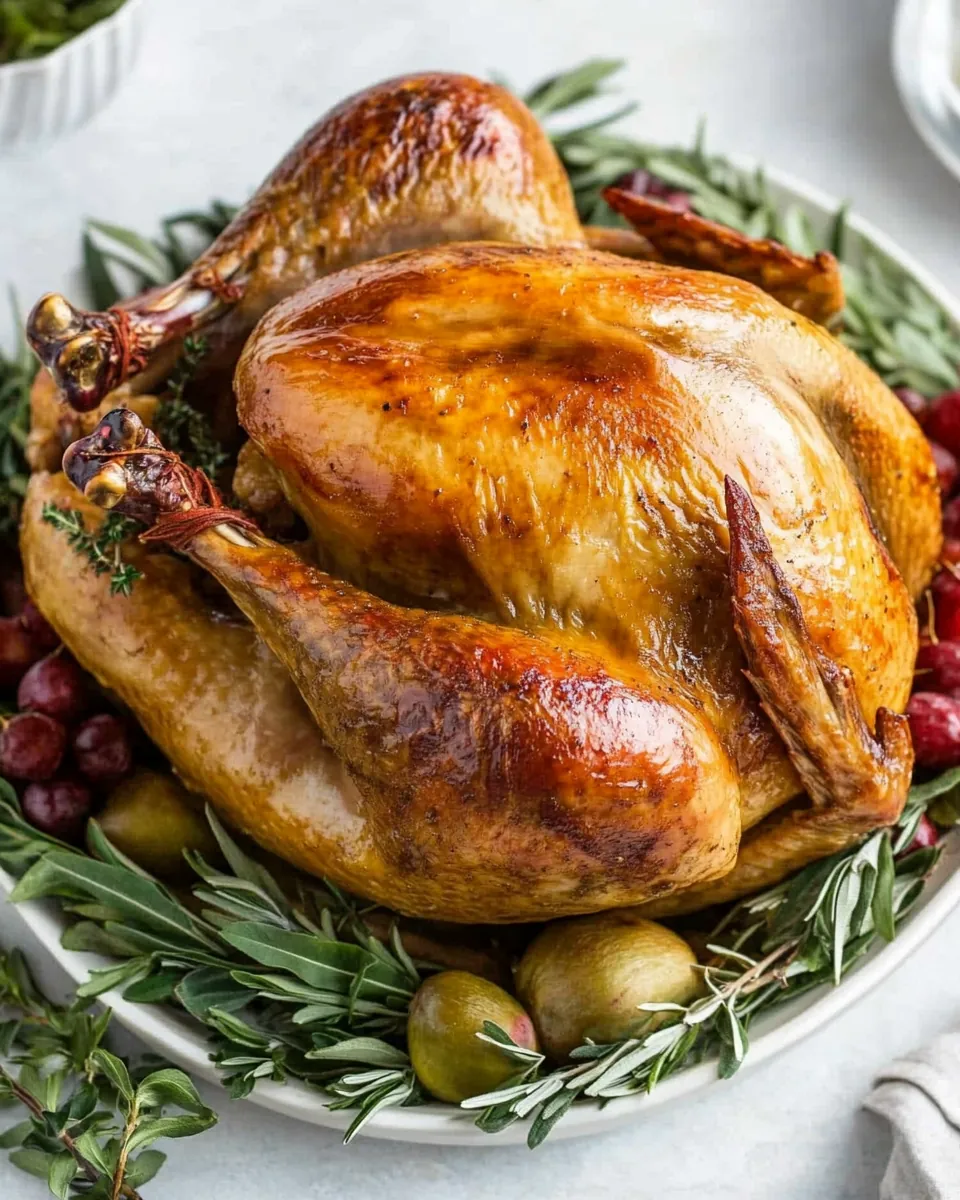
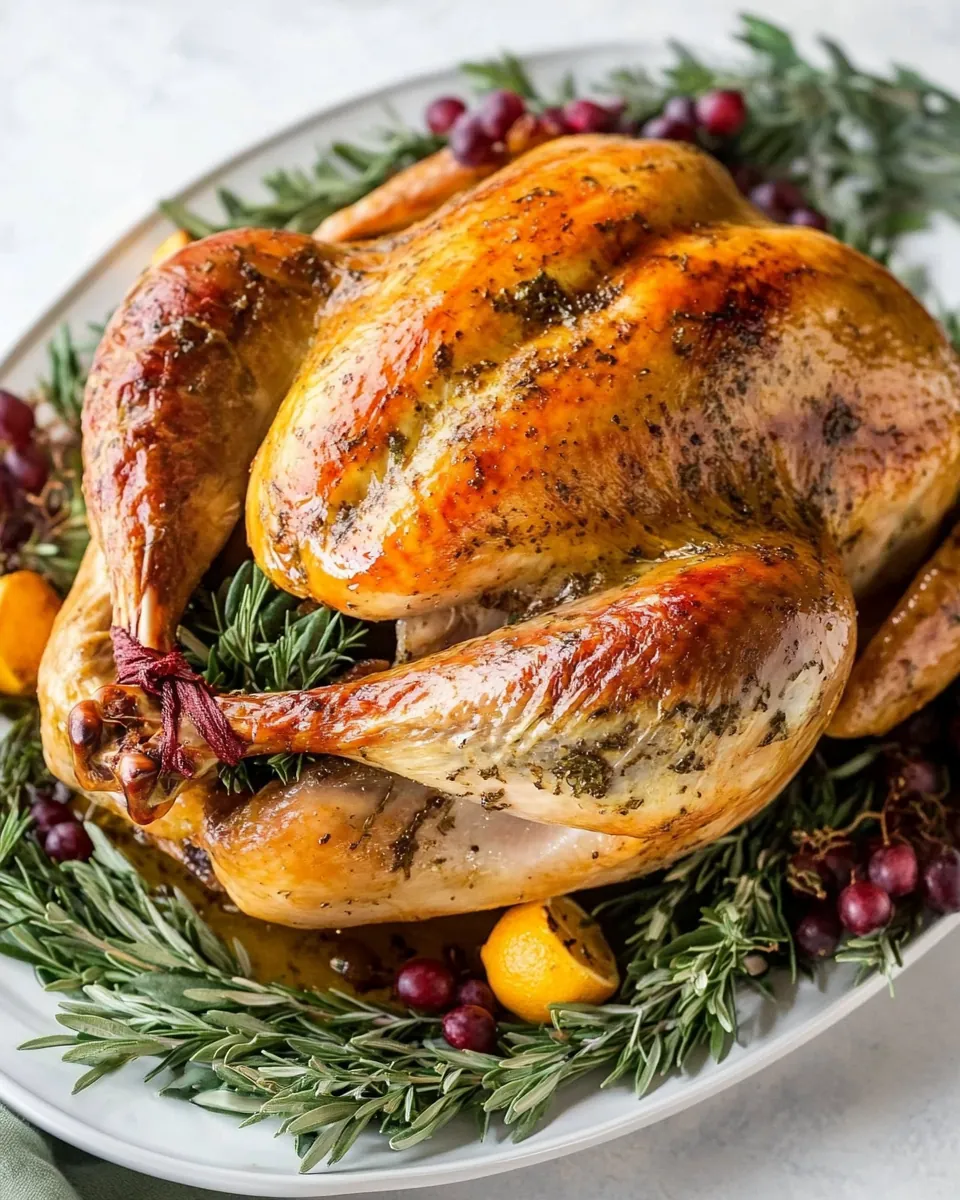
Perfect Roast Turkey
Every holiday season, the aroma of a well-roasted turkey fills my home and sparks fond memories. The Perfect Roast Turkey is more than just a dish; it’s a centerpiece that gathers friends and family around the table. I still remember the first time I tackled the challenge of roasting a turkey. The anticipation of that golden, crispy skin, and juicy meat was both exciting and nerve-wracking. With every step, from the careful brining to the precise timing, I felt a sense of accomplishment. This dish has become a cherished tradition, a labor of love that I look forward to each year. The Perfect Roast Turkey embodies warmth, celebration, and togetherness, creating a delicious bond that lasts long after the last bite is savored. So, let’s embark on this culinary adventure together and make this Thanksgiving unforgettable!
Recipe Snapshot
59 mins
30 mins
29 mins
Hard
375 kcal
58 g
Keto, Gluten-Free, Low FODMAP
17 g
Oven, Baking Sheet, Frying Pan, Whisk, Saucepan, Mixing Bowl, Chef’s Knife, Wooden Spoon
What You’ll Enjoy About This Perfect Roast Turkey
Timeless Tradition
Roasting a turkey is a time-honored tradition that evokes memories of family gatherings and festive celebrations. The Perfect Roast Turkey sits proudly at the center of our feasts, bringing everyone together to share stories and laughter. This recipe not only delivers incredible flavor but also creates an atmosphere of joy and togetherness.
Flavorful Brine
The secret to a succulent turkey lies in the brining process. Using kosher salt and baking powder helps to dry out the skin while allowing moisture to penetrate the meat, resulting in juicy, flavorful slices. This dry-brining technique is a game-changer that elevates the overall taste of the turkey, making it the star of the show.
Crispy Skin
Who doesn’t love a turkey with perfectly crispy skin? The combination of butter and olive oil used for basting creates that golden brown exterior that we all crave. This technique not only enhances the texture but also adds richness to the meat, ensuring every bite is deliciously satisfying.
Endless Leftover Possibilities
One of the best parts of roasting a turkey is the leftover potential. With the Perfect Roast Turkey, you can whip up sandwiches, soups, or even casseroles for days after the big meal. It’s a delight to repurpose such a magnificent dish into new meals, ensuring the flavors live on long after the gathering has ended.
Gravy Mastery
The accompanying gravy is essential to a successful turkey dinner. Using the drippings from the roasted turkey, combined with chicken broth and cornstarch, creates a rich, velvety sauce that enhances the flavors of each serving. This gravy isn’t just a side; it’s the finishing touch that ties the entire meal together.
Family Bonding
Preparing the Perfect Roast Turkey is a wonderful opportunity to bond with loved ones. Involving family members in the cooking process fosters a sense of teamwork and shared accomplishment. Whether it’s mixing the brine, basting the turkey, or carving the final product, these moments create lasting memories that define our family traditions.
What to Gather for Perfect Roast Turkey
The ingredients for the Perfect Roast Turkey are simple yet impactful, each playing a vital role in achieving that coveted flavor and texture. The star of the show, the turkey, is complemented by kosher salt for brining, which enhances the meat’s natural flavor. Butter and olive oil bring richness to the skin, while fresh sage adds an aromatic touch. Together, these ingredients create a perfectly balanced dish that embodies the essence of a holiday feast.
- 1 (15-pound) frozen turkey, thawed, neck, heart, and gizzards removed and discarded: The main attraction; a well-chosen turkey ensures a flavorful centerpiece.
- 1/2 cup kosher salt: Essential for dry-brining, enhancing moisture and flavor in the turkey.
- 2 tablespoons baking powder: Helps achieve that crispy skin we all yearn for.
- 4 tablespoons butter, softened, plus 4 tablespoons butter, melted: Adds richness and flavor, perfect for basting.
- 1 bunch fresh sage: A classic herb that imparts aromatic notes to the turkey.
- Freshly ground black pepper: A simple seasoning that elevates the turkey’s flavor profile.
- 1/2 cup olive oil: Used for basting, contributing to the golden skin and delicious taste.
- Reserved pan drippings from roasted turkey: A key component for making gravy with deep, rich flavor.
- 7 cups chicken broth or turkey broth: Adds moisture and flavor to the gravy.
- 1/4 cup cornstarch: Used to thicken the gravy, making it rich and velvety.
- Salt and freshly ground black pepper: For final seasoning, ensuring the turkey is perfectly flavored throughout.
Instructions for Perfect Roast Turkey
Roasting a turkey might seem daunting, but with a little patience and attention, it’s a rewarding process. Let’s take each step together to create a stunning Perfect Roast Turkey that will impress your guests and fill your home with delightful aromas.
- Rinse the turkey well inside and out under cold running water. This step is crucial for cleanliness. Once rinsed, set the turkey on a rack set over a rimmed baking sheet. Remove any excess fat or pin feathers and pat it dry with paper towels.
- In a small bowl, add kosher salt and baking powder, stirring to combine. This mixture will form the base of your dry brine. Sprinkle the salt mixture thoroughly over the turkey, making sure to coat evenly. Stop before a crust forms; you may not need all of the salt mixture.
- Transfer the turkey to the rimmed baking sheet and refrigerate, uncovered, for 12 to 24 hours. This process allows the flavors to penetrate the meat while drying out the skin for that perfect crunch. If you can’t wait, you can loosely cover and refrigerate for up to 3 days.
- Remove the turkey from the refrigerator and allow it to sit at room temperature for 2 hours before roasting. This helps ensure even cooking throughout the bird.
- Preheat the oven to 425 degrees Fahrenheit, placing a rack in the lower third of the oven. In a small bowl, stir together the melted butter and olive oil for basting, setting it aside for later.
- Using paper towels, thoroughly dry both the inside and outside of the turkey. This step is essential for achieving crispy skin. Gently slide your fingers between the skin and the breast of the turkey to loosen it. Spread half of the softened butter between the breast and the skin, ensuring it’s evenly distributed.
- Arrange twelve sage leaves evenly between the skin and the breast, then place the remaining sage in the cavity of the turkey. Season generously with black pepper, making sure to include the cavity as well for an extra flavor boost.
- Truss the turkey, placing the bird on its back. Rub the remaining 2 tablespoons of softened butter all over the bird. Place it in a roasting pan breast-side up. Pour about 1 inch of water into the bottom of the roasting pan to keep the turkey moist while it cooks.
- Lower the oven temperature to 325 degrees Fahrenheit and roast the turkey for 3 to 3 ½ hours. Be sure to baste the turkey every hour with the butter and oil mixture. If needed, add additional water to the pan to maintain moisture.
- Start testing for doneness after 2 ½ hours. A thermometer inserted into the thickest part of the thigh should reach 165 degrees, and the juices should run clear, indicating that it’s fully cooked. Once done, transfer the turkey to a carving board and tent it with aluminum foil. Allow it to rest for 30 minutes before carving.
- While the turkey rests, place the roasting pan with the drippings over 2 burners on medium-high heat. Add broth and bring to a simmer, scraping up the browned bits from the bottom of the pan. This enhances the flavor of your gravy.
- Pour the contents through a fine-mesh strainer set over a large bowl. Using a large flat spoon, skim off and discard the layer of fat that floats to the surface. Alternatively, use a fat separator to pour off the liquid while leaving the grease behind.
- Transfer the liquid to a saucepan and place it over medium-high heat to simmer briskly. In a small bowl, combine some of the liquid with cornstarch to create a slurry, whisking until smooth. Gradually whisk this slurry into the simmering liquid, cooking until the gravy thickens, about 5 minutes. Season to taste with salt and black pepper.
- On a large cutting board, place the turkey breast side up. Remove the truss and begin carving one side of the turkey fully before moving on to the other side. For removing the wing, pull it away from the body and slice through the skin to locate the shoulder joint; cut through the joint to remove the wing.
- To remove the whole leg, pull the leg away from the body and slice through the skin to locate the thigh joint. Cut through that joint to remove the entire leg. For separating the thigh and leg, cut through the joint that separates the drumstick from the thigh. You can serve these pieces whole or carve them into thin slices parallel to the bone.
- For removing the breast, cut along the breastbone following the curvature of the bones. Use your hand or a carving fork to gently pull the breast meat away while using the knife to detach the meat from the ribs. Place the turkey breast on the cutting board, and for larger slices, slice the breast meat on an angle.
- Repeat the carving process on the second side of the turkey. Arrange all cut portions on a serving platter and pass the gravy separately for guests to enjoy.
Things Worth Knowing
- Brining Tip: Brining your turkey ahead of time is essential for achieving maximum flavor and moisture. It allows the salt to penetrate the meat, making it juicier.
- Resting Time: Always allow the turkey to rest before carving. This helps retain moisture and ensures a juicy result.
- Doneness Check: Invest in a reliable meat thermometer to check the turkey’s doneness accurately. The thickest part of the thigh should reach 165 degrees Fahrenheit.
- Flavor Boost: Experiment with herbs and spices in the cavity for added flavor. Options like rosemary, thyme, or even citrus can enhance the taste.
- Gravy Consistency: If your gravy is too thick, whisk in some extra broth to reach your desired consistency. If it’s too thin, continue simmering to thicken it up.
Make It Your Own

There’s always room for personal touches when it comes to the Perfect Roast Turkey. Here are some thoughtful tips to help you make this dish uniquely yours.
- Storage: Store any leftover turkey covered in the refrigerator for up to 4 days. This keeps it fresh and ready for delicious meals.
- Freezing: You can freeze cooked turkey for longer storage. Wrap it tightly in plastic wrap, then aluminum foil, to prevent freezer burn.
- Pairing: Serve your turkey with classic sides like mashed potatoes, roasted vegetables, or cranberry sauce to create a traditional feast.
- Herb Variations: Feel free to mix different herbs or even use flavored butters for basting to add unique flavor profiles.
- Make Ahead: If you’re busy during the holidays, consider preparing the turkey a day ahead. Roast it, carve, and store in its juices to reheat on the big day.
- Gravy Additions: Add sautéed mushrooms or a splash of stock from simmering the turkey neck to your gravy for added depth of flavor.
Accompaniments for Perfect Roast Turkey
Serving the Perfect Roast Turkey can be as delightful as preparing it. Here are some excellent accompaniments that will enhance your feast:
- Mashed Potatoes: Creamy mashed potatoes are a classic pairing. They soak up the delicious gravy and bring comfort to your holiday meal.
- Roasted Vegetables: Seasonal roasted vegetables like carrots, Brussels sprouts, and sweet potatoes bring color and balance to your plate.
- Cranberry Sauce: A tangy cranberry sauce adds a refreshing contrast to the rich flavors of turkey, making every bite special.
- Stuffing: Whether you prefer traditional or creative stuffing, it complements the turkey’s flavor beautifully and rounds out the meal.
- Green Beans: Garlic sautéed green beans provide a crisp, fresh element that brightens up the plate and enhances the overall flavors.
- Seasonal Salad: A mixed greens salad with nuts and vinaigrette can add a light, refreshing touch to your holiday table.
- Serving Style: Consider serving your turkey family-style on a large platter, allowing guests to help themselves to their preferred portions.
- Leftover Ideas: Encourage creative use of leftovers for sandwiches, soups, or casseroles, ensuring no delicious bite goes to waste.
FAQ
Conclusion
The Perfect Roast Turkey is more than just a meal; it’s a centerpiece that brings family and friends together. The juicy meat, crispy skin, and rich gravy make every bite special, making it a dish worth mastering. I encourage you to try this recipe for your next gathering—it’s sure to impress and create lasting memories around your table. Enjoy every moment of the cooking process and the delicious outcome it brings!
Perfect Roast Turkey
Ingredients
Equipment
Method
- Rinse the turkey well inside and out under cold running water. Set on a rack set over a rimmed baking sheet. Remove any excess fat or pin feathers and pat dry with paper towels.
- In a small bowl, add kosher salt and baking powder and stir to combine. Sprinkle the salt mixture over the bird. Coat well, stopping before a crust forms (you may not need all of the salt mixture).
- Transfer the turkey to a rimmed baking sheet and refrigerate, uncovered, for 12 to 24 hours (or loosely cover and refrigerate for up to 3 days).
- Remove the turkey from the refrigerator and let sit at room temperature 2 hours prior to roasting.
- Preheat the oven to 425 degrees and place a rack in the lower third of the oven. In a small bowl, stir together the melted butter and olive oil (for basting) and set aside.
- Using paper towels, dry both the inside and outside of the turkey. Gently slide your fingers between the skin and the breast of the turkey to loosen the skin. Spread half of the softened butter between the breast and the skin.
- Arrange twelve sage leaves evenly between the skin and the breast. Place the remaining sage in the cavity. Season with black pepper, including the cavity.
- Truss the turkey, place the bird on its back, and rub the remaining 2 tablespoons softened butter all over. Place in a roasting pan breast-side up. Pour 1 inch of water into the bottom of the roasting pan, then place turkey in the oven.
- Lower the oven temperature to 325 degrees. Roast the turkey for 3 to 3 ½ hours, basting every hour with the butter and oil mixture. Add additional water to the pan as needed.
- Begin testing for doneness after 2 ½ hours. A thermometer inserted into the thickest part of the thigh should reach 165 degrees, and the juices should run clear. Transfer the turkey to the carving board and tent with aluminum foil and allow to rest for 30 minutes.
- Place the roasting pan with drippings over 2 burners and turn heat to medium-high. Add broth and bring to a simmer, scraping up the browned bits off the bottom of the pan.
- Pour the contents through a fine-mesh strainer set over a large bowl. Using a large flat spoon, skim off and discard the layer of fat that floats to the surface, or pour the liquid into a fat separator and pour off the liquid, leaving the grease behind.
- Transfer the liquid to a saucepan, place over medium-high heat, and simmer briskly. In a small bowl, add some of the liquid and the cornstarch and whisk together to make a slurry. Gradually whisk the slurry into the simmering liquid, then cook until the gravy thickens, about 5 minutes. Season to taste with salt and black pepper.
- On a large cutting board, place the turkey breast side up. Remove the truss. Begin carving one side of the turkey completely before moving on to the other side.
- Removing the wing: Pull the wing away from the body and slice through the skin to locate the shoulder joint. Cut through the joint to remove the wing.
- Removing the whole leg: Pull the leg away from the body and slice through the skin to locate the thigh joint. Cut through the joint to remove the entire leg.
- Separating the thigh and leg: Cut through the joint that separates the drumstick from the thigh. Serve these pieces whole, or carve them by cutting off the meat in thin slices parallel to the bone.
- Removing the breast: Cut along the breastbone while following the curvature of the bones. Using your hand or a carving fork, gently pull the breast meat away while using the knife to remove the meat from the ribs. Place turkey breast on the cutting board. For larger slices, slice the breast meat on an angle.
- Repeat with the second side of the turkey. Arrange cut portions on a serving platter and pass the gravy separately.
Notes
- Turkey: Look for a turkey with the words “no salt added” on the label. Stay away from “self-basting” or Kosher turkeys which are already injected with a brine. The best (and safest) way to thaw a frozen turkey is slowly in the refrigerator over the course of several days (about 4 days for a 15-pound turkey). Never thaw a turkey using warm/hot water, in the microwave, or at room temperature, all of which let bacteria grow before the turkey is thawed.
- How much turkey: Plan on 1 ¼ pounds per person. If you can’t find a turkey small enough for your group, consider a turkey breast instead. And if you’re feeding a large group, consider a couple of medium or large turkeys rather than an enormous one (it is easier to thaw and cook a couple of average birds rather than the biggest one you can find).
- Kosher salt: Used for dry-brining (aka pre-salting). The salt draws out the extra moisture in the turkey, forms a salt solution on the outer layer of the bird, and is then reabsorbed back into the meat to season it. Don’t substitute standard table salt for the Kosher salt because it is much finer and much saltier.
- Baking powder: Baking powder dries out the outer layer of the turkey resulting in deliciously crispy skin.
- Storage: Store leftovers covered in the refrigerator for up to 4 days.