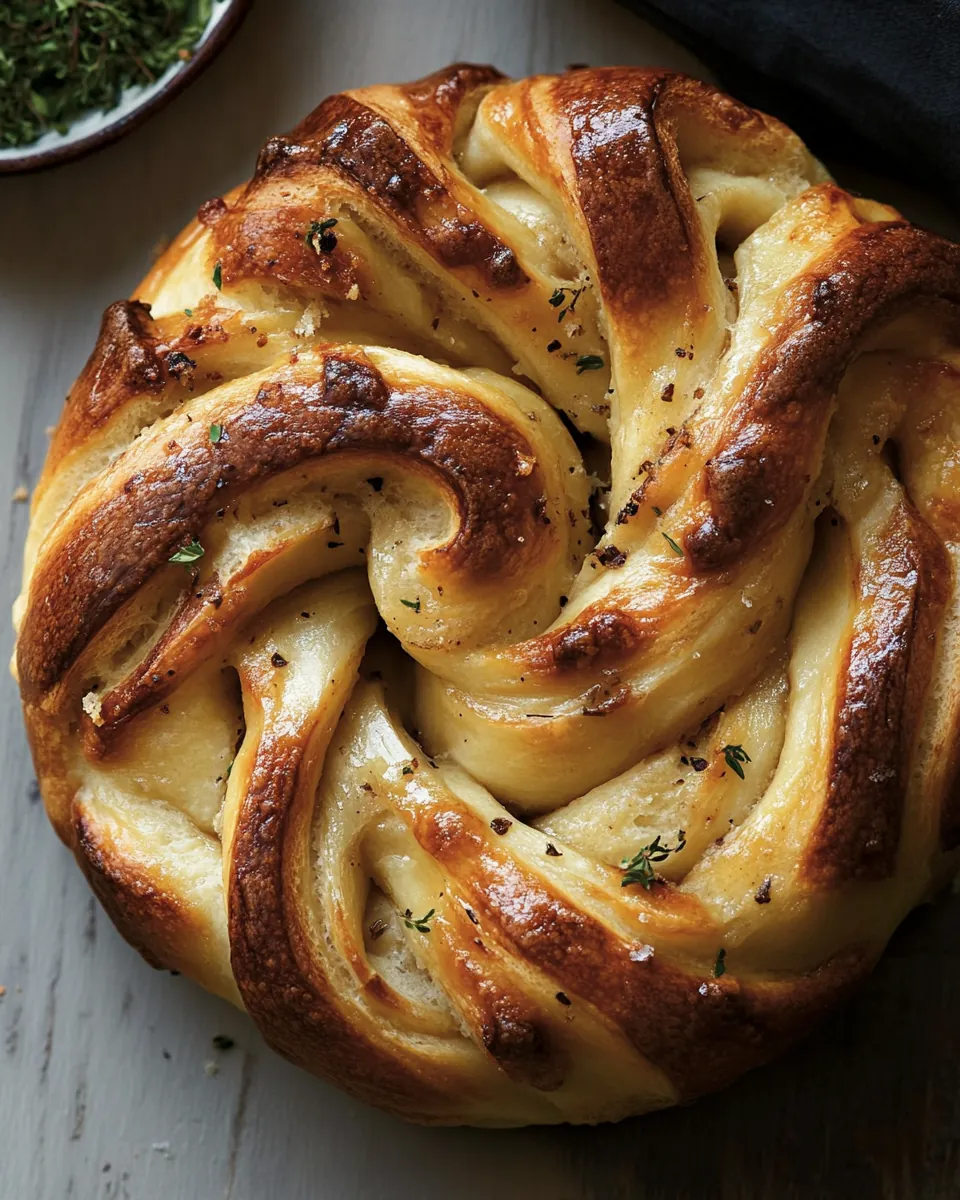
Onion Twist Bread
There’s something incredibly comforting about freshly baked bread, and when it comes to Onion Twist Bread, the aroma alone is enough to draw in anyone nearby. I remember the first time I made this beautiful loaf—my kitchen was filled with the rich scent of caramelized onions mingling with the warmth of bread baking. It was an overcast Saturday afternoon, and I was looking for a way to bring some cheer into my home. As the dough rose and transformed in front of my eyes, I couldn’t help but smile. This bread is not just a recipe; it’s an experience, a celebration of flavors and textures, perfect for sharing with friends and family.
As I twisted the dough, I felt a sense of artistry as I created something not just to feed the stomach, but to nourish the soul. The combination of roasted garlic, sweet onions, and the buttery richness of the bread creates layers of flavor that dance on your palate with every bite. This isn’t just any bread; it’s a showstopper that can take center stage at any meal. With a crispy crust and a soft, flavorful interior, Onion Twist Bread is sure to be a hit, whether you’re having a casual lunch or a festive dinner.
Hosting a gathering? Serve this bread warm, and watch your guests marvel at the beautiful twists. Or enjoy it with a bowl of homemade soup or a fresh salad. The memories created around the table, with the comforting aroma of baking bread wafting through the air, are what truly make this dish special. So, let’s roll up our sleeves and dive into the delightful world of baking this exceptional Onion Twist Bread.
Recipe Snapshot
60 mins
0 mins
0 mins
Hard
250 kcal
8 g
Gluten-Free
10 g
Food Processor, Oven, Baking Sheet, Skillet, Mixing Bowl, Grater, Chef’s Knife, Wooden Spoon
Why This Onion Twist Bread Shines
It’s All About the Flavors
One of the main reasons I adore Onion Twist Bread is its incredible flavor profile. The sweet caramelized onions and roasted garlic meld together perfectly, creating a rich filling that makes each bite a savory delight. This depth of flavor is what sets it apart from standard bread recipes.
Perfect for Any Occasion
This bread is incredibly versatile. Whether it’s a cozy family dinner, a festive gathering, or a simple snack while watching a movie, Onion Twist Bread fits the bill perfectly. It’s a bread that can be enjoyed any time of the year, making it a staple in my kitchen.
Fun to Make
There’s something therapeutic about kneading dough and shaping it by hand. The process of creating Onion Twist Bread is not only fun but also rewarding. It’s a great activity to do with kids or friends, allowing everyone to participate in the kitchen magic.
Beautiful Presentation
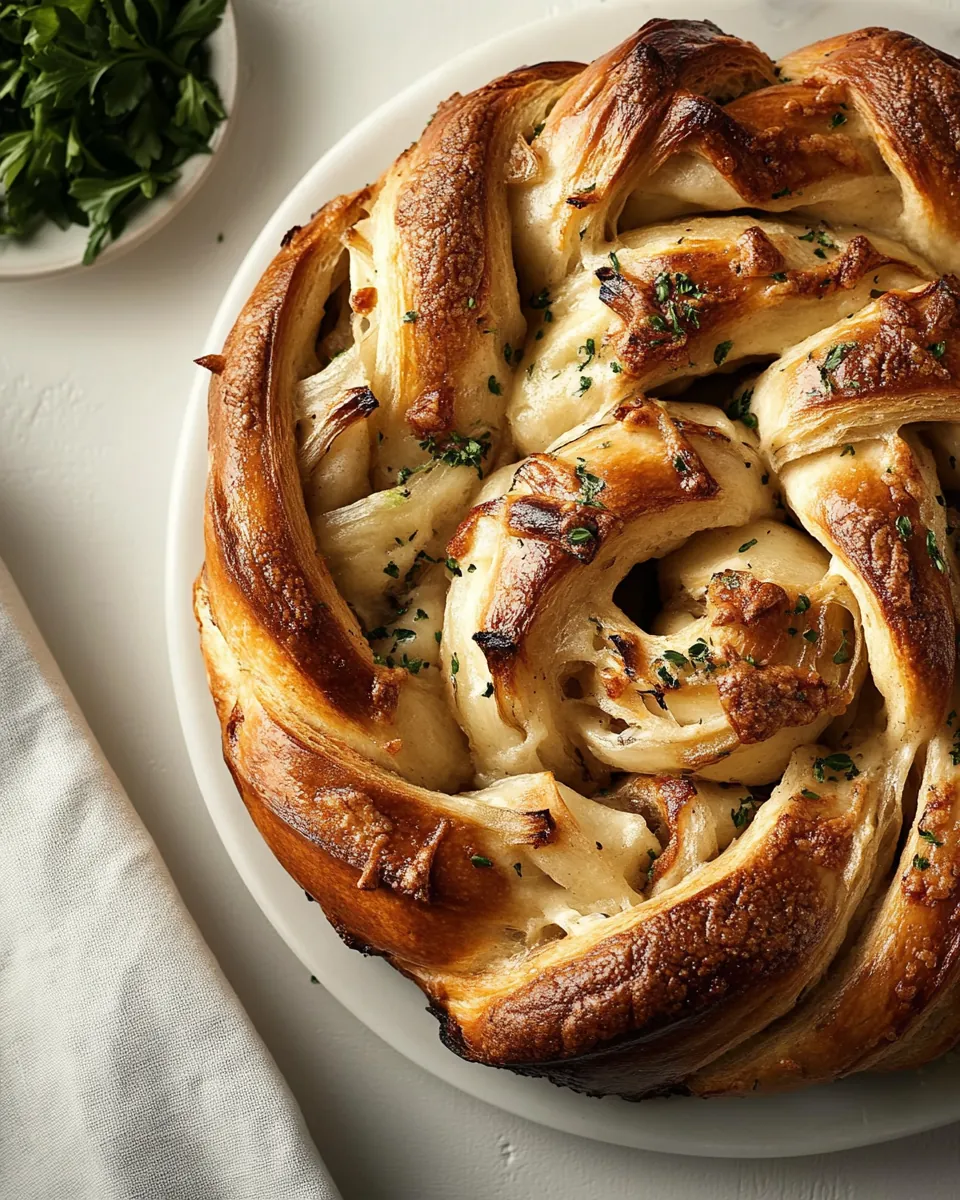
The twisted shape of this bread is not just for looks; it also creates a stunning presentation. When you pull apart a slice, the intricate layers of filling are revealed, making it visually appealing and perfect for impressing guests.
Leftover Versatility
If by chance you have any leftovers, this bread makes a delicious base for sandwiches or can be toasted and served with a spread. It doesn’t just end at the main dish; it continues to delight in new forms.
A Labor of Love
Lastly, making Onion Twist Bread is a labor of love. The time spent allowing the dough to rise, the care taken in preparing the flavorful filling, and the joy of watching it bake are what make this bread a heartfelt creation. It’s more than a recipe; it’s a way to express love for those you share it with.
Ingredients Overview for Onion Twist Bread

The ingredients for Onion Twist Bread come together in a beautiful harmony, each playing a crucial role in creating the final product. The star ingredients are definitely the onion and garlic, whose sweetness and depth elevate this bread to a new level. Combined with bread flour, butter, and a bit of milk, these components create a tender dough that is easy to work with and delicious to eat.
- Warm Water: About a quarter cup of warm water helps activate the yeast, ensuring the dough rises nicely.
- Active Dry Yeast: Two teaspoons of yeast is essential for leavening the bread, giving it that lovely fluffiness.
- Bread Flour: Three cups of bread flour create a sturdy base that can hold up the filling and shape well.
- Sugar: A quarter cup of sugar enhances the flavor and supports the yeast in its activity.
- Kosher Salt: Two teaspoons of salt are necessary to balance the flavors and enhance the overall taste of the bread.
- Butter: A quarter cup of softened butter adds richness and moisture to the dough.
- Milk: One cup of milk helps create a tender crumb in the bread, enhancing the texture.
- Egg: One large egg enriches the dough, giving it a nice structure and color.
- Garlic: One head of roasted garlic brings a deep, sweet flavor that pairs beautifully with the onions.
- Olive Oil: Two tablespoons of olive oil are used to sauté the onions, adding a lovely flavor.
- Yellow Onion: One large onion, chopped and caramelized, adds sweetness and depth to the filling.
- Fresh Thyme Leaves: Two tablespoons of thyme provide an aromatic touch that complements the filling.
- Grated Parmesan Cheese: A half cup of parmesan adds a salty, savory flavor to the filling, making it irresistible.
Recipe Steps for Onion Twist Bread
Making the Onion Twist Bread is an enjoyable and interactive process, perfect for a weekend baking project. The steps involve mixing, kneading, and ultimately baking, allowing the beautiful flavors to meld together. Let’s dive into the detailed steps of creating this masterpiece.
For the dough, start by stirring together ¼ cup warm water and 2 teaspoons active dry yeast in a medium bowl. Let it stand for about 5 minutes until it becomes frothy. This indicates that the yeast is active and ready to work its magic in your dough.
In a large mixing bowl, combine 3 cups bread flour, ¼ cup sugar, and 2 teaspoons kosher salt. These dry ingredients create the foundation of your dough, and mixing them thoroughly ensures an even distribution of flavors.
Using a stand mixer fitted with a paddle attachment, beat ¼ cup softened butter at medium speed until it becomes creamy. This step is crucial for incorporating air into the butter, resulting in a light and fluffy texture.
Next, add the frothy yeast mixture and about a quarter of the flour mixture to the stand mixer. Beat until smooth. This step creates a wet batter that will help the rest of the flour to incorporate more easily.
Now, add another quarter of the flour mixture, 1 cup milk, and 1 large egg. Beat until smooth. You’ll notice the dough becoming thick and sticky at this point; don’t worry, that’s perfectly normal!
Gradually add the remaining flour mixture, beating until everything is combined and the dough pulls away from the sides of the bowl. This indicates that you’ve reached the right consistency.
On a lightly floured surface, turn out the dough and knead for about 10 to 12 times. Kneading develops the gluten in the dough, resulting in a nice structure for your bread.
Spray a large bowl with cooking spray and place the kneaded dough inside, turning it to grease the top. Cover the bowl with a clean kitchen towel and let it stand in a warm, draft-free place (about 75 degrees) until it doubles in size. This can take about 1½ to 2 hours, depending on your environment.
Meanwhile, prepare the filling. Preheat your oven to 400 degrees. Cut about a quarter-inch off the top of the head of garlic and wrap it in foil. Bake it until soft, which should take around 1 hour. Once it’s cool enough to handle, press the garlic head to extract the roasted garlic; set this aside.
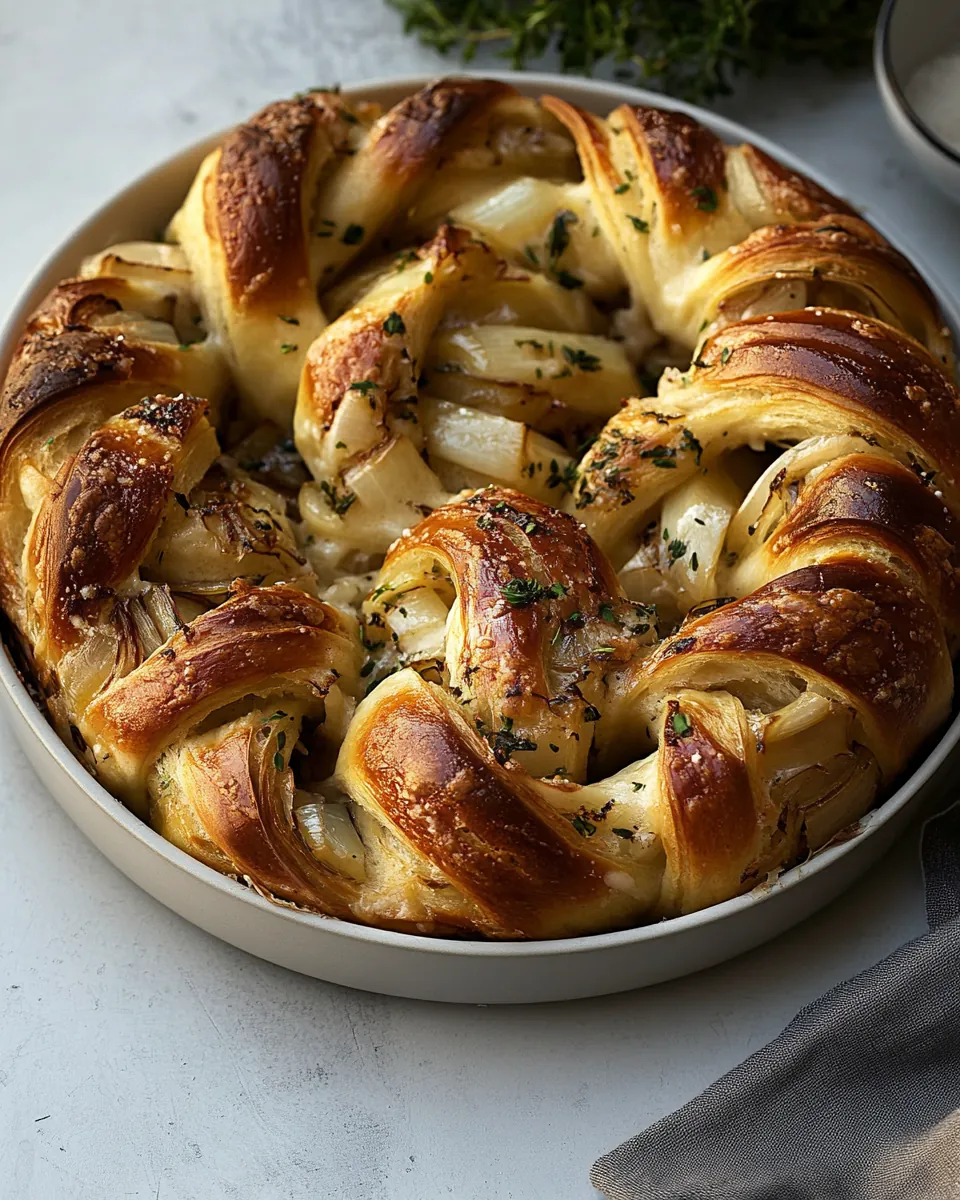
In a medium skillet, heat 2 tablespoons olive oil over medium heat. Add the 1 large chopped yellow onion and cook, stirring occasionally, until it turns a rich caramel color, about 20 to 25 minutes. Allow it to cool completely.
In the work bowl of a food processor, combine the caramelized onion, roasted garlic paste, ¼ cup softened butter, 2 tablespoons fresh thyme leaves, and ½ cup grated parmesan cheese. Process until the mixture forms a smooth, thick paste, which will be your delightful filling.
Once the dough has risen, turn it out on a heavily floured surface and roll it into a 14 by 10-inch rectangle. Spread the onion filling over the surface of the dough, leaving a one-inch border on the long sides. This filling is the heart of your bread, so spread it generously!
Starting at one long side, roll up the dough jelly-roll style, pressing the edge to seal. Using a sharp knife, cut the roll in half lengthwise. This step will reveal the beautiful layers of filling.
Carefully twist the two pieces of dough around each other to form a circle. Using a cake lifter, place the twisted dough into a greased 10-inch cast-iron skillet. Cover and let it stand in a warm place until it doubles in size again, about 1 hour. Patience is key here!
Preheat your oven to 350 degrees. Bake the loaf for 30 minutes. After that, cover it loosely with foil and continue baking until a wooden pick inserted in the center comes out clean, which should take about 40 more minutes. The aroma will be mouthwatering at this point!
Once done, take the bread out of the oven and let it cool slightly before serving warm. The first slice is always the best!
Things Worth Knowing
- Yeast Activation: Always ensure your yeast is fresh for the best results. If the mixture doesn’t foam, the yeast may be inactive.
- Kneading Technique: Kneading the dough helps develop gluten, which gives the bread its structure and chewiness. Don’t skip this step.
- Caramelizing Onions: Patience is key! Low and slow cooking releases the sugars, creating a rich flavor.
- Proofing: Ensure the dough is in a warm environment for proofing to help it rise effectively.
How to Switch It Up
While the classic Onion Twist Bread is absolutely delicious, there are several fun ways to switch things up. Here are some ideas to explore your creativity in the kitchen:
- Herb Variations: Experiment with different herbs such as rosemary or dill to alter the flavor profile.
- Cheese Options: Swap Parmesan for cheddar or feta for a different taste.
- Vegetable Filling: Add other roasted veggies, like peppers or zucchini, to the filling for a colorful twist.
- Spice it Up: Incorporate a bit of chili powder or crushed red pepper for some heat.
- Gluten-Free Option: Use a gluten-free flour blend to make this recipe suitable for gluten-sensitive friends.
- Sweet Twist: For a dessert version, try adding cinnamon and sugar along with raisins instead of the savory filling.
What Complements This Onion Twist Bread
When it comes to serving Onion Twist Bread, the options are indeed plentiful. Here are some ideas to inspire your next meal:
- Soups: Pair it with a creamy tomato or vegetable soup for a comforting meal.
- Salads: Serve alongside a fresh garden salad or a robust caesar salad for a delightful contrast.
- Picnics: This bread makes for a great addition to picnic baskets, perfect for pulling apart and enjoying with spreads.
- Appetizers: Slice it into small pieces for a shareable appetizer with dips like hummus or tzatziki.
- Brunch: Include it in your brunch spread, served warm with butter for a delectable treat.
- Storage: Keep any leftovers in an airtight container at room temperature for up to 3 days, or freeze for longer storage.
FAQ
Conclusion
In summary, Onion Twist Bread is a remarkable recipe that brings people together, filling the home with warmth and delightful aromas. It’s a fantastic way to make mealtime special with a unique twist on classic bread. I encourage you to try making it and share it with loved ones. You’ll be amazed at how a simple loaf can create such joy and connection around the table.
Onion Twist Bread
Ingredients
Equipment
Method
- For the dough, start by stirring together ¼ cup warm water and 2 teaspoons active dry yeast in a medium bowl. Let it stand for about 5 minutes until it becomes frothy.
- In a large mixing bowl, combine 3 cups bread flour, ¼ cup sugar, and 2 teaspoons kosher salt.
- Using a stand mixer fitted with a paddle attachment, beat ¼ cup softened butter at medium speed until it becomes creamy.
- Next, add the frothy yeast mixture and about a quarter of the flour mixture to the stand mixer. Beat until smooth.
- Now, add another quarter of the flour mixture, 1 cup milk, and 1 large egg. Beat until smooth.
- Gradually add the remaining flour mixture, beating until everything is combined and the dough pulls away from the sides of the bowl.
- On a lightly floured surface, turn out the dough and knead for about 10 to 12 times.
- Spray a large bowl with cooking spray and place the kneaded dough inside, covering it to rise until doubled in size.
- Meanwhile, prepare the filling. Preheat your oven to 400 degrees. Cut about a quarter inch off the top of the head of garlic and wrap it in foil. Bake it until soft, about 1 hour.
- In a medium skillet, heat 2 tablespoons olive oil over medium heat. Add the 1 large chopped yellow onion and cook, stirring occasionally, until it turns a rich caramel color.
- In the work bowl of a food processor, combine the caramelized onion, roasted garlic paste, ¼ cup softened butter, 2 tablespoons fresh thyme leaves, and ½ cup grated parmesan cheese. Process until the mixture forms a smooth, thick paste.
- Once the dough has risen, turn it out on a heavily floured surface and roll it into a 14 by 10 inch rectangle. Spread the onion filling over the dough.
- Starting at one long side, roll up the dough jelly-roll style, pressing the edge to seal. Using a sharp knife, cut the roll in half lengthwise.
- Carefully twist the two pieces of dough around each other to form a circle. Place the twisted dough into a greased 10 inch cast-iron skillet.
- Preheat your oven to 350 degrees. Bake the loaf for 30 minutes. After that, cover it loosely with foil and continue baking until a wooden pick inserted in the center comes out clean.
- Once done, take the bread out of the oven and let it cool slightly before serving warm.
Notes
- Storage: Keep any leftovers in an airtight container at room temperature for up to 3 days.
- Freezing: You can freeze the bread for longer storage; wrap it tightly to prevent freezer burn.
- Pairing: This bread pairs wonderfully with soups and salads.
- Variations: Feel free to experiment with different herbs and cheeses in the filling.
- Serving: Serve warm with a spread of butter or olive oil for added flavor.